background image

18

USING YOUR AIR COMPRESSOR

With your Briggs and Stratton engine running, you can now 

start using your air compressor.
To use you air compressor;

1.  Close the unloading valve, Pic. 14, rotate the silver 

aluminium lever so that it is hanging down “loose”.  This 

will allow the pump to start filling your tank.

2.  Allow the tank to fill completely.
3.  Once the tank is full (115PSI/8Bar) the Briggs and 

Stratton engine will slow to an idle.

4.  You can now start using your air tools.  See the 

“Connecting Air Tools” section, for information on how to 

attach your air hose and tool.

NOTE:  Your Briggs and Stratton engine will automatically 

go to full speed once the tank pressure drops to about 

85PSI/6Bar.
Once the tank is full (115PSI/8Bar) the Briggs and Stratton 

engine will slow to an idle.
This will continue automatically until you turn the engine 

OFF.

Stopping Your Air Compressor

To stop your Briggs and Stratton powered air compressor;

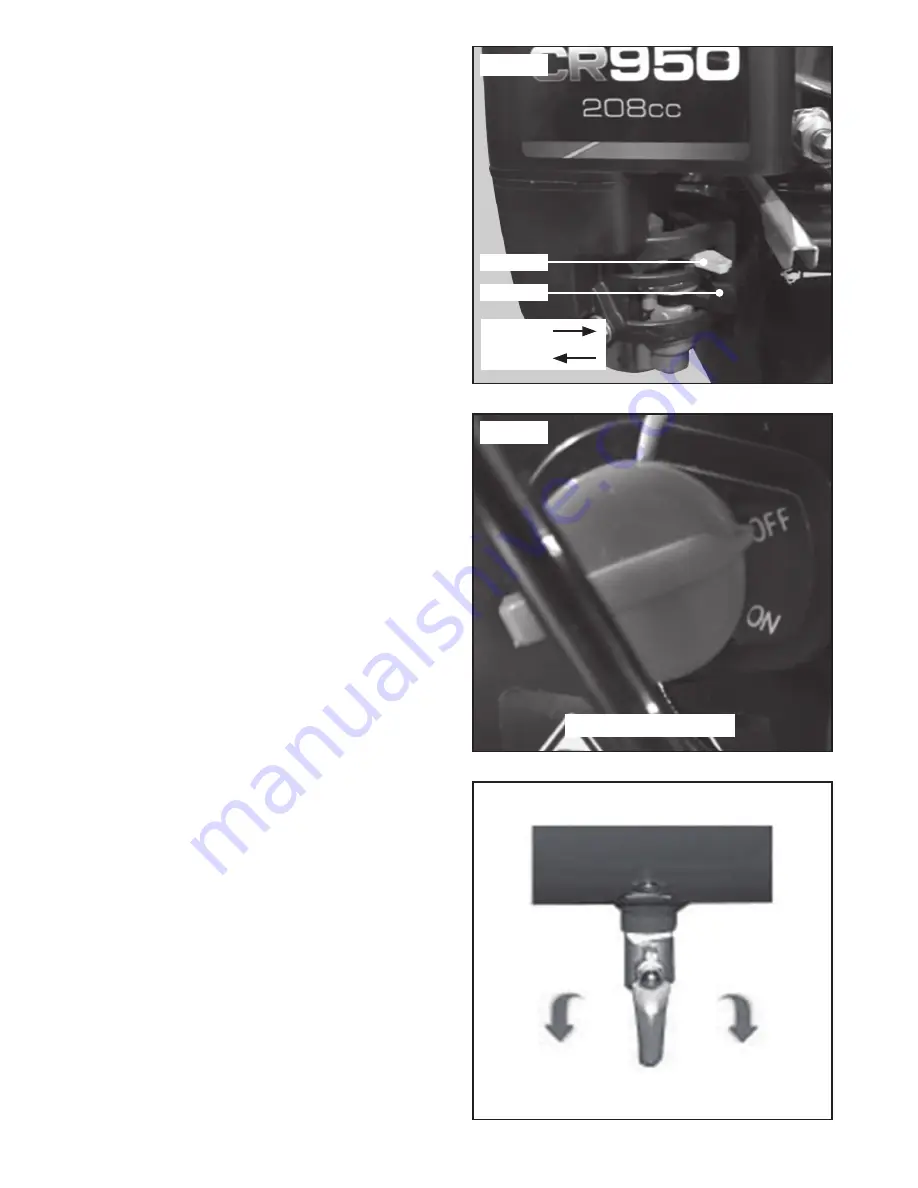
1.  Turn the fuel tap lever OFF, Pic. 15, this moves to the left.
2.  Turn the engine switch to OFF, Pic, 16, this rotates up.
3.  Open the drain valve, Pic. 17.

Connecting Air Tools

This Briggs and Stratton powered air compressor has a 

maximum pressure of 8 bar. Always regulate the outlet air 

pressure to match your air tool. Different air tools require 

different operating pressures. Always check with the tool 

manufacturer if unsure.
The configuration of tools and accessories can be varied to 

suit your particular requirements. A basic recommended set 

up is shown in Pic.18.
When connecting your air hose and or air tool:

1.  Lift up the regulator cap and turn anti-clockwise.
2.  This will reduce the, outlet pressure, continue winding 

anti-clockwise till the outlet pressure gauge is showing 

0PSI/0Bar.  This will allow easy connection.

3.  Connect your air hose the longer the air hose the better.
4.  Connect your air tool.
a.  Always check your air tool manual to find out the tools 

recommended operating pressure.

5.  To adjust the pressure turn regulator cap clockwise.
6.  This will increase the, outlet pressure, continue winding 

clockwise till the outlet pressure gauge is showing the 

correct pressure for the selected tool.

7.  Push regulator cap down to ensure it does not change 

position with vibration.

PIC. 15

 Choke lever

 Fuel lever

Choke OFF

Fuel OFF

PIC. 16

Turn engine switch to OFF

PIC. 17

Open drain valve, lever pointing to the ground

Summary of Contents for BRC270

Page 1: ...ct information please contact Smart Marketing Group Pty Ltd AUST 1300 660 457 N Z 0800 474 876 Trade petrol compressor for heavy duty DIY tasks around the home and workshop MODEL NO BRC270 BELT DRIVE AIR COMPRESSOR with Briggs Stratton Engine Recyclable Paper ...

Page 2: ...formation 28 CONTENTS You may use most air tools with this compressor Some examples of tools are INFLATION Car and bike tires Sports toys Pool toys Air mattress CLEANING Engine cleaning gun Sandblaster kit Air blow gun Abrasion kit Touch up spray gun High pressure spray gun FASTENING Framing gun C bradder T nailer PAINTING Gravity feed spray gun Low pressure spray gun Touch up spray gun High press...

Page 3: ...e and composition where an identical part or component is not available Products presented for repair may be replaced by refurbished products of the same type rather than being repaired Refurbished parts may be used to repair products under warranty What is covered Manufacturing fault or defect How to claim under this warranty Call customer service Ensure you have the following Original purchase r...

Page 4: ...ctive parts of the product with parts and components of similar quality grade and composition where an identical part or component is not available Products presented for repair may be replaced by refurbished products of the same type rather than being repaired Refurbished parts may be used to repair product under warranty Damage caused by third party accessories is not covered under this warranty...

Page 5: ...ur eyes wash immediately with clean water and seek medical attention If any fuel is swallowed DO NOT induce vomiting seek immediate medical attention WORK AREA Work areas and benches should be kept tidy Cluttered benches and work areas can cause accidents Floors should be kept clean and free from rubbish Special care should be taken when the floor is slippery due to sawdust or wax Always leave suf...

Page 6: ... not recommended to use your air compressor when a total fire ban is in force Never refuel your air compressor while it is running As a precaution it is recommended that an expert is consulted on obtaining and using a suitable fire extinguisher CLEANING YOUR AIR COMPRESSOR Always ensure your air compressor has stopped and is turned off before cleaning Always ensure that your air compressor has coo...

Page 7: ...ates dust or when spray painting an approved dust filter mask must be worn When machining concrete man made fibres especially MDF Medium Density Fibre board the resin used in these materials can be hazardous to your health Use an approved face mask with replaceable filter WARNING Only use compressor with oil breather fitted Only use compressor when fully assembled Do not attempt to modify the air ...

Page 8: ...g changes and when changing attachments such as air hoses tools Always use the correct type of tool for the operation to be carried out Never use the air compressor if any part of the unit is damaged Always have the air compressor serviced by an authorised service agent Always wear safety eye ear and respiratory protection when operating the air compressor Allow the tank to completely fill before ...

Page 9: ... decanting into the fuel tank OIL To operate this air compressor requires oil in the sump not supplied If the air compressor does not have the correct level of oil in the sump it will not run see below Oil capacity approximately five hundred and fifty millilitres 0 55L or 550ml to six hundred millilitres 0 6L or 600ml Oil type SAE30W Always check oil level before using Always use fresh clean oil C...

Page 10: ...4 15 ASSEMBLY INSTRUCTIONS Unpacking Carefully unpack your air compressor This air compressor is bulky and heavy two 2 person lift required Dispose of all packing material in an environmentally responsible manner Assembly Your air compressor requires minor assembly before initial operation Check that you have all required components required for assembly and initial use Your compressor is filled w...

Page 11: ...ouching the ground 9 Remove this caster wheel 10 Place 1 washer on the caster wheel bolt and insert back into the tank bracket 11 Fit split washer and nut 12 Hand tighten the nut 13 Check the caster wheel end of the compressor is level by gently rocking the pump from side to side 14 If level and both caster wheels are fully against the floor move to step 16 15 If one caster wheel is not touching t...

Page 12: ...ather area of any dirt and debris 3 Remove oil breather see Pic 5B 4 Add oil SAE30 to at least the top of the red dot see Pic 5A and 5B 5 Oil level will take about 1 minute to drain down and settle 6 Check oil level in sight glass see Pic 5A and 5B Re check and top up if required until level is correct 7 Replace oil breather and wipe area clean of any excess oil To remove pump oil if required 1 Ma...

Page 13: ...an cloth 4 Replace the oil dipstick DO NOT TURN OR TIGHTEN 5 Remove the dipstick and check the oil level Correct oil level is at the top of the full indicator on the dipstick Pic 6B 6 Add oil SAE30 via the oil fill Pic 6B Add about 100ml at a time and check before adding more oil 7 Oil level will take about 1 minute to drain down and settle 8 Check oil level using the oil dipstick see Pic 6A and 6...

Page 14: ...op of the fuel filter Pic 7 6 Ensure that the fuel tank cap is screwed on tightly PIC 7 WARNING Fuel and its vapours are extremely flammable and explosive Fire or explosion can cause severe burns or death Always fill fuel tank outdoors or in well ventilated area Keep fuel away from sparks open flames pilot lights heat and other ignition sources Check fuel lines tank cap and fittings frequently for...

Page 15: ... oil level is correct see page 13 4 Fuel tank has been filled with the correct unleaded petrol ULP see page 9 To run your Briggs Stratton powered air compressor Note For full details on starting and stopping your Briggs and Stratton powered air compressor see below and pages 16 18 1 Open the drain tap 2 Open the unloading valve 3 Turn the fuel tap on 4 Turn the choke on 5 Turn the engine switch on...

Page 16: ...e the air tank is empty if not open the drain valve and drain the air tank Your Briggs and Stratton engine will NOT start with a load on it 2 Open the unloading valve Pic 8 rotate the silver aluminium lever so that it is sticking straight out 3 Close the drain valve Pic 9 4 Turn the fuel tap lever on Pic 10 this moves to the right 5 Turn the choke lever on Pic 10 this moves to the left 6 Turn the ...

Page 17: ...17 PIC 12 Pull recoil starter PIC 13 PIC 11 Choke lever Fuel lever Choke OFF Fuel ON Turn engine switch to ON PIC 14 Unloading valve closed ...

Page 18: ... Connecting Air Tools This Briggs and Stratton powered air compressor has a maximum pressure of 8 bar Always regulate the outlet air pressure to match your air tool Different air tools require different operating pressures Always check with the tool manufacturer if unsure The configuration of tools and accessories can be varied to suit your particular requirements A basic recommended set up is sho...

Page 19: ...easy disconnection 3 Disconnect your air hose and or air tool Nitto Style Fitting The Nitto style fittings are operated by 1 Pulling the outer collar back on the female Nitto style fitting on the regulator 2 Push the male Nitto style fitting in until it clicks and the collar slides back into place 3 To remove pull the outer collar back on the female Nitto style fitting on the regulator 4 Gently pu...

Page 20: ...ll the outlet pressure gauge is showing your required pressure 3 Once required pressure is set push the regulator cap down to ensure it does not change with vibration To increase the outlet pressure 1 Lift up the regulator cap 2 To increase the outlet pressure wind the regulator cap clockwise till the outlet pressure gauge is showing your required pressure 3 Once required pressure is set push the ...

Page 21: ...ean around the engine muffler 8 Clean around engine air filter 9 Clean around pump air filter 10 Drain air tank MAINTENANCE SCHEDULE NOTE If unsure how to do any of these checks please contact our service centre or an authorised service agent NOTE When performing any maintenance or servicing always ensure the air compressor is stopped and turned off First 5 Hours Change engine oil Change pump oil ...

Page 22: ...3 Remove oil dipstick see Pic 22A and wipe with a clean cloth 4 Replace the oil dipstick DO NOT TURN OR TIGHTEN 5 Remove the dipstick and check the oil level Correct oil level is at the top of the full indicator on the dipstick Pic 22B 6 Add oil SAE30 via the oil fill Pic 22B Add about 100ml at a time and check before adding more oil 7 Oil level will take about 1 minute to drain down and settle 8 ...

Page 23: ... new air filter element onto the air filter box 5 Replace air filter element washer and wing nut 6 Replace the air filter cover and thumb nut To check or replace the pump air filter Pic 23B 1 Wipe around the air filter to remove any dirt or debris 2 Unscrew the screws inside the air filter 3 Remove air filter 4 If dirty replace air filter 5 Replace air filter 6 Replace the air filter screws and ti...

Page 24: ...d wear on components This will not be covered by warranty The belt should run parallel to the two pulleys If not adjust To adjust the belt straightness follow these simple steps 1 Loosen the pump bolts Pic 25 2 Slide the pump to the appropriate position 3 Tighten the pump bolts 4 Check belt straightness and repeat if needed 5 Check belt tension and correct if necessary Belt Replacement Pic 26 The ...

Page 25: ...alve see page 17 If your compressor does not built up pressure Check that the tank drain tap is closed Check that the unloading valve is closed if not close unloading valve see page 17 Check that the pump air filter is clean if not replace see page 23 If your compressor smells like burnt oil Check the pump oil level as it may be low If these tips do not work please have your unit checked by an aut...

Page 26: ...p Spark plug Oil pump Air filter Oil Authorised Service Agent Name or Company Stamp Technician Date 9 MONTHS This Service is to be complete within 150 hours or 9 months of purchase which ever comes first Replace Check Adjust Air filter pump Spark plug Oil pump Air filter Oil Authorised Service Agent Name or Company Stamp Technician Date 12 MONTHS This Service is to be complete within 200 hours or ...

Page 27: ... BRC270CV 9 Wheel 2 95 BRC270WH 10 Drain Tap 1 95 BRC95DT Image may not match exactly For reference only 7 8 3 2 20 19 17 16 15 14 13 9 10 11 Part Description Qty SMG Part No 11 Castor Wheel 2 95 BRC270CW 13 Tank Handle 1 95 BRC180TH 14 Filter Regulator 1 95 BRC270FR 15 Gauge 2 95 BRC270G 16 Nitto Fitting 2 95 BRC270NF 17 Safety Valve 1 95 BRC95SPV ...

Page 28: ...r the 12 month warranty Specifications Air Compressor BRC270 Engine Briggs and Stratton petrol No Load Speed 1280 RPM Free Air Delivery FAD 270L per minute Tank Size 50L Duty Cycle 100 Max Tank Pressure 115PSI 8BAR Outlet Pressure Fully Adjustable 0 115PSI 0 8BAR regulator with oil trap Pump Lubrication Oil Splash Pump Oil SAE30 factory filled Engine Lubrication Oil splash Engine Oil SAE30 not inc...

Reviews: