24
BELT TENSION
Correct belt tension is paramount to a safe and reliable air
compressor. Too tight a belt can cause damage to bearings
and premature motor failure. These failures will not be
covered by warranty. Too loose a belt can cause poor
performance and excess heat due to slippage which can
also lead to premature component failure. This will not be
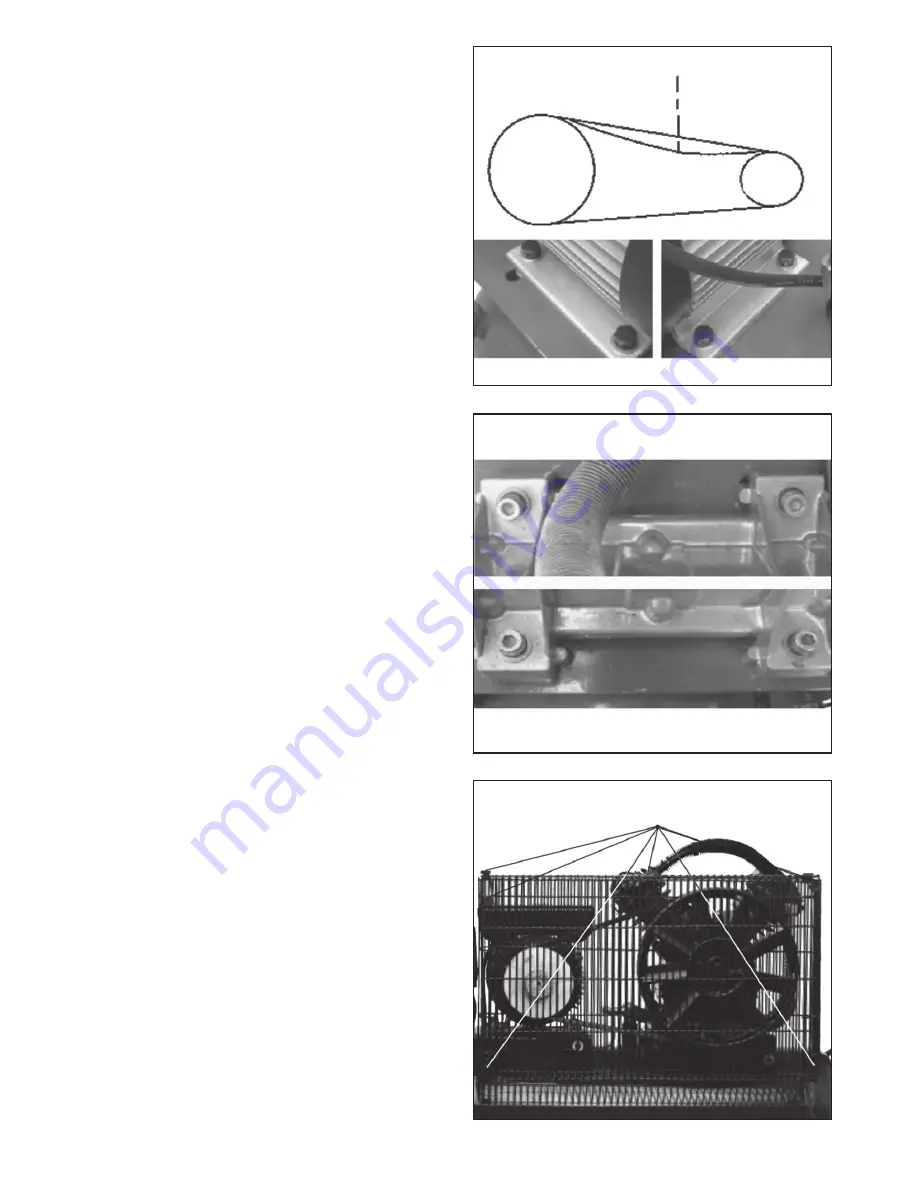
covered by warranty. To check the belt tension, gently push
down midway between the two pulleys the belt should only
move between 10mm – 15mm, Pic. 15. If the belt moves
more that this amount then you will need to tighten the belt.
To adjust the belt tension, follow these simple steps;
1. Loosen the motor bolts, Pic. 24.
2. Slide the motor forward or backward to correct position.
3. Tighten the motor bolts.
4. Check belt tension and repeat if needed.
5. If uncertain about attempting the above steps please
consult an authorised service agent.
Belt Straightness, Pic. 25
Belt straightness is paramount to a safe and reliable air
compressor. The belt should always run in a straight line
between the two (2) pulleys. If the belt is on an angle this
could cause excessive strain and wear on components.
This will not be covered by warranty. The belt should run
parallel to the two pulleys. If not, adjust. To adjust the belt
straightness, follow these simple steps;
1. Loosen the pump bolts, Pic. 25.
2. Slide the pump to the appropriate position.
3. Tighten the pump bolts.
4. Check belt straightness and repeat if needed.
5. Check belt tension and correct if necessary.
Belt Replacement, Pic. 26
The belt will need replacing if it has been damaged, worn, or
it has reached 200 hours of use. To replace the belt follow
these steps;
1. Undo and remove the belt guard twist locks, see Pic. 26.
To remove twist locks use pliers to rotate the twist locks
by 90° then remove.
2. Remove the front of the belt guard.
3. Loosen the motor bolts Pic. 15.
4. Remove the belt.
5. Clean both pulleys with a dry soft cloth. DO NOT USE any
lubricants or solvents as this can damage the new belt
by causing slippage.
6. Fit new belt.
7. Set correct belt tension
8. Check the belt straightness and tension, adjust if
required.
9. Replace the front of the belt guard.
10. Replace then tighten the belt guard twist locks.
To replace twist locks use pliers to rotate the twist
locks by 90°. The replacement belt is similar to (Bosch
Style) 13A1230.
PIC. 24
PIC. 25
Motor bolts
10 - 15mm
Pump bolts
PIC. 26
2 Twist locks on each side of the
guard and 3 twist locks on top


