background image

ENG

LIS

H

ENG

LIS

H

 | 

Owner’s Manual

blackstoneproducts/support.com

ENG

LIS

H

Section 04

CLEANING YOUR GRIDDLE TOP

Follow these simple cleaning steps to ensure optimal performance and 

longevity of your Blackstone Griddle.

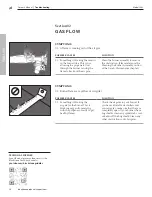
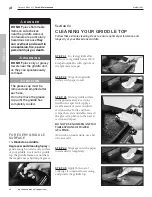
STEP 01 

To clean griddle after 

each use, cool griddle below 300° F. 

Scrape food debris with spatula or 

straight metal scraper.

STEP 02 

Wipe down griddle 

surface with paper towel.

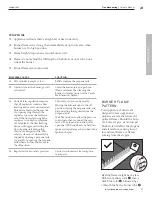
STEP 03 

Divide griddle surface 

into approximately 6" sections 

(width of scraper tool). Apply a 

small amount of water onto first 

section with a bottle and then 

scrape the water and debris toward 

the grease trap. Move to the next 6" 

section and repeat. 

DO NOT USE MORE THAN TWO 

TABLESPOONS OF WATER 

AT A TIME.


(For stuck-on food residue, use a bit 

of coarse salt.)

STEP 04 

Wipe again with a paper 

towel and dry completely.

STEP 05 

Apply thin coat of 

cooking oil to maintain seasoning 

and protect the griddle top.

!

D A N G E R

DO NOT

 place flammable 

items on side shelves 

near the griddle. Aerosol 

containers are particularly 

hazardous because 

they 

can overheat and result in 

an explosion, fire, severe 

personal injury, or death. 

!

WA R N I N G

DO NOT

 place oily or greasy 

towels near the griddle unit 

as they can spontaneously 

combust. 

!

C AU T I O N

The grease cup must be 

removed and emptied after 

each use.
Do not remove the grease 

cup until the griddle has 

completely cooled.

FOR EVERY GRIDDLE 

SURFACE

The 

Blackstone Griddle 

Degreaser and Cleaning Spray

 is 

gentle enough to clean every surface 

of your griddle. Use it on the griddle 

top, the griddle frame, or anywhere 

that experiences a build up of grease.

Care & Maintenance

ENG

LIS

H

FIRST TIME CLEANING

Blackstone Griddles are pre-treated 

with cooking oil to prevent rust and 

damage during shipping. For first 

time use, wash griddle with hot, 

soapy water. 

THIS IS THE ONLY TIME YOU 

SHOULD USE SOAP ON THE 

GRIDDLE COOKING SURFACE. 

Rinse and dry completely. Proceed 

with seasoning instructions. (Please 

reference the Griddle Seasoning 

Instructions section.) 

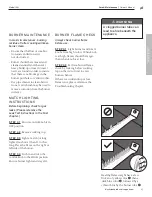
PROTECTING YOUR 

GRIDDLE TOP

Store griddle in a cool, dry loca-

tion. Always cover griddle if stored 

outdoors. Choose from a variety of 

griddle covers offered by Blackstone.

When protecting griddle with soft 

cover, use the “tenting” method to 

prevent water from accumulating 

on griddle top. “Tenting” involves 

placing an object (a bowl, tennis 

ball or PVC pipe) beneath soft cover 

in the center of griddle in order to 

allow water to slide off. “Tenting” 

helps prevent rust.

CUTTING ON THE 

GRIDDLE TOP

Using a knife directly on the surface 

of the griddle will not harm the 

griddle top.

REMOVING RUST

If rust appears on the griddle surface, 

rub it off with steel wool, low grit 

sandpaper or the 

Blackstone 

Pumice Stone

 and re-season 

the surface. 

!

WA R N I N G

NEVER APPLY COLD 

WATER ACROSS THE 

WHOLE SURFACE OF A 

HOT GRIDDLE AT ONCE

This may cause warping. 
Adding a large amount 

of cold or frozen food (or 

food with significant water 

content) to a hot griddle may 

cause griddle to warp. 

!

C AU T I O N

DO NOT USE SOAP ON 

THE GRIDDLE COOKING 

SURFACE.

 This will destroy 

the griddle’s seasoning.

ASSEMBLY VIDEOS 

View Product Assembly and 

Technical Support videos online at

blackstoneproducts.com/support 

and on YouTube 

@BlackstoneGriddles

Recovering your Blackstone 

Griddle Top 


youtube.com/

watch?v=thPE2IgnSiI 

Care & Maintenance

Model 1902

35

Summary of Contents for Culinary Pro 1902

Page 1: ... North Logan UT 84321 Blackstoneproducts com Please reference blackstoneproducts com support for the latest version of this manual and to follow along with assembly videos OWNER S MANUAL ENGLISH 5015923 36 GRIDDLE WITH HOOD CABINET WIND GUARDS Model 1902 v14 ...

Page 2: ... all warnings and instructions while using the appliance WAR NING Accessible parts may be very hot Keep children and pets away from appliance at all times This appliance is not intended for use by children Close supervision is neces sary when any appliance is used by or near children WAR NING This appliance is not intended for and should never be used as a heater Do not use for purposes other than...

Page 3: ...l Gas Code ANSI Z223 1 NFPA 54 Natural Gas and Propane Installation Code CSA B149 1 or Propane Storage and Handling Code B149 2 or the Standard for Recreational Vehicles NFPA 1192 and CSA Z240 RV Series Recreational Vehicle Code as applicable LOW HEAT Cooks slowly and requires more time Breaks down connective tissue and fat for a tender moist meal Fatty thick cuts of meat eg chuck steak brisket ch...

Page 4: ...on which if not avoided may result in minor or moderate injury SAFETY ALERT KEY Read and follow all the notices throughout the manual CONTENTS 01 REGISTER YOUR PRODUCT 01 02 FOR YOUR SAFETY 02 Section 01 Food Safety 02 Section 02 Gas Appliance Safety 03 03 ASSEMBLY GUIDE 04 04 FUEL 20 LB 9 KG PROPANE TANK 20 Section 01 LPG Cylinder Requirements 20 Section 02 Connection Removal 21 Section 03 Leak T...

Page 5: ...com support We are pleased to help you with any questions concerning appliance use replacement parts or your warranty Customer Service Hours The North Atlantic Imports LLC 1 Year Warranty covers replacement parts up to one year after the date of purchase Please reference the Warranty chapter for more information To enable this warranty you will need to provide Proof of Purchase Receipt Order Detai...

Page 6: ...completely to destroy harmful bacteria WAR NING The use of alcohol prescrip tion or non prescription drugs may impair the consumer s ability to prop erly assemble or safely operate the appliance CAU TION For residential and house hold use only DO NOT use for commercial cooking CAU TION Use long handled cooking utensils and oven mitts to protect against burns and splatters CAU TION Do not place any...

Page 7: ...TEP 03 Clean and inspect valve hose and regulator before continuing STEP 04 Perform a leak test Please reference the Leak Test Instructions in the Fuel chapter For problems with this appli ance please reference the Troubleshooting chapter GAS INSTALLATION CODES Appliances must be used in accordance with the installation requirements of your gas supply authority and constructed and marked in accord...

Page 8: ...r hose 1 1 7 Left baffle panel 1 1 8 Right baffle panel 1 1 9 Gas tank heat shield 1 3 1 Hood hinge lever 1 2 3 2 Hood hinge lever 2 2 Parts Qty 6 1 Gas tank slides 2 6 2 Sliding tray assembly 1 26 1 Left drawer slides 2 26 2 Right drawer slides 2 30 1 Door drawer handle inserts 6 35 1 Grease cup liner 1 7 29 3 4 3 1 3 2 1 8 5 21 20 1 3 10 34 32 33 9 12 17 1 2 26 13 27 28 30 1 30 2 35 1 35 1 5 22 ...

Page 9: ...eft door 1 piece 15 Door handle 1 piece 16 Door handle standoffs 2 pieces 17 Side panels 2 pieces 18 Back panel 1 piece 19 Left side shelf 1 piece 20 Right side shelf 1 piece 21 Cutting board 1 piece 22 Left side shelf brackets A 2 pieces 23 Right side shelf brackets B 2 pieces 24 Lockable caster wheels 4 pieces 25 Top bracket 1 piece 26 Drawer assemblies 2 pieces 27 Upper drawer front panel 1 pie...

Page 10: ...ver Adjustable wrench ENGLISH NOT INCLUDED 20 lb 9 kg LPG tank AA Battery NOT INCLUDED 20 lb 9 kg LPG tank NOT INCLUDED 20 lb 9 kg LPG tank AA Battery NOT INCLUDED 20 lb 9 kg LPG tank NOT INCLUDED AA Battery 37 Hardware pack 1 piece a M6x15 screws 49 pieces b M5x10 screws 38 pieces c Spares d M5 step bolts 4 pieces e Small M6 step bolts 8 pieces f Large M6 Step bolts 6 pieces 37a 37b 37e 37d 37f 3...

Page 11: ...may contain sharp edges especially as noted in these instructions Wear protective gloves if necessary Th ev sh sh ne ac So sh no W ne Th du co he sis da Th du co he sis da WAR NIN G The manufacturer has made every effort to eliminate any sharp edges However you should handle all compo nents with care to avoid accidental injury Some parts may contain sharp edges especially as noted in these instruct...

Page 12: ...three 3 M6x15 screws a to attach the rear right leg to the cart base STEP 05 Use two 2 M6x15 screws a to attach the front right leg to the cart base STEP 06 Use six 6 M5x10 screws b to attach the back panel to the rear left leg and rear right leg Model 1902 08 Assembly Guide ...

Page 13: ...eproducts support com STEP 07 Use four 4 M5x10 screws b to attach the left drawer panel and right drawer panel to the back panel STEP 08 Use three 3 M6x15 screws a to attach the left drawer panel to the cart base Model 1902 09 Assembly Guide ...

Page 14: ...om STEP 09 Use three 3 M6x15 screws a to attach the right drawer panel to the cart base STEP 10 Use four 4 M5x10 screws b to attach the top cart bracket to the front left leg left drawer panel right drawer panel and front right leg Model 1902 10 Assembly Guide ...

Page 15: ... the griddle body on its back and use fourteen 14 M6x15 screws a to attach the griddle cart to the griddle body STEP 12 With the help of another person set the griddle on its feet Use four 4 M5x10 screws b to attach the one 1 side panel to the rear right leg and front right leg Model 1902 11 Assembly Guide ...

Page 16: ...ndle to the left cart door STEP 15 Attach the left cart door to the cart by first inserting the door into the upper door hinge pin then inserting the lower door hinge pin into the cart base STEP 13 Use four 4 M5x10 screws b to attach one 1 side panel to the rear left leg and the front left leg Model 1902 12 Assembly Guide ...

Page 17: ... door hinge pin then inserting the lower door hinge pin into the cart base STEP 17 Use seven 7 M5x10 screws b to attach the lower drawer front panel to the one 1 drawer body STEP 18 Insert one 1 drawer handle into two 2 handle stand offs Use two 2 M6x15 screws a to attach one 1 drawer handle to the lower drawer front panel Model 1902 13 Assembly Guide ...

Page 18: ...els Insert the upper and lower drawer sliding tracks into the cart tracks NOTE the upper drawer front panel is shorter and the lower drawer front panel is taller STEP 20 Insert one 1 drawer handle into two 2 handle stand offs Use two 2 M6x15 a screws to attach one 1 drawer handle to the upper drawer front panel STEP 19 Use seven 7 M5x10 b screws to attach one 1 drawer body to the upper drawer fron...

Page 19: ...ne left shelf bracket A and one right shelf bracket B per side STEP 23 Use four 4 M6x15 screws a to attach one 1 left and one 1 right garbage bag holder bracket to the front right leg and back right leg STEP 24 Use four 4 M5 step bolts d to attach the garbage bag holder to the garbage bag holder brackets A B A B Model 1902 15 Assembly Guide ...

Page 20: ...t while griddle is in use STEP 26 Screw two 2 small M6 step bolts e into the top holes of the left side shelf Repeat with the right side shelf STEP 27 Hook the left side shelf s M6 step bolts onto the shelf brackets on the left side of the griddle Secure the shelf with two 2 small M6 step bolts e in the bottom holes of the shelf brackets Repeat with the right side shelf STEP 28 Place the cutting b...

Page 21: ...on does not result in a clicking sound If ignition does not occur in 5 seconds turn the burner controls off wait 5 minutes and repeat the lighting procedure If this does not work to determine the cause please try to ignite your griddle with a match Please reference the Match Lighting Instructions in the Cleaning the Burner Assembly section of the Care Maintenance chapter Insert one 1 AA battery no...

Page 22: ... push the griddle top back to lock the griddle in place Ensure that all four pins are seated in the holes then push the griddle top back to lock the griddle in place Place the two front pins into the front locking holes and push the griddle top and hood back Then set the two rear pins into the rear holes Place the two front pins into the front locking holes and push the griddle top and hood back T...

Page 23: ...VING RUST If rust appears on the griddle surface rub it off with steel wool low grit sandpaper or the Blackstone Pumice Stone and re season the surface WAR NIN G NEVER APPLY COLD WATER ACROSS THE WHOLE SURFACE OF A HOT GRIDDLE AT ONCE This may cause warping Adding a large amount of cold or frozen food or food with significant water content to a hot griddle may cause griddle to warp CAU TIO N DO NO...

Page 24: ...yond 80 full An overfilled or improperly stored cylinder is a hazard due to possible gas release from the safety relief valve This could cause intense fire with risk of property damage serious injury or death If you see smell or hear gas escaping immediately get away from the LPG cylinder and appliance and call fire department LPG TANK VALVE REQUIREMENTS LPG Tank valve must have Type 1 valve outle...

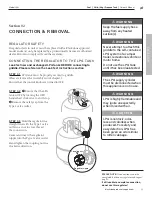
Page 25: ...m the Type 1 valve outlet PLEASE NOTE If connection cannot be completed disconnect regulator and repeat step 03 If still unable to complete connection do not use this regulator WAR NIN G The LPG supply cylinder must be disconnected when this appliance is not in use WAR NIN G LPG is highly flammable and may ignite unexpectedly when mixed with air CAU TIO N LPG is nontoxic odor less and colorless wh...

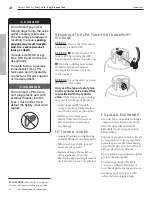
Page 26: ...linder valve Other types of caps or plugs may result in leakage of propane A disconnected LPG tank in storage or during transportation must have a safety cap installed Failure to use safety cap as directed may result in serious personal injury and or prop erty damage FITTINGS HOSES Annual checking and tightening of metal fittings is recommended Before each use check to see if hoses are cut or worn...

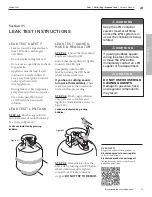
Page 27: ...IN G Keep the LPG container valves closed at all times unless the LPG system is in use or the container is being refilled WAR NIN G If growing bubbles appear during leak test do not use or move the LPG bottle Immediately contact an LPG supplier or fire department CAU TIO N DO NOT USE HOUSEHOLD CLEANING AGENTS Damage to gas valve hose and regulator components may result LEAK TEST VALVES HOSE REGULA...

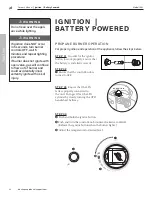
Page 28: ...oes not ignite with open valve gas will continue to flow out of burner and could accidentally inad vertently ignite with risk of injury IGNITION BATTERY POWERED PROPANE BURNER OPERATION For proper ignition and operation of the appliance follow the steps below STEP 03 Ensure that the LPG tank is properly connected to the unit Turn gas ON at the LPG cylinder by slowly turning the OPD handwheel halfw...

Page 29: ...ot receiving fuel Please reference the Gas Flow section of the Troubleshooting Chapter SYMPTOMS 01 Burner will not Light with ignition system 02 Pressing the ignitor button does not result in a clicking sound If ignition does not occur in 5 seconds turn the burner controls off wait 5 minutes and repeat the lighting procedure If this does not work to determine the cause please try to ignite your gr...

Page 30: ...Cleaning the Burner Assembly section of the Care Maintenance chapter POSSIBLE CAUSES SOLUTION 01 Something is blocking the air gate for the burner This is blocking oxygen from mixing with the propane correctly to get healthy flames Check the air gates in your burner If you have adjustable air shutters over your air gates make sure that they are completely open If your burners have bug shields clea...

Page 31: ... closing the propane tank and disconnecting the regulator from the propane tank Wait five minutes to allow the pressure to dissipate then reconnect the regu lator to the propane tank and slowly open the OPD handwheel one half turn Ignite your appliance as described in the Ignition chapter 04 Regulator stuck in safety position Contact customer service for replace ment parts SYMPTOMS 01 Appliance wi...

Page 32: ...ult GENERAL CLEANING Ensure that the appliance and its components are sufficiently cool before cleaning Clean your appliance often pref erably after each use Be sure to keep the ventilation opening s of the cylinder enclo sure free and clear from debris Baked on grease deposits may require the use of an abrasive plastic cleaning pad Use only in direction of brushed finish to avoid damage DO NOT us...

Page 33: ...ut of reach of children Store appliance indoors ONLY if gas supply is turned off discon nected removed from appliance and stored outdoors When removing appliance from storage clean burner assembly before starting appliance Please reference the Cleaning the Burner Assembly section VALVE CHECK Ensure gas is off at the supply shut off valve before checking appli ance valves Knobs must be turned to OF...

Page 34: ... use wire brushes Additional Methods Include a Run a stiff wire bent into a small hook through each burner tube several times b Use an air hose to force air into burner tube and out burner ports Check that air blows through each hole Wear eye protection STEP 05 Clean any blocked ports with stiff wire such as an open paper clip Then carefully replace burners and reattach VERY IMPORTANT Burner tubes...

Page 35: ...d up or insects insect nests are found in order to ensure that there is no blockage in the burner portholes or venturi tubes Use pipe cleaner to clear obstruc tions A wire brush may be used to remove corrosion from the burner surfaces MATCH LIGHTING INSTRUCTIONS Before beginning check for gas leaks Please reference the Leak Test Instructions in the Fuel chapter STEP 01 Ensure control knob is in OF...

Page 36: ...ns of your seasoning oil across the griddle surface When seasoning your griddle top remember to use a thin and even layer of oil the thinner the layer of oil the easier it will be to burn it off STEP 03 You will know it is done when it stops smoking You will want to repeat this 3 4 times for your initial seasoning The heat of the griddle will break down the oil and bond it to the metal creating a ...

Page 37: ...er seasoning the griddle surface is not black 02 Food is sticking to the griddle surface POSSIBLE CAUSES SOLUTION 01 Too much oil was used 02 You turned off the heat too soon First turn your griddle on high and let it heat for 10 15 minutes Next scrape off as much of the thick ened and partially cooked oil as you can Then re season with a very thin layer of oil POSSIBLE CAUSES SOLUTION 01 The corn...

Page 38: ...stuck on food residue use a bit of coarse salt STEP 04 Wipe again with a paper towel and dry completely STEP 05 Apply thin coat of cooking oil to maintain seasoning and protect the griddle top DANGER DO NOT place flammable items on side shelves near the griddle Aerosol containers are particularly hazardous because they can overheat and result in an explosion fire severe personal injury or death WA...

Page 39: ...all or PVC pipe beneath soft cover in the center of griddle in order to allow water to slide off Tenting helps prevent rust CUTTING ON THE GRIDDLE TOP Using a knife directly on the surface of the griddle will not harm the griddle top REMOVING RUST If rust appears on the griddle surface rub it off with steel wool low grit sandpaper or the Blackstone Pumice Stone and re season the surface WAR NIN G ...

Page 40: ...Press smash them very thin STEP 03 Add 2 3 ounces of thinly sliced onion over each patty STEP 04 Cook for 60 90 seconds and flip so that the onions are under the patty Add 1 slice of American cheese to each patty and then place the top bun over the cheese and then the bottom bun on top of the top bun Cook for another 60 seconds STEP 05 To plate remove the bottom bun from the top and set on plate U...

Page 41: ...ld the egg whites and strawberry bits into the pancake mix STEP 08 Preheat Griddle to medium Melt a tablespoon of butter on griddle and spread around Pour 1 4 cup of pancake mix onto griddle and let cook until bubbles start to form and edges are slightly browned About 3 4 minutes Flip and cook another 3 minutes STEP 09 Once all of your pancakes are cooked grab a plate and start layering your panca...

Page 42: ...your previously marinated steak to the Blackstone griddle STEP 08 Cook the steak for about three minutes or until the steak is thor oughly cooked and place in a bowl STEP 09 Spread all remaining steak juices in the griddle and place the tortillas on top until the tortillas are cooked the tortillas change color slightly and they become malleable turning the tortillas from time to time STEP 10 To ma...

Page 43: ...xclude any liability on the part of North Atlantic its agents servants or employees whether under this warranty or implied by law for any indirect or conse quential damages for breach on any warranty The purchaser must establish all applicable warranty periods pursuant to this warranty by verifying the original purchase date by producing the dated sales receipt This warranty shall not apply to thi...

Page 44: ...ENGLISH ENGLISH North Atlantic Imports LLC 1073 West 1700 North Logan UT 84321 Blackstoneproducts com ...

Reviews: