background image

Operating the Studio Fiber Converter

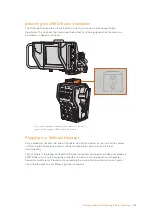
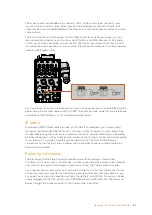
Selecting the LCD Source

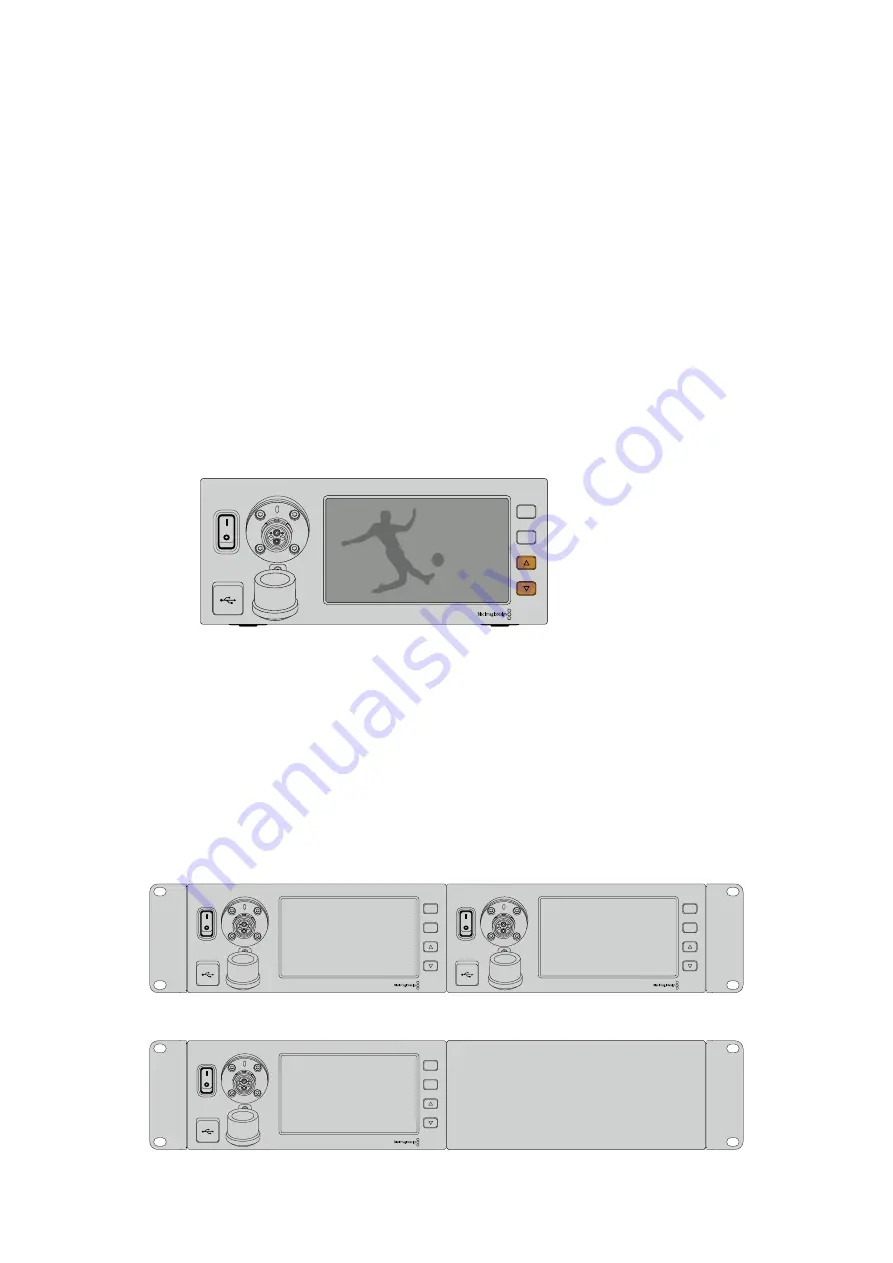
When powered on, your Blackmagic Studio Fiber Converter’s large LCD will immediately display 
the feed from your camera.

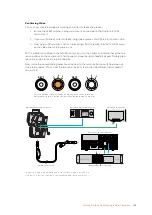
As the central base unit, the studio fiber converter takes the program feed from your switcher, 
plus all return sources, and feeds them to the camera unit via the SMPTE fiber cable. The built 
in LCD lets you monitor each source connected to the return feed inputs, and you can switch 
between them by pressing the up and down arrow buttons on the front control panel. The 
'menu' and 'set' buttons will be enabled in a future software release.

A text overlay in the top right corner of the LCD lets you identify which feed you are monitoring 
when you switch between feeds.

For example, as you press the arrow buttons, the overlay will appear for a few seconds to 
indicate which feed you are monitoring..

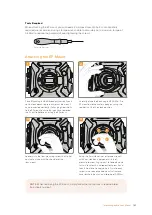
Press the up and down arrow buttons to monitor the return feed sources

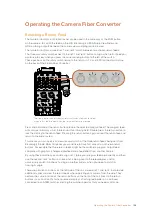
Rack Mounting the Studio Unit

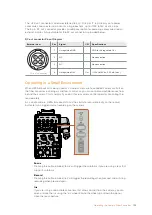
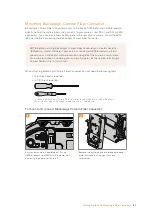
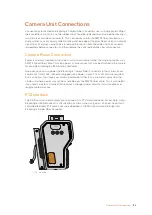
If you’re running multiple Blackmagic Studio Fiber Converters, you can use Blackmagic Studio 
Fiber Rack Kit to install your converters into a broadcast rack or road case. Using the rack kit, 
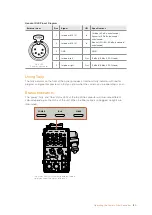
you can mount two studio units in a rack side by side, or fitted to either side. A blanking panel is 
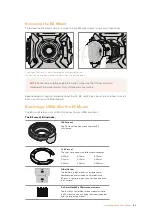
supplied with the Studio Fiber Rack Kit to cover the empty side of the rack if you only want to 
mount a single unit.

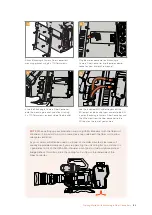
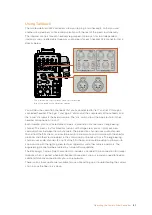
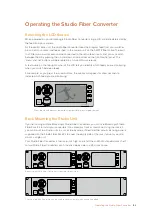
Your Studio Fiber Converter is two rack units high, and is half the width of a standard rack shelf, 
so two Studio Fiber Converters can fit neatly side by side in a 2RU rack space.

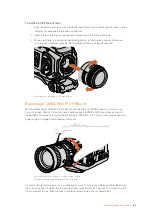
Blackmagic Studio Fiber Converters mounted side by side 

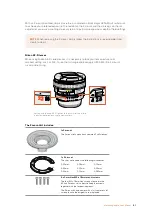
The supplied blanking plate can be used to cover an empty rack space if needed

MENU

SET

Camera Feed

MENU

SET

MENU

SET

MENU

SET

MENU

SET

154

Operating the Studio Fiber Converter

Summary of Contents for URSA BROADCAST

Page 1: ...on and Operation Manual Blackmagic URSA Broadcast Includes Blackmagic Camera Fiber Converter Studio Fiber Converter Blackmagic URSA Viewfinder URSA Studio Viewfinder and URSA Mini Shoulder Mount Kit February 2018 ...

Page 2: ...a s functions while comprehensive ATEM switcher integration and extremely low latency gives you the perfect solution for live studio production combined with full CCU features for incredible control over your camera directly from the switcher We also listened to single operators when we developed our URSA Viewfinder which is perfect for mobile ENG style shooting on the shoulder Additional features...

Page 3: ...t Controls 39 Forward Control Panel 39 Ergonomic Control Panel 42 Internal Control Panel 47 Touchscreen Controls 50 Touchscreen 50 Touchscreen Features 50 Settings 70 Dashboard 70 Record Settings 70 File Naming Convention 75 Monitor Settings 76 Audio Settings 83 Setup Settings 85 Presets 96 LUTS 98 Entering Metadata 101 Camera Video Output 107 HD Monitoring Output 107 12G SDI Output 107 URSA Mini ...

Page 4: ...rating the Studio Fiber Converter 154 Selecting the LCD Source 154 Rack Mounting the Studio Unit 154 Camera Unit Connections 156 Camera Power Connection 156 PTZ Interface 156 Talkback Connection 157 Tracker Interface 158 DC Connection 158 D Tap Output 159 Reference Output and Operation 159 Studio Unit Connections 160 12G SDI Output 160 Return SDI Inputs 160 Reference Input and Output 161 Talkback ...
Page 5: ...r 202 Adding a Power Window 203 Tracking a Window 204 Using Plugins 204 Mixing Your Audio 205 The Fairlight Page 206 The Audio Timeline 206 What is a Bus 207 The Mixer 207 Using the Equalizer to Enhance your Audio 208 Mastering your Edit 210 Working with RAW files 211 Blackmagic Camera Setup Utility 214 Working with Third Party Software 216 Working with Files from CFast 2 0 and SD cards 216 Workin...

Page 6: ... rotate the outer locking ring counterclockwise and pull the dust cap away from the mount To attach a B4 mount lens Attaching and removing a B4 lens on Blackmagic URSA Broadcast 1 Turn the B4 lens locking ring counterclockwise to reveal the alignment pin inside the top of the mount Align the B4 lens to your URSA Broadcast s B4 mount so the registration slot on the lens mount matches the position o...

Page 7: ...r to balance on your shoulder and rest steadily when sitting on a desk or flat surface See Blackmagic URSA Mini Shoulder Mount Kit for more information on fitting the base Powering your Camera Now that you ve attached a lens you will need to supply power The quickest way to power your camera is to connect external power using the supplied AC to 12V DC adapter NOTE When no lens is attached to the c...

Page 8: ... batteries with your URSA Broadcast Refer to the mounting batteries section for more information about mounting the different types of battery plates to support different batteries To turn on URSA Broadcast 1 Move the power switch located above the fold out LCD to the on position 2 To turn the camera off move the switch to the off position You are now ready to insert CFast 2 0 cards and start reco...

Page 9: ... record and forward skip buttons on the control panel behind the LCD to power your camera on or off ISO GAIN SHUTTER WHITE BAL XLR1 ON OFF XLR2 SD CFAST USB MIC LINE AES OFF 48V POWER FOCUS PEAK PGM MENU REC XLR1 XLR2 SD CFAST U MIC LINE AES OFF 48V POWER FOCUS PEAK PGM MENU REC TIP If your URSA Broadcast is turned off when the power switch is set to on your camera may have been powered down via B...

Page 10: ...on B4 lens models with HA ZA XA and UA prefixes in their model name and RM in their suffix For example Fujinon XA20sxBRM Canon B4 lens models with HJ KJ and CJ prefixes and IRSE or IRSD in their suffix For example for example Canon KJ20x8 2B IRSD B4 Lenses with full servo control for focus iris and zoom include Fujinon B4 lens models with HA ZA and UA prefixes in their name and the letters RD or Z...

Page 11: ...mode your lens will not accept aperture commands from your URSA Broadcast or ATEM switcher Push Auto Iris Use this button to momentarily activate auto aperture control while in manual mode This can be combined with iris controls on your camera or ATEM switcher to great effect For example with your camera set to an iris based auto exposure mode and your lens aperture set to manual you can freely ad...

Page 12: ...mands from URSA Broadcast and ATEM switchers so long as it is connected to the camera via the 12 pin hirose connector In this mode you typically can t adjust your lens s manual zoom ring Manual Set this switch to manual or m to disable servo control and adjust zoom using the zoom ring on your lens barrel In this mode your lens will not accept zoom commands from the handgrip URSA Broadcast or ATEM ...

Page 13: ... focus B4 lenses tend to autofocus quite slowly so using manual control is more common ZOOM FOCUS S M S M NOTE Analog B4 lenses with servos are also supported although the camera will only power the zoom servo and support electronic iris control Many of them are standard definition and may not have the standard 12 pin Broadcast connector If you are going to use an analog B4 lens it s important to ...

Page 14: ...ensate for exposure by using the built in NDs if you need to You ll want a shallow depth of field so you can exaggerate any focus issues 3 Zoom into the chart and set focus 4 Now zoom out If you reach maximum wide and the focus remains sharp then your back focus is correct and you don t need to make any adjustments However if you zoomed out and the chart drifted out of focus the back focus is inco...

Page 15: ...mera correctly on a heavy duty tripod or pedestal with adequate spacing This is possible with URSA Mini Shoulder Kit a VCT 14 plate and a box lens adapter Plug the 12 pin Hirose connector from the lens into URSA Broadcast or URSA Mini Pro s 12 pin lens connector Add additional power to the lens by using an URSA 12 volt power supply or if you are using Blackmagic Camera Fiber Converter you can run ...

Page 16: ...5 8 9 Focus and zoom controls can also be used to drive focus and zoom from the pan handles in a studio environment on all of the servo zoom lenses listed above Hybrid Compact Servo Zoom Lenses Recently a new category of lenses known as compact servo zoom lenses have been introduced These are have some of the functionality of B4 and PL servo zoom lenses but use an EF mount The zoom rocker for thes...

Page 17: ... CFast card facing the touchscreen insert the card until you feel it lock into place Push the CFast card ejector button to eject the card The storage information at the bottom of the LCD touchscreen will show the name and record time remaining of the detected CFast cards Blackmagic URSA Broadcast has two CFast slots for continuous recording NOTE While CFast 2 0 cards are generally high speed cards...

Page 18: ...ional 3600x 128GB Lexar Professional 3600x 256GB SanDisk Extreme Pro SDCFSP 128G x46D 128GB SanDisk Extreme Pro SDCFSP 256G x46D 256GB Transcend CFX650 TS128GCFX650 128GB Transcend CFX650 TS256GCFX650 256GB Transcend CFX650 TS128GCFX650BM 128GB Transcend CFX650 TS256GCFX650BM 256GB Wise CFast 2 0 3400x 128GB Wise CFast 2 0 3400x 256GB The following CFast 2 0 cards are recommended for 2160p RAW up ...

Page 19: ...FX310 CFast 2 0 Card 256GB Transcend CFX650 TS128GCFX650 128GB Transcend CFX650 TS256GCFX650 256GB Transcend CFX650 TS128GCFX650BM 128GB Transcend CFX650 TS256GCFX650BM 256GB Wise CFast 2 0 3400x 128GB Wise CFast 2 0 3400x 256GB Wise CFast 2 0 3500x 512GB The following CFast 2 0 cards are recommended for 2160p ProRes 422 HQ up to 60 fps but have been discontinued by the manufacturer Brand Card Nam...

Page 20: ...With the label on the SD card card facing away from the touchscreen insert the card until you feel it lock into place To remove an SD card push the SD card in to eject it 4 The storage indicator at the bottom of the LCD touchscreen will show the name and record time remaining of detected cards When recording to SD cards on URSA Broadcast make sure the storage media selection switch is set to SD Ch...

Page 21: ...ird AV Pro 300MB s UHS II 128GB Delkin Devices UHS II 250MB s SDHC 32GB SanDisk Extreme Pro UHS II 280MB s SDHC 32GB SanDisk Extreme Pro UHS II 280MB s SDXC 64GB SanDisk Extreme Pro UHS II 300MB s SDHC 32GB SanDisk Extreme Pro UHS II 300MB s SDXC 128GB Sony SF G64 300MB s UHS II 64GB Sony SF G128 300MB s UHS II 128GB Toshiba Exercia Pro UHS II 270MB s SDXC 64GB Transcend Ultimate UHS II 180MB s SD...

Page 22: ...SDHC 32GB Lexar Professional 2000x UHS II 300MB s SDXC 64GB Lexar Professional 1000x UHS II 150MB s SDXC 64GB SanDisk Extreme Pro UHS I 95MB s SDXC 64GB SanDisk Extreme Pro UHS I 95MB s SDXC 128GB SanDisk Extreme Pro UHS II 280MB s SDHC 32GB SanDisk Extreme Pro UHS II 280MB s SDXC 64GB SanDisk Extreme Pro UHS II 300MB s SDXC 64GB SanDisk Extreme Pro UHS II 300MB s SDXC 128GB Sony SF G64 300MB s UH...

Page 23: ...you won t be able to record video capture stills or export LUTs and presets until it is unlocked Your URSA Broadcast will indicate when locked SD storage media is inserted Preparing Media for Recording You can format your CFast or SD cards using the format card feature on URSA Broadcast s storage and formatting screen or via a Mac or Windows computer We recommend formatting storage media using URS...

Page 24: ...edit reel number if you would like to manually change the reel number 4 Choose OS X Extended or exFAT format and tap the format card button Tap edit reel number to manually edit the reel number 5 You will be asked to confirm your selection Tap format card again to continue or cancel to cancel the format NOTE Before formatting your media it s important to make sure the media storage switch has been...

Page 25: ... reset to 1 when you tap on reset project data in the project tab of the slate It s worth mentioning that if your camera s media storage switch is set to SD or CFast only the selected card type will be formatted when you tap format card The storage manager on your URSA Broadcast will indicate whether you are currently managing CFast or SD media For information on switching between CFast and SD sto...

Page 26: ...en click erase Your CFast or SD card will quickly be formatted and made ready for use Use Disk Utility on Mac OS to erase your CFast card in the Mac OS extended journaled or exFAT format Preparing Media on Windows The format dialog box can format a drive in the exFAT format on a Windows PC Remember to back up anything important from your card as all data will be lost when it is formatted 1 Connect...

Page 27: ... dropping frames check that your card is on our list of recommended media for the codec and frame size you are using For lower data rates try lowering your frame rate resolution or try a compressed codec such as ProRes Check the Blackmagic Design website for the latest information at www blackmagicdesign com 27 Storage Media ...

Page 28: ...g RAW 4 1 and RAW 3 1 compression are compatible with DaVinci Resolve but may be incompatible with other software applications If you plan on using other editing software you should check its compatability with compressed RAW formats before filming TIP Blackmagic URSA Broadcast has a LANC input so you can easily attach an external LANC controller and trigger the record externally For example you m...

Page 29: ...o select your desired codec and resolution 1 Press the menu button on the control panel 2 Navigate to the first page of the record tab 3 Tap your desired combination of codec quality and resolution 4 Press menu to exit Recording Formats and Project Frame Rates After setting your codec and resolution you should set your project and sensor frame rates Refer to the recording section in this manual fo...

Page 30: ...nds compared to format project frame rate and media size The maximum recording time for your storage media will vary depending on the data size of the CFast or SD card and the recording format and frame rate you choose For example the storage rate for Apple ProRes 422 HQ at 3840 x 2160 is approximately 880 Mbps At 24 frames per second you can record approximately 47 minutes of video on a 256GB CFa...

Page 31: ...114 mins 163 mins 363 mins HD Interlaced CFast Card Frame Rate DNxHD 220x 1080i DNxHD 145 1080i Duration Duration 256GB 50i 182 mins 274 mins 59 94i 152 mins 229 mins 60i 152 mins 229 mins ULTRA HD CFast Card Frame Rate CinemaDNG RAW CinemaDNG RAW 3 1 CinemaDNG RAW 4 1 ProRes 444 XQ ProRes 444 ProRes 422 HQ ProRes 422 ProRes 422 LT ProRes 422 Proxy Duration Duration Duration Duration Duration Dura...

Page 32: ...he iris on compatible lenses while recording clips When recording a clip using a sensor frame rate that differs from your project frame rate your clip s playback speed will also differ For example imagine you have set your camera s project frame rate to match your post production timeline of 24 frames per second If you record a clip with your sensor frame rate set to 60 frames per second your clip...

Page 33: ... the mount is interchangeable and compatible with URSA Mini Pro 4 6K EF PL and F mounts Refer to the interchangeable lens mount section for more information 3 Broadcast Lens Connector This connector provides power and control to compatible PL and B4 mount lenses with 12 pin connections Refer to the using servo zoom lenses section in this manual for a list of compatible lenses including PL and B4 m...

Page 34: ...djust the amount of light reaching the sensor Four settings are available ranging from clear to six stops of light reduction Simply turn this wheel to move through the available settings The filter will click into place for each setting For more information see the section URSA Broadcast control buttons in this manual 8 Forward Control Panel The forward control panel provides quick access to all o...

Page 35: ...st 2 0 cards SDXC or SDHC cards for record and playback Please note that you should check the list of certified cards in this manual or on our website See the section storage media for more information Right Side URSA Broadcast s right side panel gives you access to all the video audio and power connectors plus the side handle rosette mount 14 Side Rosette Mount Standard rosette mount for the side...

Page 36: ...rovides power and control to compatible PL and B4 mount lenses with 12 pin connections Rear Panel 19 Battery Mount Plate Your Blackmagic URSA Broadcast has 4 mounting points and a molex connector for attaching the optional V mount or gold mount battery plate Refer to the mounting batteries section for more information 20 LANC This 2 5mm jack is used for external LANC remote control such as an exte...

Page 37: ...multiple cameras or audio and picture when shooting dual system This ensures audio and picture or video from multiple cameras can be easily synchronized during post production It s worth noting that to use a reference signal through this input you must set your reference source to external in your URSA Broadcast s setup menu You can also set your camera to use the reference signal from an ATEM swi...

Page 38: ... audio input setting plus mic low or mic high on the audio input levels settings Scroll the menu to reveal the phantom power setting and select on To disable phantom power select off Phantom power is active only when external audio inputs are selected in the audio settings Underside 28 1 4 Inch Mounting Points The 5 mounting points on the underside are used for attaching tripod heads the optional ...

Page 39: ... kit URSA Broadcast forward control panel 1 Power Switch Power your URSA Broadcast by moving this switch to the on position Power off by moving the switch to the off position ISO GAIN SHUTTER WHITE BAL XLR1 ON OFF XLR2 SD CFAST USB MIC LINE AES OFF 48V POWER FOCUS PEAK PGM MENU REC ISO GAIN SHUTTER WHITE BAL XLR1 ON OFF XLR2 SD CFAST USB MIC LINE AES OFF 48V POWER FOCUS PEAK PGM MENU REC 6 8 1 4 5...

Page 40: ...heel s function by adjusting the adjacent three position switch next to the wheel The options are headphone monitor and iris Headphone When set to headphone the settings wheel will adjust headphone audio levels Rotate the wheel upwards to increase volume and downwards to decrease Monitor When set to monitor the settings wheel adjusts audio levels on your camera s built in monitor speaker The speak...

Page 41: ... are helpful when you want to make fast adjustments without taking your eyes off the shot Gently push the switches up or down to make setting adjustments The switches are spring loaded so they always return to a neutral position Gain ISO Push this switch up or down to adjust your camera s gain setting Pushing up will increase the setting one interval and pushing down will decrease one interval The...

Page 42: ...ols section of this manual HFR Use the HFR or high frame rate button to toggle off speed frame rates To use this button simply set the off speed frame rate you d like to use in your URSA Broadcast s frame rate menu Pressing this button will toggle between your chosen off speed frame rate and project frame rate It s worth mentioning that this setting can only be adjusted when the recording is stopp...

Page 43: ...roadcast s essential settings at a glance without needing to open the internal touchscreen This screen is designed to be visible even in bright daylight The following information is available Timecodes Your URSA Broadcast displays three timecodes If you have an external timecode connected this will be shown under the ext indicator in the top left of the status LCD Your camera s internally generate...

Page 44: ... indicator will appear under the card or cards being currently written to Low Time Remaining A low indicator will appear under the relevant card when you have approximately 5 minutes of record time remaining Audio Meters The peak audio meters display audio levels when using the internal microphone or via external audio when connected The display is calibrated to dBFS units and features peak hold i...

Page 45: ...de Press the timecode button to toggle the main timecode display s format between clip duration and timecode By default the timecode will be free running time of day code as this is the most frequently used If you press and hold the timecode button for five seconds it will switch the camera into record run timecode and the timecode generator will flash as well as the first two digits of the large ...

Page 46: ... SDI input on the rear panel This means if you re using the camera in a live broadcast you can plug in the switcher s program output and monitor it during the shoot Press and hold the program button to see your program feed The program feed will continue to display whilst the program button is being held If you want to lock the monitor to display the program input feed then double press the progra...

Page 47: ... iris focus menu and playback controls and more URSA Broadcast internal control panel 17 XLR1 XLR2 Use these switches to set how your URSA Broadcast s XLR inputs behave when selected as an input source The options available are mic audio line level audio and AES digital audio 18 Phantom Power The camera s XLR inputs can provide 48V phantom power so you can use microphones that aren t self powered ...

Page 48: ...off To display a switcher s program output your camera and switcher must be set to the same resolution and frame rate NOTE It is standard practice to plug in your XLR cable before switching phantom power on It is also important to switch phantom power to off when you no longer have a phantom powered microphone connected Connecting devices that don t have phantom power protection built into their A...

Page 49: ...orward and reverse skip buttons can also be used to open or close the iris when using compatible lenses Refer to the playback section for more information on how to use the playback buttons NOTE You can power your URSA Broadcast on or off via a combination of internal control panel buttons Holding the rec and forward skip buttons will power up the camera if it is turned off or power it off if it i...

Page 50: ...or Options Tap the monitor icon at the top left of your URSA Broadcast s LCD touchscreen to access the LCD monitor settings These settings let you toggle and adjust the appearance of your URSA Broadcast s monitoring features including zebra focus assist frame guide and grids When accessing LCD monitor options the controls for these features appear in a tabbed menu along the bottom edge of the LCD ...

Page 51: ...le focus assistance for the LCD touchscreen tap the switch icon in the bottom left of the screen while in the focus assist tab To set the level of focus assistance for all outputs on your URSA Broadcast tap the low medium or high titles along the bottom of your touchscreen The optimum level of focus assistance varies shot by shot When focusing on actors for example a higher level of focus assistan...

Page 52: ...os The same aspect ratio has also been adopted for Ultra HD broadcasting 14 9 Displays a 14 9 aspect ratio used by some television broadcasters as a compromise between 16 9 and 4 3 television sets Ideally both 16 9 and 4 3 footage remains legible when center cropped to fit 14 9 You can use this as a compositional guide if you know your project may be broadcast by a television station that uses 14 ...

Page 53: ...f the screen while in the frame guides tab When your URSA Broadcast is set up and connected to an ATEM switcher as the current program source and grids are set to on the red program tally outline will automatically illuminate on the LCD When connected to an ATEM switcher sending a tally signal a red border will appear around your camera s image preview when grids are set to on To set which overlay...

Page 54: ...rapid editing easier to follow Center Dot The center dot setting places a dot in the center of the frame This works in exactly the same way as the crosshair setting albeit with a smaller overlay that you may find less intrusive You can enable a combination of thirds and crosshairs or thirds and center dot by tapping both options in the grids menu Crosshairs and center dot cannot be selected togeth...

Page 55: ...ft or right arrows on either side of the current numerical value at the bottom of your touchscreen Alternatively you can drag the slider left or right False Color The false color setting toggles the appearance of false color exposure assistance on the LCD touchscreen False color overlays different colors onto your image that represent exposure values for different elements in your image For exampl...

Page 56: ... provides a selection of common frame rates used in the film and television industry This frame rate is normally set to match your playback speed used in your post production workflow Your Blackmagic URSA Broadcast has 8 project frame rate settings including 23 98 24 25 29 97 30 50 59 94 and 60 frames per second To adjust your URSA Broadcast s project frame rate while in the FPS menu tap the left ...

Page 57: ...e rate Setting the sensor frame rate higher than your project frame rate will create slow motion during playback Alternatively the lower your sensor frame rate the faster your clips will appear The principle is similar to overcranking and undercranking a film camera Overcranking speeds up the sensor frame rate so you can stretch out moments in time during playback to enhance emotion Undercranking ...

Page 58: ...erent shutter speeds to see how this setting can provide different levels of motion blur to your image Tapping the shutter indicator brings up the shutter speed menu along the bottom of your URSA Broadcast s touch screen If you have auto exposure set to off this screen will show you your currently selected shutter speed as well as the available flicker free shutter speeds based on the mains power ...

Page 59: ...otion blur It s also worth keeping an eye out for any flicker that may be introduced from various light fixtures on indoor shoots URSA Broadcast s auto iris feature is not available when the shutter auto exposure mode is selected Shutter Iris Maintains the correct exposure levels by adjusting the shutter then the aperture If the maximum or minimum available shutter speed is reached and exposure st...

Page 60: ...ure to maintain a constant exposure while keeping shutter speed constant This will keep motion blur constant but may affect your depth of field Iris Shutter Maintains the correct exposure levels by adjusting the aperture then the shutter speed If the maximum or minimum available aperture is reached and exposure still cannot be maintained URSA Broadcast will begin adjusting the shutter speed to kee...

Page 61: ...ap the duration display again to return to clip duration Additional status indicators may appear around the duration display Appears to the left of the duration display when your URSA Broadcast is using a windowed sensor mode Appears to the right of the duration display when showing timecode Appears to the right of the duration display if an external timecode is connected and valid Appears to the ...

Page 62: ...arm color and an overcast sky emits a cool color White balance settings are used to color balance your image so white stays white by adjusting the mix of orange and blue in your image For example when shooting under tungsten lamps which emit a warm orange light selecting 3200K adds some blue to the image This balances the color so white is accurately recorded Your URSA Broadcast comes with white b...

Page 63: ...e Your URSA Broadcast can set white balance automatically Tapping AWB will bring up the white balance screen When setting white balance automatically a square will be overlaid on the center of your image Fill this square with a neutral surface such as a white or gray card and tap update Your URSA Broadcast will automatically adjust its white balance and tint values to ensure that the average of th...

Page 64: ...s in 25 increments At 20 charge remaining the battery bar will turn red Voltage When your battery display is set to voltage this indicator will display your battery s remaining voltage When your battery drops below 12 5 volts this indicator will turn red Your URSA Broadcast will automatically shut down once the battery reaches 11 9 volts When using battery power you can switch between voltage and ...

Page 65: ...Broadcast begins dropping frames while recording The time remaining indicator for the affected card or cards will also turn red For example if you are recording in dual card mode and card 1 is dropping frames the indicator will appear over the record button and the time remaining indicator on card 1 will turn red This lets you know if a particular card is too slow for your currently selected codec...

Page 66: ...card and the record time remaining in minutes The card name will also be shown in a small bar above the time remaining This bar will turn blue to indicate that it is the card that the camera will be recording to While recording the bar will turn red Tapping the CFast card indicators will bring up the storage and formatting menu Tap the storage indicators on your URSA Broadcast s LCD touchscreen to...

Page 67: ...imum level that your camera can record meaning that any audio that exceeds this level will be clipped resulting in distortion The colored bars on the audio meter represent peak audio levels Ideally your peak audio levels should fall in the upper end of the green zone between 18 and 12dBFS If your peaks enter into the yellow or red zones corresponding to 12 and 6dBFS your audio is in danger of clip...

Page 68: ...can move around the image by dragging your finger along the screen as you would on a smartphone or tablet Full Screen Mode It can be useful when framing or focusing a shot to temporarily hide your touchscreen s status text and meters Simply swipe up or down on URSA Broadcast s LCD touchscreen to hide these The record indicator frame guides grids focus assist and zebra will remain visible Swipe up ...

Page 69: ...y tapping the transport keys again Each time you tap the transport key in the same direction you will double the shuttle rate The maximum shuttle rate is x16 normal speed Tapping the transport key again at x16 speed will return you to x2 speed Tapping the opposite direction will halve the current shuttle speed until you reach 2x speed You can return to normal playback by tapping the play button Th...

Page 70: ...e settings screen or swiping left or right as you would on a smartphone or tablet Tap the record monitor audio setup presets and LUTS headings to move between your URSA Broadcast s dashboard tabs Record Settings The record tab allows you to set your video format codec and resolution as well as other settings which affect the footage saved by your URSA Broadcast such as preferred card and detail sh...

Page 71: ...r your desired recording format For example if you want to record Ultra HD clips using ProRes HQ select ProRes and HQ in the codec and quality menu Now choose Ultra HD in the resolution menu Record Settings 2 The second page of the record settings tab contains the following settings TIP The amount of video you can record on a CFast card or SD card will increase when choosing codecs that utilize hi...

Page 72: ...ading software such as DaVinci Resolve Project Frame Rate The project frame rate is URSA Broadcast s recording format frame rate and provides a selection of common frame rates used in the film and television industry For example Ultra HD at 29 97 frames per second using ProRes HQ This frame rate is normally set to match your playback speed and audio sync used in your post production workflow and d...

Page 73: ...oup files chronologically when shooting a single camera project The setting you choose is applied when a CFast card or SD card inserted You can override this setting at any time by entering the storage manager and setting a different card as active It s important to note however that ejecting and reinserting cards will revert to the current preferred card for recording setting Record RAW on 2 Card...

Page 74: ...ording format so if you set the camera to record Ultra HD using ProRes HQ the time lapse setting will maintain this format The frame rate will be based on your project frame rate This is so your time lapse footage can be easily incorporated into your post production workflow Your URSA Broadcast will indicate it is in time lapse mode with an icon over the record button Detail Sharpening Use this se...

Page 75: ...ov QuickTime Movie Filename A001_08151512_C001 mov Camera index A001_08151512_C001 mov Reel Number A001_08151512_C001 mov Month A001_08151512_C001 mov Day A001_08151512_C001 mov Hour A001_08151512_C001 mov Minute A001_08151512_C001 mov Clip Number For CinemaDNG files the folder of the image sequence will also be named the same way Still image files captured using the still button will follow the f...

Page 76: ... left or right LCD Front SDI Main SDI Monitor Settings 1 The first page of the LCD front SDI and main SDI monitor tab contains identical settings for each output For example you can set zebra on for the LCD touchscreen but off the front or main SDI outputs Clean Feed Tap the clean feed switch in the LCD front SDI and main SDI menus to disable all status text and overlays for that output except the...

Page 77: ...LCD front SDI and main SDI menus to enable frame guides for those outputs For more information on frame guides and choosing different guides see the touchscreen features section in this manual Grid Tap the grid switch in the LCD front SDI and main SDI menus to enable a rule of thirds grid for those outputs For more information on the rule of thirds grid see the touchscreen features section in this...

Page 78: ...ce of the histogram and audio meters Screen Brightness Drag the screen brightness slider in the LCD menu left or right to adjust the brightness of your URSA Broadcast s LCD touchscreen Front SDI and Main SDI Monitor Settings 2 The second page of your URSA Broadcast s front SDI and main SDI monitor tab contains settings unique to your front and main SDI outputs Status Text It can be useful to hide ...

Page 79: ...e rate is being used the sensor frame rate will be shown followed by the project frame rate CAM Displays the camera index as set in your URSA Broadcast s Slate See the slate section later in this manual for more information OPERATOR Identifies the camera operator as set in your URSA Broadcast s Slate See the slate section later in this manual for more information DURATION DISPLAY Displays the dura...

Page 80: ...f your URSA Broadcast s outputs are grouped within the all menu For example setting safe area guide to 90 in this menu will set the safe area guide to 90 for your camera s LCD front SDI and main SDI outputs There are two pages of all settings The first page of your URSA Broadcast s all monitor tab contains the following settings Frame Guides Tap the left or right arrows in the frame guides menu se...

Page 81: ...precise focus aid Focus Assist Intensity To set the level of focus assistance for your LCD touchscreen front SDI and main SDI tap the low medium or high setting Focus Color Use this setting to change the color of focus line overlays when using colored lines style focus assistance Changing the focus line color can make it easier to tell focus assistance lines apart from your image The available opt...

Page 82: ...puts and in recorded files Enabling anamorphic desqueeze will correct the preview image on your URSA Broadcast as well as recording the desqueeze amount used in the clip metadata for easy correction in post The desqueeze amount available will vary depending on what you ve set your URSA Broadcast resolution to but the resulting image will always be in the cinematic widescreen 2 4 1 aspect ratio Ana...

Page 83: ...s are Camera Left or Right Use this setting to record from your camera s internal microphones Camera Mono Use this setting to record audio from your URSA Broadcast s built in microphone s left and right channels onto a single audio channel XLR 1 or 2 Use this setting to record from your camera s XLR inputs Depending on which audio signal you ve set on your URSA Broadcast s internal control panel s...

Page 84: ... forward control panel Speaker Volume This slider adjusts the output levels for your URSA Broadcast s built in speaker Move the audio slider left or right to adjust levels These levels will also update when you adjust the speaker volume using the settings wheel on the forward control panel Pad XLR 20dB The 20dB pad option gives you added control to further reduce the input gain levels on your URSA...

Page 85: ...roject frame rates of 29 97 and 59 94 Drop frame timecode drops a small number of frames from the timecode at set intervals This keeps your project timecode accurate despite each second not containing a whole number of frames at NTSC frame rates Shutter Measurement Tap the shutter measurement button to change between shutter speed and shutter angle as a unit of shutter measurement It s important t...

Page 86: ... displays your ND filter setting Each setting corresponds to a different camera convention Cinematographers typically use ND number notation while those familiar with DSLRs or broadcast cameras may prefer this information in f stop format or as a fraction of available light These options are available here as number stop and fraction respectively Setup menu in URSA Broadcast with the option to cus...

Page 87: ...ses the program return audio as your input source to be mixed with talkback when monitoring using headphones or a headset This is useful when you are not feeding the switcher audio from your camera but you still want to listen to the program feed from the mixer Simply tap the program audio switch icon to toggle camera audio or program audio Headset Mic Move this volume slider left or right to incr...

Page 88: ...mappable to frequently used features and are quickly accessible when using your camera with the LCD touchscreen closed such as when you are using URSA Viewfinder Your URSA Broadcast s F1 and F2 buttons are located on the forward control panel NOTE When you are setting your reference source for URSA Broadcast you may experience a small dropout on your camera s outputs when switching between your re...

Page 89: ...hen set to this behavior pressing a function button will move a particular setting up or down For example you may want to set F1 to increase your lens aperture and F2 to decrease it To do this select the F1 function button set the behavior to up down and the parameter to up Do the same for the F2 function button but set the option to down Toggle On Off When set to this behavior pressing a function...

Page 90: ... this Three flashes indicate that inserted media has been recognized Orange If your camera s battery is low the LED will flash orange and your other current status color For example if currently recording the LED indicator will slowly alternate between orange and red If your camera is in standby mode the LED will alternate between white and orange The threshold for low battery is 20 percent for ba...

Page 91: ...amera Setup Utility section for more information on updating software Playback This setting allows you to select whether to play back a Single Clip or All Clips during playback All Clips will play back through all matching media sequentially and Single Clip will play one clip at a time This also applies for the loop function Selecting loop on All Clips will play through all of the clips on the CFa...

Page 92: ...Camera Control Protocol section in this manual To pair your camera with an IPad for the first time 1 Enable Bluetooth by tapping the Bluetooth switch icon in the setup menu on your URSA Broadcast 2 Open the Blackmagic Camera Control App and select the URSA Broadcast you would like to pair with Available cameras will be listed by their camera letter followed by their unique hardware ID For example ...

Page 93: ...era Control App will request a six digit code to pair with the camera This code will be displayed on the camera s LCD screen Type this code into the iPad 4 The information on the screen will confirm that your URSA Broadcast is now paired with your iPad 93 Settings ...

Page 94: ... with Controlling Your Camera with the Blackmagic Camera Control App Once you have successfully paired your URSA Broadcast to your iPad you can power the camera on or off change settings adjust metadata and trigger record remotely using the iPad app Once paired the Blackmagic Camera Control app will display this screen allowing you to adjust your settings and start recording NOTE If you are not us...

Page 95: ...y tapping power off in the top right corner You will be prompted to confirm your selection before your camera is powered off When Bluetooth is enabled and URSA Broadcast is powered off the name of your camera will still show up on the list of available devices in the Blackmagic Camera Control App Since you have already paired with your camera you can now switch it on remotely by selecting your cam...

Page 96: ...ply set up one URSA Broadcast to suit your project then export that preset for all the other URSA Broadcasts on set Your URSA Broadcast s Presets tab Preset buttons The button icons along the bottom of your URSA Broadcast s preset menu correspond with the following functions Add Load Update Manage Delete Saving and loading presets To create a new preset tap the add icon This will bring up a touch ...

Page 97: ...presets To import presets tap the preset manager icon at the bottom of the preset menu Select either SD or CFast with the storage media selection switch depending on where your presets are saved Tap import preset and confirm your selection with the import icon This will bring up the import screen Choose card 1 or card 2 at the top left of this screen to display any available presets on those cards...

Page 98: ... tap the delete icon You will be prompted to confirm your choice Tap delete to confirm LUTS The LUTS menu lets you import export and apply 3D LUTs to your camera s outputs Your URSA Broadcast s LUT tab Introducing 3D LUTs Your URSA Broadcast can apply 3D LUTs to images on its LCD touchscreen front SDI and main SDI LUTs work by telling your camera what color and luminance output to show for a parti...

Page 99: ...t alongside other broadcast cameras limited to the REC 709 color space Broadcast Film to Extended Video The Broadcast Film to Extended Video LUT offers a preview with a wider dynamic range than the Broadcast Film to Video LUT and applies a mild contrast change with a smooth roll off in the highlights Broadcast Rec 2020 Hybrid Log Gamma The Broadcast Rec 2020 Hybrid Log Gamma LUT offers a preview t...

Page 100: ... the monitor settings section in this manual for more information Exporting LUTs To export a LUT to a CFast or SD card select the LUT you want to export and tap the icon You will be prompted with two options import LUT and export selected LUT Use the storage media selection switch to select either SD or CFast depending on the location you would like to export the LUT to Tapping export selected LUT...

Page 101: ...h as the project name director and camera and operator ID Clip metadata Changes made to clip metadata work slightly differently in standby mode when your URSA Broadcast is ready to record and playback mode when you re reviewing footage you ve already shot In standby clip metadata will be saved to the next clip recorded except for good take last clip which refers to the most recently recorded clip ...

Page 102: ...it is not provided automatically Iris Shows the iris aperture setting at the start of your clip This information can be displayed in f or T stops depending on the lens used if supplied automatically Tap this setting to enter data manually Focal length Shows the focal length setting of the lens at the start of the recorded clip When automatically supplied this is shown in millimeters Tap this setti...

Page 103: ...apping the reset lens data icon in the lens data menu You will be prompted to confirm your choice If you confirm all lens data will be cleared and repopulated with any lens data automatically provided by the currently fitted lens If you have manually entered any information into these fields you will need to reset the lens data the next time you mount a lens otherwise the manually entered value wi...

Page 104: ...to the scene number in the scene number editor you can also indicate the current shot For example 23A would indicate scene twenty three shot one If you have a shot letter added to your scene your URSA Broadcast will suggest letter increments whenever you enter the scene number editor For example if your current scene number is 7B your URSA Broadcast will offer 7C as an increment suggestion The sce...

Page 105: ...ta your URSA Broadcast will offer prompts for additional shot types to the right of the touch keyboard Good take Tap the good take indicator to flag good takes for easy recall in post production This tag applies to either the last clip recorded if your URSA Broadcast is in standby mode or the clip currently being viewed in playback mode Int Ext Tap int or ext to add a interior or exterior tag to t...

Page 106: ... for the current project Tap the pencil icon to change the director name Camera Displays a single letter camera index Tap the pencil icon to change the camera index Camera Op Displays the camera operator Tap the pencil icon to change the camera operator name NOTE Camera index is used in metadata and for file naming purposes and differs from your URSA Broadcast s ATEM Camera ID which is used when c...

Page 107: ...ou can connect the rear panel SDI output directly to production switchers for live production work or to ATEM Camera Converters to convert your signal to optical so you can send it hundreds of meters to a broadcast truck on location When connected to a switcher you can easily view the switcher s program output on your Blackmagic URSA Broadcast To do this first connect the switcher to your camera s...

Page 108: ...DI overlays provide frame guides and information such as recording details and camera settings If you simply want to monitor your shots you can always turn overlays off for a clean SDI output Connect the camera s SDI output to SDI monitors or to a Blackmagic SmartScope Duo 4K for live waveform monitoring SDI Output Formats Rear SDI Output 2160p23 98 24 25 29 97 30 50 59 94 60 1080p23 98 24 25 29 9...

Page 109: ...ores or online It s also worth mentioning that mounts modeled after the VCT U14 tripod plate are a different system and are not compatible When attaching the shoulder mount kit you will need the following tools 1 x flat head screwdriver for the 2 x shoulder mount base plate screws 1 x 3 16 Hex key driver for the 2 x top handle screws 1 x 2 5mm Hex key driver for the 4 x Viewfinder adapter plate M3...

Page 110: ... is replaced with an adapter plate when attached to the URSA Viewfinder We recommend leaving the cap attached when using the handle without the URSA Viewfinder 1 Top handle URSA Viewfinder cap 2 Place your URSA Broadcast on a flat stable surface so you can access the top of your camera Fasten the handle to any two of your URSA Broadcast s top 1 4 mounting points using the two supplied 1 4 screws w...

Page 111: ...o the handle using the 4 x M3 screws with a 2 5mm Hex key driver Fasten the handle to any two of URSA Broadcast s top 1 4 mounting points using the two supplied 1 4 screws with a 3 16 Hex key driver URSA Broadcast s rear two mounting points are recommended for most situations but you can choose any pair for better weight balance when using large lenses Avoid over tightening the screws as it may da...

Page 112: ...d fasten with the supplied rosette thumbscrew 3 Attach the side handle to the extension arm s front rosette Fasten by tightening the side handle screw with the large flat head screwdriver or by twisting the D ring with your thumb and forefinger 4 Connect the side handle LANC output to the camera LANC input using the long LANC cable supplied with your shoulder mount kit You can easily adjust the ex...

Page 113: ...oadcast s menu it will actually tell the viewfinder which frame guide is selected in the camera so when you toggle the frame guide display on the viewfinder the same 2 40 1 frame guide is also displayed Mounting and Connecting to Blackmagic URSA Broadcast Blackmagic URSA Mini Shoulder Mount Kit is required to mount URSA Viewfinder correctly on URSA Broadcast To attach Blackmagic URSA Viewfinder re...

Page 114: ... Adjusting the Eyepiece The detachable rubber eyepiece can be adjusted to fit your left or right eye Adjust the viewfinder arm by loosening the knob on the bottom of the arm and sliding it left or right to comfortably fit your eye Button Features On the top of the viewfinder you ll find the zoom display and peak buttons These buttons are used for zooming into your image and turning overlays and fo...

Page 115: ...n also quickly open the shortcuts menu setting by pressing and holding this button Refer to the shortcuts section for information on how to set shortcuts PEAK F3 down The focus peaking feature creates a green edge around the sharpest parts of the image so you can easily confirm your focus Press the peak button to turn the peaking feature on Press again to turn peaking off When using the settings m...

Page 116: ...wfinder s setup menu The style of these overlays such as the safe area percentage are set in your camera Zoom Turns the zoom feature on and off Film to Video Switches between film and video display mode Refer to the record settings section in this manual for information on film and video mode This setting is only available when your camera is outputting film images to your viewfinder It is disable...

Page 117: ... are turned on in your URSA Broadcast s front SDI monitor settings you can use this setting to toggle the appearance of these guides in your Blackmagic URSA Viewfinder For more information see the Monitor Settings section in this manual Safe Area Guide Toggles the appearance of a safe area guide When safe area guide is turned on in your URSA Broadcast s front SDI monitor settings you can use this ...

Page 118: ...r The viewfinder will detect when you look into the viewfinder eyepiece pressing any button on the viewfinder will also turn the display back on Deliberately blocking or covering the IR sensor could cause the viewfinder s display to remain powered for prolonged periods of time This could decrease the lifespan of the display and cause image retention if high contrast images or frame guides are disp...

Page 119: ... computer to the small USB connection located at the front of your viewfinder near the eyepiece When Blackmagic Camera Utility is launched and your viewfinder is connected to your computer you will be prompted to update if your computer detects that your viewfinder is using an older version Follow the on screen prompts to update your viewfinder s internal software NOTE Refer to the Blackmagic Came...

Page 120: ...a large easily viewable tally light control knobs large handles sun hood and variable tension articulated mount These features make it easy to stand behind the camera and comfortably follow the action for extended periods of time especially when filming live concerts sports and other long events The URSA Studio Viewfinder is perfect for professional live production in the studio or on location BAC...

Page 121: ... We recommend doing this while the camera is attached to a tripod for stability If you are mounting the Blackmagic URSA Studio Viewfinder to your URSA Broadcast whilst using the URSA Mini shoulder mount kit you need to attach it using the supplied URSA Mini handle mount Attach the supplied URSA Mini handle mount to the top handle with three of the supplied 1 4 screws using a 3 16 Hex key Slide the...

Page 122: ... 1 2 3 4 1 2 3 4 INTERCOM 2 LEVEL REAR INCOM PROD INCOM PROD MIC ON OFF FRONT MIC ON OFF OFF TIP The Blackmagic URSA Studio Viewfinder connects to the camera via a quick release V lock mount plate which means that the viewfinder can be removed quickly if you need to take the camera off a tripod When filming sports matches it can be advantageous to leave both the Blackmagic URSA Viewfinder and Blac...

Page 123: ...ion of the arm and the right hand dial allows you to lock the Viewfinder in place once you have found the angle you require To connect your Blackmagic URSA Studio Viewfinder to your URSA Broadcast simply connect the viewfinder s attached cables to your camera s front 12V power and 3G SDI outputs The power switch on the viewfinder will then allow you to turn on the viewfinder instantly when your ca...

Page 124: ...rols pan tension 3 Tilt Tension Dial Controls tilt tension 1 2 3 TIP The center tension dial on the supplied mount controls pan tension and can be loosened to allow you to take hold of the viewfinder and move the camera independently This means that you can film things like motorsport where you need to pan the camera left and right to follow the action whilst holding the viewfinder positioned towa...

Page 125: ...e two captive screws on the base of the sun hood The top section of the visor is adjustable and can raise and lower to provide additional viewing angles The sun hood provides additional protection for the 7 screen and can be removed quickly and easily if desired or to access the USB C connector for software updates Sun hood and adjustable visor BACK F1 F2 F3 ON OFF MENU 125 Blackmagic URSA Studio ...

Page 126: ...e on screen Overlays on screen will show the contrast level on a scale of 100 to 100 7 Peaking Adjusts the focus peaking level for the image on screen Overlays on screen will show the peaking level on a scale of 100 to 100 In the setup menu you can select between various styles of peaking to suit your environment There is the option for the traditional style of focus peaking that many will be fami...

Page 127: ... in the software installer that allows you to edit and print out your own tally numbers to match the ones provided and also to create your own custom tally number inserts After installing the Blackmagic cameras software these can be found on a Mac in the Application Blackmagic Cameras Documents folder and on a PC in the Blackmagic Design Documents folder The tally light will illuminate according t...

Page 128: ...n your URSA Broadcast in the All section of the Monitor menu When the Studio Viewfinder is not connected with URSA Broadcast the zebra level will represent 95 of the luminance levels of a Rec 709 signal For more information refer to the settings section in this manual False Color Switches the false color feature on and off False color overlays different colors onto your image that represent exposu...

Page 129: ...ewfinder therefore the meters will show you URSA Broadcast s audio input levels If you have program input selected the audio meter will display these audio levels Exposure Meters Switches the display of the histogram on or off Red Channel Allows you to switch on or off the red channel of your image Green Channel Allows you to switch on or off the green channel of your image Blue Channel Allows you...

Page 130: ...etup Front Tally Brightness Allows adjustments of tally LED brightness between off low medium and high The tally light will illuminate whilst adjustments are being made so you can see what each brightness level represents The setup submenu Rear Tally Brightness Allows adjustments of tally LED brightness between low medium and high The tally light will illuminate whilst adjustments are being made s...

Page 131: ...on to show grids as part of your Studio Viewfinder s Guides When connected to URSA Broadcast these will match your camera s grids settings When not connected this will switch your crosshairs on or off Cursors The cursors allow you to mark an area on screen where graphics like a lower third graphic logo or ticker will be overlaid To adjust these cursors go to cursors and select edit cursors This wi...

Page 132: ...ty software The viewfinder will need to be powered when updating so we recommend keeping the viewfinder connected to your URSA Broadcast during the update process This also means your camera will need to supply consistent power so be sure to plug into external power Remove the sun hood to provide access to the small USB C connection located on the bottom of the Blackmagic URSA Studio Viewfinder an...

Page 133: ...gn resellers or V mount and gold mount battery plates from suppliers of professional digital cinema and video equipment If you don t have an off the shelf battery plate designed for Blackmagic URSA Broadcast and you want to modify your own battery plate then you can use the supplied adapter cable and connector Refer to the using your own battery plate section for information about how any battery ...

Page 134: ... own battery plate you can use the supplied adapter cable and connector which is also available at your local Blackmagic Design support office To wire the adapter cable and connector to your battery plate 1 Strip approximately half an inch of insulation from the end of each red and black wire 2 Solder all 4 x red Batt wires to the corresponding positive wire from your battery plate 3 Solder all 4 ...

Page 135: ...att and GND pin supports 3 amps Make sure all Batt and GND pins are connected To monitor the battery status using Anton Bauer IDX or Blueshape plates follow the connection table below Anton Bauer Connect the blue white striped wire to the housing blue wire at pin 7 IDX Connect the green wire to the housing green wire at pin 8 and the grey wire to the housing blue wire at pin 7 Blueshape Connect th...

Page 136: ... Blackmagic Studio Fiber Converter via a standard SMPTE hybrid 304 connector Blackmagic Studio Fiber Converter This converter converts the optical fiber SDI signal from the camera unit to SDI via BNC which is then connected to an ATEM switcher The converter also takes all return feed sources including program return from the ATEM switcher and sends them back to the camera unit The Blackmagic camer...
Page 137: ...iber optic cable you can use one single industry standard optical fiber cable to connect each camera to your ATEM switcher and provide all video power talkback tally and control signals along one cable With optical fiber you can also carry these signals and power over longer distances up to 2 kilometers SMPTE 311 hybrid fiber optic cable with male and female SMPTE 304 connectors NOTE The male and ...

Page 138: ...onnector is exposed For example immediately prior to connection and immediately after disconnection It s also a good idea to connect the rubber cap from each end of the SMPTE fiber cable into the rubber cap on the converters whilst in use to prevent any dust or debris from entering the caps Plugging in Power Power from the studio unit is sent through the fiber cable to the camera unit therefore th...

Page 139: ...nnect the cable Push the metal base of the studio unit s fiber connector towards the front panel and remove the cable connector Plug the male end of the SMPTE fiber cable into the female connector on the front of Blackmagic Studio Fiber Converter Push the metal base of the studio unit s fiber connector towards the front panel to disengage the cable connector allowing you to pull the cable away fro...
Page 140: ...of the female end of the cable and compress the rubber sheath around the cable pulling it gently away from the tip of the cable until you can see the red ring under the sheath This will detach the teeth from the locking mechanism 2 Put one hand on the camera to brace it gently and pull the cable away from the connector on the Blackmagic Camera Fiber Converter The cable should disconnect easily wit...

Page 141: ...are using a cable over greater distances the handshake process can take a moment longer before indicators illuminate green If the power light remains red for an extended period of time and does not turn green or flickers between red and green check that both ends of the fiber cable are securely connected If the interruption persists check the condition of your fiber cable POWER RET 1 1 3 2 RET 2 L...

Page 142: ...to 2km away To ensure safe operation your Blackmagic Studio Fiber Converter has safety mechanisms built in to ensure accurate monitoring and automatic management of the voltage being carried A dedicated micro controller along with internal handshaking and communication between the Blackmagic fiber converters ensure that a hybrid fiber optic cable remains off until it is plugged into the Camera Fib...
Page 143: ...ds if you want to Switch between the return feeds on the camera unit and press the corresponding return button to view the selected feed on a monitor To confirm video plug video sources into the return feed inputs on the studio unit then view them on a monitor connected to the camera unit RET 1 1 3 2 RET 2 1 3 2 ATEM 4 M E Broadcast Studio 4K SMPTE 311 Fiber Cable Blackmagic Studio Fiber Converter...

Page 144: ...Camera Fiber Converter 2 Connect one of the included BNC cables from the SDI output on Blackmagic Camera Fiber Converter to the 12G SDI input on Blackmagic URSA Broadcast or URSA Mini s rear panel Plugging in Return SDI Outputs The three SDI outputs marked SDI Out on the front of the camera unit are loop outputs of the return feeds coming from the switcher These let you connect the return feeds to...

Page 145: ...cast you will need a large phillips head screwdriver and a T10 torx driver To mount and connect Blackmagic Camera Fiber Converter 1 2 SD IOUT SD IIN RE FIN TC IN 12V Ensure your camera is powered off If using URSA Broadcast or URSA Mini Pro power it off by moving the power switch to off Remove the battery plate or molex power cover plate if attached using a phillips head screwdriver NOTE Before in...

Page 146: ...t on the back of your camera to the SDI input on Blackmagic Camera Fiber Converter and the SDI output from the fiber converter to the SDI input on the rear of your camera NOTE When setting up your production and using URSA Broadcast with the fiber unit attached it s important to maintain some clearance underneath the fiber unit to allow adequate ventilation As your camera will often be used on a t...

Page 147: ...ctors allows two people to communicate with crew simultaneously That s all there is to getting started With the fiber converters powered and video connected via SMPTE fiber you can start using the converters to create your live production with greater flexibility and efficiency Please continue reading the manual for more information on how to use all the features on your Blackmagic fiber converter...

Page 148: ...uickly and easily adjust which of the three return feeds being sent from Blackmagic Studio Fiber Converter you would like to have fast access to on the two return buttons For example the three return feeds might be the switcher s program output feed complete with graphics a teleprompter feed and a feed direct from another camera By using these switches you could assign ret 1 to be your program fee...

Page 149: ...he two channels The production channel uses audio channels 15 and 16 of the SDI stream and could be setup to allow you to communicate with the director producer and other crew members in the control room or broadcast truck The engineering channel uses audio channels 13 and 14 of the SDI stream and could be setup to allow you to communicate with the lighting crew technical operators and other camer...

Page 150: ...ou know when the camera you are operating is on air Status Indicators The power tally and fiber status LEDs at the top of the converter will illuminate different colors depending on the status of the unit When the fiber cable is unplugged no lights are illuminated The status LEDs will illuminate different colors to let you know the status of the unit 1 2 3 5 4 POWER RET 1 1 3 2 RET 2 LIGHT FOCUS R...

Page 151: ...s red to indicate that the camera you are operating is currently on air Constant Green The tally LED illuminates green to indicate that the camera you are operating is currently in preview mode Fiber Constant Red When the SMPTE hybrid fiber optic cable is plugged into the camera fiber converter the fiber LED will turn red to indicate that the handshake process has begun and the converter is in a l...

Page 152: ...y 10 bit video encoding and decoding All other connections such as talkback tally camera control and lens control are also converted to low latency IP so you get incredibly reliable performance The 1G and 10G Ethernet connections on the Camera Fiber Converter and Studio Fiber Converter will be enabled in a future software update Power Specifications The Blackmagic Studio Fiber Converter provides p...
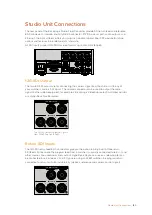
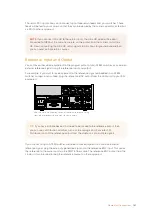
Page 153: ...a This is helpful if you don t have a camera control operator controlling the lens remotely As a studio camera URSA Broadcast still has the ability to record internally so the record button lets you trigger internal recording on the camera Focus Pressing the button marked focus will trigger the autofocus if you are using a lens that supports autofocus Record Pressing the button marked rec will tri...

Page 154: ...rlay will appear for a few seconds to indicate which feed you are monitoring Press the up and down arrow buttons to monitor the return feed sources Rack Mounting the Studio Unit If you re running multiple Blackmagic Studio Fiber Converters you can use Blackmagic Studio Fiber Rack Kit to install your converters into a broadcast rack or road case Using the rack kit you can mount two studio units in ...

Page 155: ...allel with the front panel of the unit 2 Attach the blanking panel to the side of your Studio Fiber Converter near the front using three of the supplied blanking panel screws 3 Use three of the supplied rack ear screws to attach a rack ear to the other side of your Studio Fiber Converter Your converter is now ready to be installed into a rack using the mounting holes on the brackets you have just ...
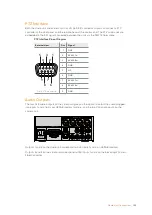
Page 156: ...ories that may be attached to the camera for example Blackmagic URSA Studio Viewfinder However you can also power the Blackmagic Camera FIber Converter via the camera if your camera has its 12V XLR connector plugged into a power supply This is not normally required but is an option if you have your camera positioned further than 2 kilometers away from the studio unit where power may not be as reli...

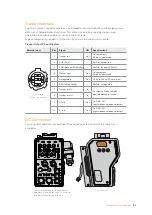
Page 157: ...5 Intercom right Out 11 dBu VR Max 250 Ω Load The corresponding intercom controls are located above each headset connection For more information on how to use the intercom controls refer to the Operating the Blackmagic Camera Fiber Converter section The intercom controls are used to mix Tracker Interface connector talkback audio levels 1 2 3 5 4 POWER RET 1 1 3 2 RET 2 LIGHT FOCUS REC IRIS TALLY F...
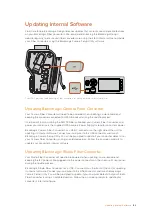
Page 158: ... Unregulated GND for unregulated 7 Tracker talk X In Tracker talk 0 dBu 20 dBu high impedance balanced 10 pin hirose tracker connector 8 Tracker talk Y In 9 G Tally Out On GND Off High impedance open collector 10 R Tally Out On GND Off High impedance open collector DC Connection You can power additional accessories for example an external monitor via the DC out connector The DC out connector lets ...

Page 159: ...erence signal lets you genlock video equipment to a common reference so all equipment share the exact same timing This means all video sources are synced and will switch smoothly ATEM switchers have built in re synchronizers so if you are using all Blackmagic Design equipment then you don t need to worry about connecting a sync reference The reference signal is embedded in the SDI program return f...

Page 160: ...uipment for example a Blackmagic Videohub router SmartView monitor or a HyperDeck Disk Recorder The 12G SDI outputs allow for signals from 720p50 up to 2160p60 Return SDI Inputs The 12G SDI return feed BNC connectors give you the option to plug in up to three return SDI feeds For example the program feed from a switcher is normally connected to return 1 and other sources like a second camera outpu...

Page 161: ...o a common external reference signal plug the externally generated signal into the reference BNC input This sends the reference to the camera unit via the SMPTE fiber cable The reference BNC output from the studio unit can be used to loop the reference source to other equipment NOTE If you connect Ultra HD to the return inputs the Ultra HD video will be down converted to 1080p at the same frame ra...

Page 162: ...3 ENG GND GND for ENG 4 ENG T OUT Engineering channel output 0dBu balanced 5 ENG T OUT 6 PGM IN 20dBu 7 PGM IN 20dBu 8 PGM GND 20dBu 9 GND GND for aux 10 N C 11 Red Tally IN On 5 24Vdc Off 0Vdc 12 Red Tally GND 13 GND Chassis GND 14 PROD R IN Production channel input 0dBu balanced 15 PROD R IN 16 PROD GND 17 PROD T OUT Production channel output 0dBu balanced 18 PROD T OUT 19 N C 20 N C 21 N C 22 N...

Page 163: ...x 9 pin PTZ connector 9 GND Audio Outputs The four XLR audio outputs on the studio unit give you the option to output the audio plugged into inputs 1 and 2 from your URSA Broadcast camera and the two XLR audio inputs on the camera unit Outputs 1 and 2 on the studio unit correspond to XLR inputs 1 and 2 on URSA Broadcast Outputs 3 and 4 on the studio unit correspond to XLR inputs 1 and 2 on the Bla...

Page 164: ...a USB C connector on the right side of the unit for updating its internal software Connect your computer to this USB connector and launch Blackmagic Camera Setup Utility You will be prompted to update if your computer detects that your Camera Fiber Converter is using an outdated version Follow the on screen prompts to update your converter s internal software Updating Blackmagic Studio Fiber Conve...
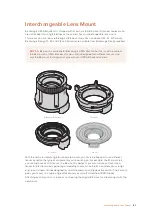
Page 165: ...igh quality stills lenses the B4 mount is perfect if you want to use par focal zoom lenses for electronic news gathering or wedding shoots while the PL mount lets you use high end robust cinema lenses designed for absolute precision and repeatable control The F mount gives you access to a huge range of Nikkon lenses manufactured from 1959 to today Attaching each mount is as simple as unscrewing th...

Page 166: ...to your URSA broadcast The EF mount kit includes 1x EF mount The EF mount lets you attach common EF stills lenses 1 x Shim set The shim set includes the following thicknesses 0 50mm 0 30mm 0 20mm 0 18mm 0 15mm 0 12mm 0 10mm 0 05mm 0 025mm 1x Baffle tool The baffle in the EF mount is not removable however we have included a baffle tool in the EF kit as a spare item you can use if you also have the ...

Page 167: ...ore inserting the EF mount Carefully place the Blackmagic URSA Mini Pro EF mount onto the camera body ensuring the red dot is at the 12 o clock position 3 ND FILTER AUTO W B LENS SDIOUT 12VOUT 4 ND FILTER AUTO W B LENS SDIOUT 12VOUT 1 3 4 2 Loosely turn the four mounting screws until initial contact is made with the shoulder of the lens mount Using the 2mm Hex driver or torque wrench with 2mm Hex ...

Page 168: ...o F Mount attached to your URSA Broadcast you can use F mount lenses Nikon s F mount system stretches back to 1959 and F mount lenses are still made today This means that with the Blackmagic URSA Mini Pro F mount you have access to a huge range of vintage and contemporary lenses Use URSA Mini Pro F mount s iris adjustment ring to smoothly change the aperture of F mount lenses It s worth noting tha...

Page 169: ...nt lets you attach common F stills lenses 1 x Shim set The shim set includes the following thicknesses 0 50mm 0 30mm 0 20mm 0 18mm 0 15mm 0 12mm 0 10mm 0 05mm 0 025mm 4 x 2mm Hex M3 x 18mm mount screws The four M3 x 18mm Hex screws are used in the EF and F mount so it is best to keep the screws together with the respective mount The F mount kit also comes with a full spare sets of screws in case t...

Page 170: ...o the camera body ensuring the white dot is at the 2 o clock position 3 4 1 3 4 2 Loosely turn the four mounting screws until initial contact is made with the shoulder of the lens mount Using the 2mm Hex driver or torque wrench with 2mm Hex key apply one full turn of pressure to mounting screw 1 followed by one full turn to screw 2 and repeat for screw 3 and then 4 Continue to apply one full turn ...

Page 171: ...ntly remove Blackmagic URSA Mini Pro PL Mount Attaching the PL mount to your URSA Broadcast lets you use high end precision cinema lenses and Super 16mm PL lenses for feature film and television production PUSH LENS NOTE Blackmagic URSA Mini Pro F mount features a mechanical iris adjustor To use older style F mount lenses with built in focus rings with this mount your lenses aperture will need to ...

Page 172: ...ool Use the PL baffle tool to tighten the baffle in your camera 5 x 2mm Hex M2 5 x 22mm mount screws The five M2 5 x 22mm Hex screws are exclusive to the PL mount so you can keep the screws together with the respective mount Tools Required When attaching the PL mount you will need a 2mm Hex driver While it s not absolutely required we recommend using a torque wrench able to accurately set a maximu...

Page 173: ...d when the ring is either open or closed Using the 2mm Hex driver or torque wrench with 2mm Hex key apply one full turn of pressure to mounting screw 1 followed by one full turn to screw 2 Repeat for screws 3 and 4 then 5 Continue to apply one full turn to each screw in the sequence above until all screws have reached the maximum torque of 0 45Nm To attach a PL mount lens 1 Open your camera s PL l...

Page 174: ...ry helpful in post production and VFX Knowing the lenses used in production and their precise settings can be helpful in the event that the setup needs to be replicated at a later date This detailed information can also be utilised by powerful applications such as DaVinci Resolve and Blackmagic Fusion for a wide variety of advanced functions For example the recorded metadata can be used to simulat...

Page 175: ...ally on a solid clean bench top to ensure that the mount can be inserted vertically Keeping the original 10mm shim in place gently put the Blackmagic URSA Broadcast B4 mount onto the camera body ensuring the red dot is at the 12 o clock position 3 ND FILTER AUTO W B LENS SDIOUT 12VOUT 4 ND FILTER AUTO W B LENS SDIOUT 12VOUT 1 3 4 5 2 Loosely turn the five mounting screws until initial contact is m...

Page 176: ...rom your local Blackmagic Design reseller A set of shims is also included with all mount kits and are compatible with URSA Broadcast Use shim thicknesses depending on your back focus requirements Blackmagic URSA Mini Pro Shim Kit Your URSA Broadcast camera ships three shims a 0 10 mm plastic shim and 0 10 and 0 50 mm metal shims These shims set the proper focal distance for your URSA Broadcast cam...

Page 177: ...imming process so it s important to keep the filter as clean as possible Be careful not to touch the filter while shimming mounts Remove the screws holding your mount in place using a 2 0mm Hex driver For more information on removing particular mounts see the interchangeable lens mount section in this manual ND FILTER AUTO W B LENS SDIOUT 12VOUT 3 ND FILTER AUTO W B LENS SDIOUT 12VOUT 4 Carefully ...

Page 178: ...a good idea to start with a small shim thickness such as a 0 10mm Place your lens mount onto the camera body tighten screws and remount your lens and check if your lens focus marks are now in alignment with the focal distance If not then continue steps 1 to 6 adjusting shimming a small amount at a time until your lens is hitting hits marks 178 Shimming Lens Mounts ...

Page 179: ... to high capacity and inexpensive solid state drives or SSDs When attaching URSA Mini SSD Recorder you will need the following tools 1 x phillips head screwdriver 1 x T10 torx screwdriver 1 x 2mm hex key driver To attach the URSA Mini SSD Recorder to your URSA Broadcast you will need a large phillips head screwdriver a T10 torx driver and a 2mm hex key driver 179 179 URSA Mini SSD Recorder ...

Page 180: ...to off Unmount any battery plates currently fitted to your camera For more information on mounting and unmounting battery plates see the section mounting batteries in this manual TIP URSA Mini SSD Recorder features a passthrough cable for your camera s battery power supply so you can attach V mount or gold mount batteries to the rear of the camera behind the recorder SD IOUT SD IIN RE FIN TC IN 12...

Page 181: ...anel Attach URSA Mini SSD Recorder to the mounting bracket using 2 x T10 torx screws on the left and right side of the brackets 7 SD IOUT SD IIN RE FIN TC IN 12V 8 Connect the SSD Recorder s SDI In and SDI out cables to the SDI inputs and outputs on the back of your camera The SSD Recorder s cables are marked in and out to help match them to the appropriate connector on your camera If you want to ...

Page 182: ...I indicates URSA Mini SSD Recorder s connection to your camera The LED provides the following indicators Off If the SDI indicator is off URSA Mini SSD Recorder is not receiving power If your camera is powered on and this indicator doesn t light check the molex connection to URSA Mini SSD Recorder Orange URSA Mini SSD Recorder is powered but the SDI connector is not plugged in or plugged in incorre...

Page 183: ...ate process This also means your camera will need to supply consistent power so be sure to plug into external power URSA Mini SSD Recorder has a USB C connector on the underside of the module for updating its internal software Connect your computer to this USB connector and launch Blackmagic Camera Setup Utility You will be prompted to update if your computer detects that your URSA Mini SSD Record...

Page 184: ...ooks using the DaVinci Resolve primary color corrector The ATEM switcher control works by broadcasting camera control packets via all the non down converted SDI outputs of an ATEM switcher So this means you can connect an SDI output of an ATEM switcher to URSA Broadcast s 12G SDI input your camera will detect the control packets in the SDI link and allow you to control features in the camera itsel...

Page 185: ... you can use these buttons to select between which camera you would like to control If you are using an Aux output for monitoring your camera control pushing these buttons to change the camera to control will also send that camera s video output to the Aux output setup in the switcher preferences Click on the settings icon to select the Aux output for camera control Channel Status The channel stat...

Page 186: ...color wheel also has its own reset button Press to restore a setting to its default state or copy paste a setting Locked controllers are not affected by the Paste feature The master reset button on the top right corner of the color corrector panel lets you reset lift gamma and gain color wheels plus Contrast Hue Saturation and Lum Mix settings You can paste color correction settings to camera cont...

Page 187: ...ol illuminates red when its respective camera is on air Zoom Control When using compatible lenses with an electronic zoom feature you can zoom your lens in and out using the zoom control The controller works just like the zoom rocker on a lens with telephoto on one end and wide angle on the other Click on the zoom control located above the coarse slider and drag up to zoom in or drag down to zoom ...

Page 188: ... electronic focus some lenses can be set to manual or auto focus modes and so you need to ensure your lens is set to auto focus mode Sometimes this is set by sliding the focus ring on the lens forward or backward On B4 lenses with servo zoom control you will need to set the switch at the bottom of the handgrip to servo Click on the auto focus button or drag the manual focus adjustment left or righ...

Page 189: ... or increase the shutter speed by hovering your mouse pointer over the shutter speed indicator and clicking the left or right arrow Hovering your mouse pointer over the gain shutter speed and white balance indicators reveal arrows you can click on to adjust their respective settings It s worth mentioning that when your URSA Broadcast is connected to an ATEM switcher the shutter speed setting will ...

Page 190: ...ontrol with extra settings and a full primary color corrector interface You have color wheels and settings such as saturation available and you can see shadows mid tones and highlight settings all at the same time Simply switch between cameras using the camera selection controls at the top of the window as you need Click on the DaVinci Resolve primary color corrector button to expand the color cor...

Page 191: ...Lift gamma and gain color wheels in the color corrector panel Master Wheels Use the master wheels below the color wheels to adjust each YRGB channels lift gamma and gain controls To make adjustments using the master wheel Drag the master wheel left or right Dragging to the left darkens the selected parameter of the image dragging to the right lightens that parameter As you make an adjustment the Y...

Page 192: ...GB processing or YRGB processing High end colorists use YRGB processing because you have more precise control over color and you can independently adjust the channels with better separation and more creative options When the Lum Mix control is set to the right side you have the 100 output of the YRGB color corrector When you have the Lum Mix control set to the left side you get 100 output of the R...

Page 193: ...our production without ever having to leave DaVinci Resolve DaVinci Resolve is the same tool used on most major blockbuster movies so it s much more than a simple NLE software tool as it has extremely advanced technology built in for high end digital film You get the advantage of this technology when you use DaVinci Resolve to edit and color correct your work Included here is information on how to...

Page 194: ...with a media storage browser at the top left The media storage browser displays all your linked media folders from where you ll drag your clips and drop them into the media pool 3 If your clip folder doesn t appear in the library you ll need to add it This is easily done by right clicking inside the media storage browser area selecting a drive or folder path and clicking open 4 In the media storag...

Page 195: ...hortcut 3 Go to the timeline and position the timeline play head where you want your clip to be inserted 4 To insert the clip onto the timeline click inside the source viewer then drag the mouse pointer across to the timeline viewer A list of edit options will appear Select the type of edit you want Your clip will be placed onto the timeline using the edit type you selected You ll find a descripti...

Page 196: ...ing on or off Snapping is a helpful feature to keep your clips held tightly against each other but can be disabled for greater precision when fine tuning edits Press the N key to quickly turn snapping on or off Mapping Keyboard Shortcuts If you are familiar with keyboard shortcuts used in other editing software you can setup DaVinci Resolve to use the same shortcuts You also have the ability to cr...

Page 197: ...e one clip to another in a pleasing way for example dissolves wipes dips to color and more These can add a layer of excitement to your edit Transitions don t always have to be joining two clips for example you can apply a dissolve transition to the end of one clip to create a quick and easy fade to black The transitions palette contains many types of transition effects 197 Using DaVinci Resolve ...

Page 198: ...lip Hover your mouse pointer over the start or end of the transition until the transition trim icon appears then drag it left or right Simply drag and drop transitions between adjoining clips Adding Titles You can place a title on any video track just as you would a clip If you run out of tracks you can easily add new ones by right clicking next to an existing track name and selecting add track To...

Page 199: ...s being able to move between the edit and color page to make fine adjustments and discover new creative choices With the color page you get absolute control over the look of your clips First click on the color tab to open the color page You ll see the color wheels curves palettes and general color correction tools as well as the preview and nodes window Don t feel overwhelmed by the vast array of ...

Page 200: ...with your images and a little practice The parade scope helps you optimize highlights mid tones and shadows The lift gamma gain and offset color wheels give you total control over the color and tonal balance of your clips To make a uniform adjustment to all colors for each tonal region drag the dial underneath the color wheels back and forth Another way to color grade is to use the built in scopes...

Page 201: ...hown on the top section of the waveform on the parade scope For a brightly lit shot these are best positioned just below the top line of the waveform scope If the highlights rise above the top line of the waveform scope they will clip and you will lose details in the brightest regions of your image 3 Adjusting the gamma Click on the gamma dial underneath the color wheel and slide it back and forth...

Page 202: ...audience s attention on it You can easily do this by using the HSL qualifier tool Using the HSL qualifier to select colors in your image is helpful when you want to make areas of your image pop to add contrast or to help draw the audience s attention to certain areas of your shot To qualify a color 1 Add a new serial node 2 Open the qualifier palette and make sure the color range sample eyedropper...

Page 203: ...y making corrections like this you can influence the audience s attention on areas you want them to look at To add a power window to your clip 1 Add a new serial node 2 Open the window palette and select a window shape by clicking on a shape icon Your selected window shape will appear on the node 3 Resize the shape by clicking and dragging the blue points around the shape The pink points adjust th...

Page 204: ...f the checkboxes DaVinci Resolve will now apply a cluster of tracking points on your clip and then step through the frames to analyze the movement When the tracking is done your power window will follow the path of the movement in your clip Most of the time automatic tracking is successful but scenes can be complex and sometimes an object can pass in front of your selected area interrupting or aff...

Page 205: ...If you are working in the edit page and want to mix a basic sound edit with lots of sound effects and music you can easily add more audio tracks when you need them This can be helpful when building your sound and separating your audio elements into individual tracks for example dialogue sound effects and music To Add an Audio Track to the Edit Page 1 Right click next to the name of any audio track...

Page 206: ...rovides details on the purpose of each tool and describes how to use them in easy to follow steps The Audio Timeline Track Header At the left of each track is a header area that displays the track number track name track color audio channels fader value and audio meters The track header also contains different controls for locking and unlocking tracks plus solo and muting controls These controls c...

Page 207: ...g in that category can be mixed as a single audio signal For example if you have five dialogue tracks you can route the output of all five dialogue tracks to a submix bus and the level of all dialogue can then be mixed with a single set of controls This submix can be rendered separately or sent to the main bus for render The Mixer Each audio track in your timeline corresponds to an individual chan...

Page 208: ... in the inspector panel and each track has a 6 band parametric equalizer in the mixer panel The graphical and numeric controls for boosting or attenuating different ranges of frequencies and different filter types allow you to define the shape of the EQ curve The four band equalizer can be applied to every clip in the timeline Outer bands let you make band filter adjustments using hi shelf lo shel...

Page 209: ...t the low end and every frequency below it Hi Shelf High shelf filters boost or cut the target frequency at the high end and every frequency above it To add EQ to an individual clip 1 Select the clip in the timeline that you want to add the EQ filter to 2 Click on the inspector and then click the clip equalizer enable button To add EQ to a track 1 Double click in the EQ section for one of your tra...

Page 210: ...xed your audio you ll want to export a render of your edit in the deliver page This page lets you select the range of clips you want to export plus the format codec and resolution you want You can export in many types of formats such as QuickTime AVI MXF and DPX using codecs such as 8 bit or 10 bit uncompressed RGB YUV ProRes DNxHD H 264 and more The deliver page is where you export your edit You ...

Page 211: ...hooting RAW is that you re not tied to these settings at all The breadth of available post processing options when working with RAW files mean that you ll develop your own workflow over time Experimenting with the clip RAW settings for each clip will show you just how powerful and flexible working with RAW can be RAW clips give you maximum flexibility in post production While ProRes and DNx files ...

Page 212: ...e clips to use the project RAW settings and make global changes from there To set project RAW settings 1 Enter the project settings menu by clicking file and selecting project settings 2 In the Camera RAW tab you ll see a small arrow in the top right corner with one of several RAW formats next to it This should be set to CinemaDNG When you first drop a RAW clip shot on your URSA Broadcast into a n...

Page 213: ...that it s not possible to adjust URSA Broadcast s clip gain after filming You ll notice that the ISO box in DaVinci Resolve s clip RAW settings will display the equivalent ISO to your camera s gain setting for the clip but this value will be greyed out and you will not be able to change it Due to the wide dynamic range of RAW footage however you can still make changes that are functionally equival...

Page 214: ...installer for when updating to later versions of Blackmagic Camera Setup Updating Camera Software Windows After downloading the Blackmagic Camera Setup utility software and unzipping the downloaded file you should see a Blackmagic Camera Setup folder containing this PDF manual and the Blackmagic Camera Setup Installer Double click the installer and follow the on screen prompts to complete the inst...

Page 215: ...ort Launch the Blackmagic Camera Setup utility and follow any on screen prompt to update the camera software The USB C port is used to update the camera software and can be found above the memory card slots next to the media selection switch on Blackmagic URSA Broadcast ISO GAIN SHUTTER WHITE BAL XLR1 ON OFF XLR2 SD CFAST USB MIC LINE AES OFF 48V POWER FOCUS PEAK PGM MENU REC WHITE BAL XLR1 ON OFF...

Page 216: ...nto your desktop or another hard drive or you can access the files straight from the CFast card using your editing software CinemaDNG RAW files are saved to the CFast card as separate DNG images for each frame This is an open format and you can use many software applications to view your RAW images as a video sequence 4 Before you unplug the card from your computer it s always a good idea to eject...

Page 217: ...settings to 1080p HD 1920x1080 and 25p 4 Set your audio and render properties settings to stereo 48kHz and Apple ProRes 422 HQ 5 Click OK To import your clips into your project go to the menu bar and select file import media Choose your clips from your media card You can now drag your clips onto the timeline for editing Using Avid Media Composer To edit your DNxHD clips using Avid Media Composer 8...

Page 218: ...lips using Adobe Premiere Pro CC you need to create a new project and set a suitable video format and frame rate For this example clips are set using ProRes 422 HQ 1080p25 Setting the project name and project options in Adobe Premiere Pro CC 2014 1 Launch Adobe Premiere Pro CC In the welcome window select create new new project A window will open containing project settings 2 Name your project Cho...

Page 219: ... is set to 10 bit and frame type is progressive 5 From the config template dropdown menu select 1920x1080 25000p cfg 6 Leave the preferred format set to ProRes 422 HQ and click create 7 Click on the new button under the user heading 8 When the create new user profile window opens type your user name and click create 9 When the project and user settings window reopens click the start button 10 From...

Page 220: ...l document Bit fields are packed from LSB first Message groups individual messages and command headers are defined as and can be assumed to be 32 bit aligned Blanking Encoding A message group is encoded into a SMPTE 291M packet with DID SDID x51 x53 in the active region of VANC line 16 Message Grouping Up to 32 messages may be concatenated and transmitted in one blanking packet up to a maximum of ...

Page 221: ...eter number specifies one of 256 potential configuration parameters available on the device Parameters 0 through 127 are device specific parameters Parameters 128 though 255 are reserved for parameters that apply to multiple types of devices Data type uint8 The data type specifies the type of the remaining data The packet length is used to determine the number of elements in the message Each messa...

Page 222: ...128 through 255 are available for device specific purposes Data void The data field is 0 or more bytes as determined by the data type and number of elements The category parameter data type and operation type partition a 24 bit operation space Group ID Parameter Type Index Minimum Maximum Interpretation Lens 0 0 Focus fixed16 0 1 0 0 near 1 0 far 0 1 Instantaneous autofocus void trigger instantane...

Page 223: ...nge Mode int8 enum 0 2 0 film 1 video 2 extended video 1 8 Video sharpening level int8 enum 0 3 0 off 1 low 2 medium 3 high 1 9 Recording format int16 0 file frame rate fps as integer eg 24 25 30 50 60 120 1 sensor frame rate fps as integer valid when sensor off speed set eg 24 25 30 33 48 50 60 120 no change will be performed if this value is set to 0 2 frame width in pixels 3 frame height in pix...

Page 224: ...V 1 4 3 2 2 4 1 3 2 39 1 4 2 35 1 5 1 85 1 6 thirds 3 2 Frame guides opacity Camera 3 x fixed16 1 frame guide opacity 0 1 1 0 0 transparent 1 0 opaque 3 3 Overlays replaces 1 and 2 above from Cameras 4 0 int8 0 frame guides style 0 off 1 2 4 1 2 2 39 1 3 2 35 1 4 1 85 1 5 16 9 6 14 9 7 4 3 1 frame guide opacity 0 100 0 transparent 100 opaque 2 safe area percentage 0 100 percentage of full frame us...

Page 225: ...e _ _ BCD s0DDdddddddddddd where s is the sign 0 north 1 south DD degrees dddddddddddd decimal degrees 1 longitude _ _ BCD sDDDdddddddddddd where s is the sign 0 west 1 east DDD degrees dddddddddddd decimal degrees Color Correction 8 0 Lift Adjust fixed16 0 red 2 2 default 0 0 1 green 2 2 default 0 0 2 blue 2 2 default 0 0 3 luma 2 2 default 0 0 8 1 Gamma Adjust fixed16 0 red 4 4 default 0 0 1 gre...

Page 226: ...ltiple speeds backwards 0 pause ve multiple speeds forwards 2 flags 1 0 loop 1 1 play all 1 5 disk1 active 1 6 disk2 active 1 7 time lapse recording 3 active storage medium 0 CFast card 1 SD PTZ Control 11 0 Pan Tilt Velocity fixed 16 0 pan velocity 1 0 1 0 1 0 full speed left 1 0 full speed right 1 tilt velocity 1 0 1 0 1 0 full speed down 1 0 full speed up 11 1 Memory Preset int8 enum 0 preset c...

Page 227: ...02710 12 4 8 0 0 1 5 3 0 0x10 0x27 0x00 0x00 add 15 to zebra level 15 0 15 f 0x0133 fp 12 4 6 0 0 4 2 128 1 0x33 0x01 0 0 select 1080p 23 98 mode on all cameras 16 255 9 0 0 1 0 1 0 24 1 3 0 0 0 0 0 subtract 0 3 from gamma adjust for green blue 0 3 0xfd9a fp 16 4 12 0 0 8 1 128 1 0 0 0x9a 0xfd 0x9a 0xfd 0 0 all operations combined 76 4 4 0 0 0 1 0 0 255 5 0 0 0 6 0 0 1 0 0 0 4 8 0 0 1 5 3 0 0x10 0...

Page 228: ... Any data alignment padding is explicit in the protocol Bit fields are packed from LSB first Blanking Encoding One tally control packet may be sent per video frame Packets are encoded as a SMPTE 291M packet with DID SDID x51 x52 in the active region of VANC line 15 A tally control packet may contain up to 256 bytes of tally information Packet Format Each tally status consists of 4 bits of informat...

Page 229: ...e 7 MSB 6 5 4 3 2 1 0 LSB 0 Version 0b0 Version 0b0 Version 0b0 Version 0b0 Reserved 0b0 Reserved 0b0 Monitor Preview Monitor Program 1 Reserved 0b0 Reserved 0b0 Slave 1 Preview Slave 1 Program Reserved 0b0 Reserved 0b0 Slave 0 Preview Slave 0 Program 2 Reserved 0b0 Reserved 0b0 Slave 3 Preview Slave 3 Program Reserved 0b0 Reserved 0b0 Slave 2 Preview Slave 2 Program 3 Master Device Monitor Device...

Page 230: ...talled To check which version of Blackmagic Camera Utility software is installed on your computer open the About Blackmagic Camera Utility window On Mac OS open Blackmagic Camera Utility from the Applications folder Select About Blackmagic Camera Utility from the application menu to reveal the version number On Windows open Blackmagic Camera Utility from your Start menu or Start Screen Click on th...

Page 231: ... if not installed and used in accordance with the instructions may cause harmful interference to radio communications Operation of this product in a residential area is likely to cause harmful interference in which case the user will be required to correct the interference at personal expense Operation is subject to the following two conditions 1 This device may not cause harmful interference 2 Th...

Page 232: ... the effect of such a modification or integration increases the time or difficulty of servicing the product Exposing URSA Viewfinder to direct sunlight could damage the viewfinder display as the viewfinder optics act as a magnifying glass Image retention or burn in could happen on OLED panels when static or high contrast images such as frame guides are displayed on the panels for extended periods ...

Reviews: