CB-9A-040 page 18
MAINTENANCE
SEAL (PACKING) REPLACEMENT
1.
Refer to the "Compressor Disassembly" section to remove the packing boxes.
2.
Remove the upper and lower retainer ring from the packing box being serviced. Disassemble the packing
box and discard the old packing sets and packing springs.
NOTE:
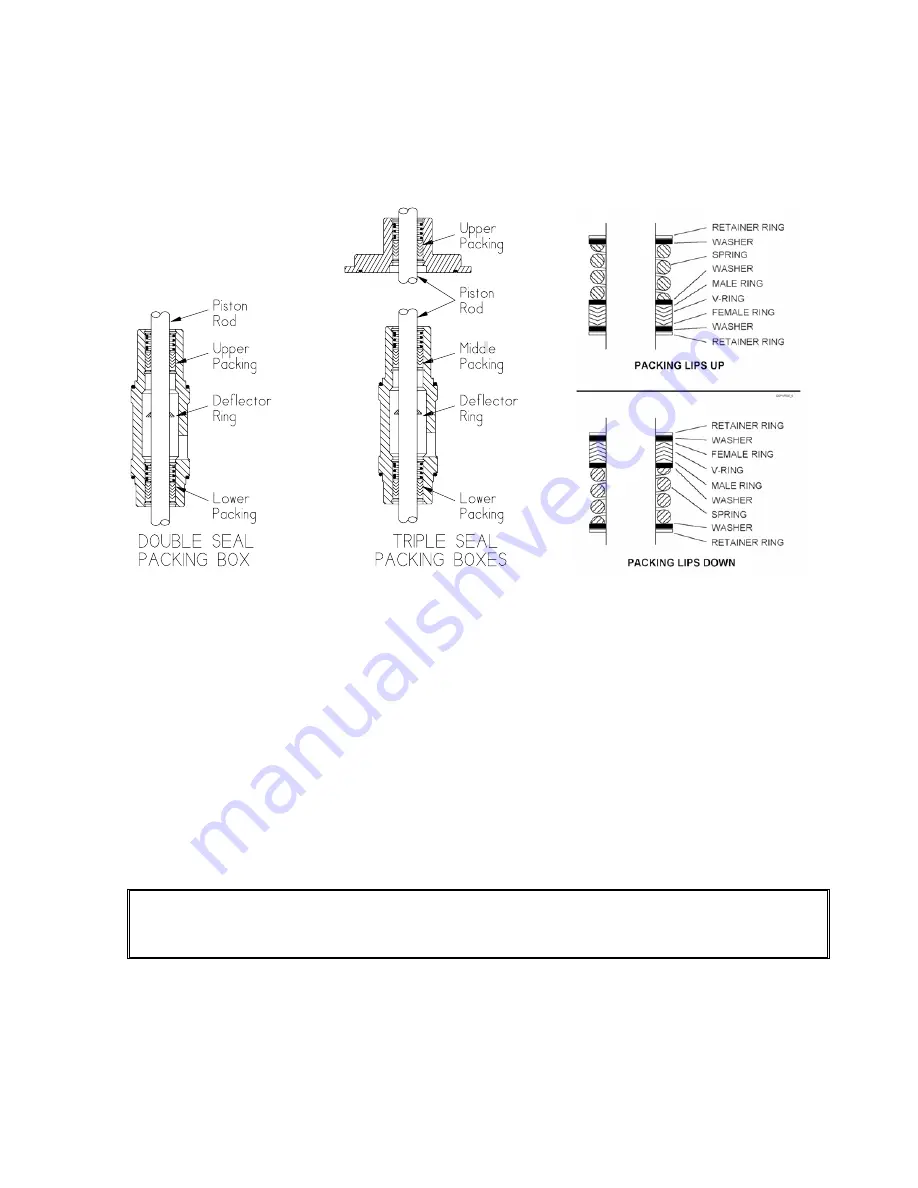
Before reassembling the packing boxes, refer back to "Seal Arrangements". The 6
th
digit of the
Compressor ID# identifies the packing orientation.
3.
Packing boxes may contain either one or two sets of packing, depending on the compressor being
serviced. To reassemble a packing box:
a.
Clean the packing box in a suitable solvent. Inspect the bore for wear, roughness, or corrosion.
b.
Install the first retainer ring (start with the inner ring on two seal packing boxes). See "Seal
Arrangements" for the proper location and orientation of the packing components, then install the packing
rings, spring, washers, and the second retainer ring. Note: To ease installation on the second retainer
ring, use a screwdriver handle and press on the last washer to compress the seal spring slightly.
c.
Two seal packing boxes only
Insert the oil deflector ring through the top of the packing box, flat side down, into the cavity between
the upper and lower packing. NOTE: The oil deflector ring will be positioned between the two sets of
packing. Install the second set of packing per step b.
4.
The lower packing must be manually lubricated with oil several times during the first 60 minutes of
compressor operation. This will prevent overheating of the piston rods and potential damage to the
packing material.
WARNING!
DO NOT INSERT OBJECTS OR FINGERS INTO INSPECTION CAVITY
WHILE COMPRESSOR IS OPERATING.
To lubricate the packing:
Remove the inspection plate from the crosshead guide.
Stop
the compressor frequently (approximately every 5 minutes) to allow adequate cooling of the
piston rods.
Lubricate the piston rods each time the compressor is
stopped
. A small oil can should be used for
lubrication.
5.
Reassemble the compressor per the "Compressor Assembly" section.
Summary of Contents for HD172A
Page 23: ...CB 9A 040 page 23 NOTES...


