7
EN
Binding for “X” and “
+
” Flight Configurations
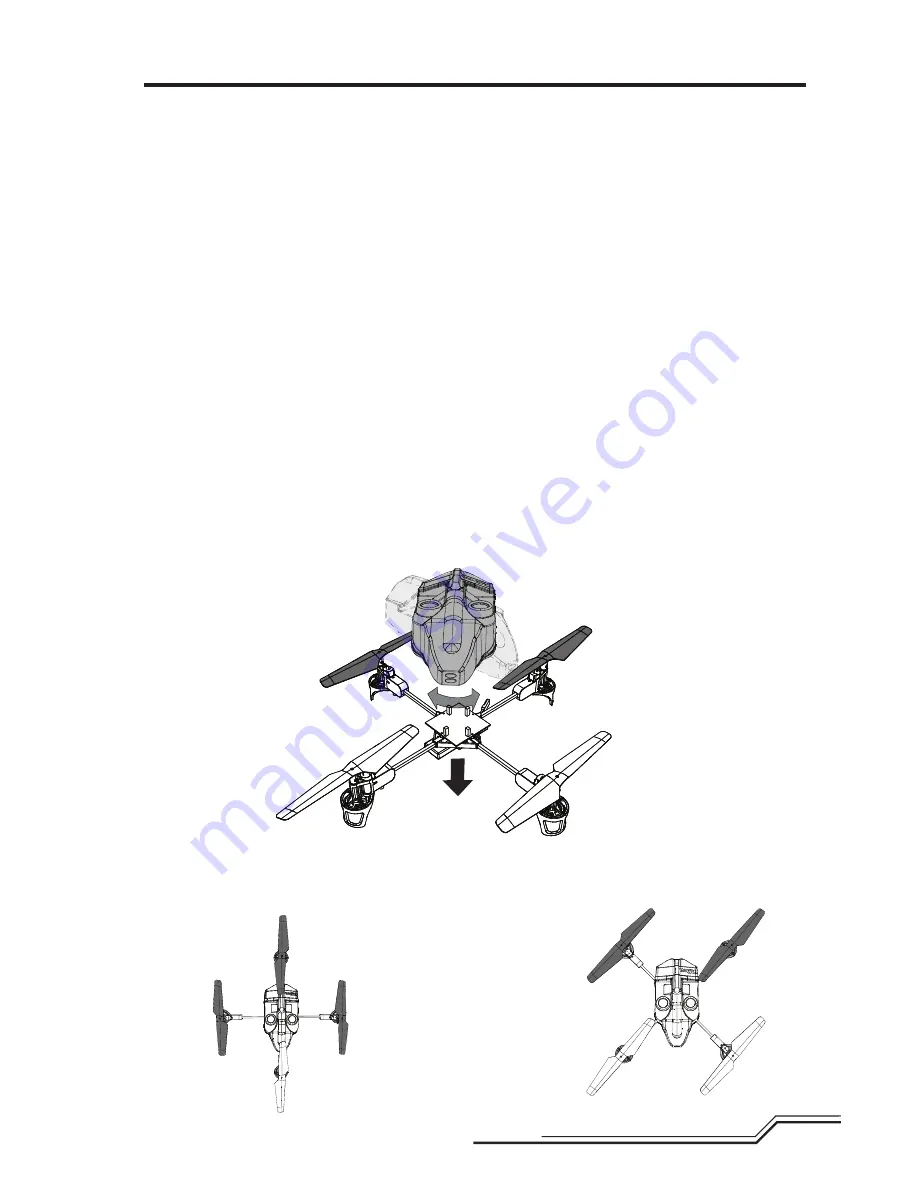
Your mQX comes out of the box in “X” configuration. It is also capable of being flown in “+” configuration, if that is
your preference. To fly the mQX in “+” configuration:
1. Remove the Quad-Copter canopy
2. Turn the canopy counterclockwise 45 degrees (refer to the arrows on the circuit board)
3. Reinstall the canopy on the mounting frame.
The LED status will indicate which mode your Quad-Copter is in. When the LED on the 4-in-1 Control unit is solid, it
is in “X” configuration. If it is blinking rapidly ”(three quick blinks, a short pause and then three more quick blinks,
etc.)”, it is in “+” configuration.
Switching from “X” to “+” requires an extra step during the binding procedure. Failure to follow the additional steps
below will simply leave the mQX in “X” configuration.
“X” Flight
Configuration:
Bind your mQX according to the instructions given in the binding section. Immediately after enter-
ing Bind Mode, move the rudder stick fully to the left and hold it there until the Binding process is
complete. This will set the 4-in-1 control unit’s flight mode to “X” configuration. You may find “X”
configuration to be slightly more responsive in flight due to the orientation of the rotors.
“+” Flight
Configuration:
Bind your mQX according to the instructions given above. Immediately after entering Bind Mode,
move the rudder stick fully to the right and hold it there until the Binding process is complete. This
will set the 4-in-1 control unit’s flight mode to “+” configuration.
Attention:
If binding is not performed correctly, the mQX will fly in the last mode it was in before the attempted
bind.
Important:
Some transmitters will not go into bind mode when rudder is held during power-up. In this situation,
make sure you release the bind button before holding the rudder stick.
Front
(X-Mode)
“X” Flight
Configuration
“+” Flight
Configuration
TIP:
To determine the front of your Quad-Copter during flight, change the propellers as needed, according to
illustrations below. Use the white-colored propeller to indicate the front of the “+” and “X” configurations. Install
the black-colored propellers at the other propeller locations.
Summary of Contents for mQX
Page 1: ...RTF READY TO FLY mQX ...
Page 67: ......


