background image

INSTRUCTIONS FOR USE

• Any programming described below is activ

a

ted after approximately 4 seconds from the pre-

setting.

• 23 hrs and 59 minutes is the maximum programmed time. Any and all programmed  settings

are erased when there is a power cut or supply failure. When power is restored the display fla-
shes and shows 0.00. To reset the programmer set both the actual time and the programme 
again.

Automatic Operation

The oven can be programmed to switch on and off automatically.

To do this proceed as follows:

1. Select the required cooking function and temperature using the function selector and the ther-

mostat dial.

2. Press key (2) and set the cooking time by pressing keys (-) and (+) within the next 4 seconds
3. Press key (3) and set the end of the cooking time in the same way.

The actual time reappears and pilot light (AUTO) remains ON, when the cooking process
starts, pilot light (A) will remain on. The cooking time left can be controlled by pressing key
(2), or the time can be changed by repeating the same procedure.
Reset the cooking time to 0.00 to erase the preset programme, and when the actual time
reappears, press key (4) to reset the manual function. Once the cooking process is over
the acoustic signal goes off and the oven automatically switched off. Pres

s

 one of the keys

from (1) to (4) to return the programmer to the manual function.

Semi-automatic Operation

  (Setting the end of cooking time)

The oven can be programmed to switch off automatically.

To do this proceed as follows:

1. Select the required function and temperature using the cooking function selector and 

the thermostat dial.

2. Press key (2) and set the cooking time by pressing keys (-) and (+) within the next 4

seconds. The actual time reappears and pilot lights (A) and (AUTO) remain ON. 

The cooking time left can be checked by pressing key (2), or the time can be changed by
repeating the same procedure.

To erase the pre-set programme, reset the cooking time to 0.00, when the actual time
reappears, press key (4) to reset to manual function.

Once the cooking programme is complete, the acoustic signal will sound and the oven is
automatically switched off. Press one of the keys from (1) to (4) to switch off the acoustic
signal. Press key (4) to return the programmer to the manual function.

141 blanco  17-02-2004 10:55  Pagina 9

13

Summary of Contents for BOSE752

Page 1: ...MULTIFUNCTIONAL OVEN BOSE752 141 blanco 17 02 2004 10 55 Pagina 1 Instructions for the Use and Care and Installation of ...

Page 2: ... perfectly with your kitchen décor It is easy to use and performs to a high standard Blanco also makes a range of products that will enhance your kitchen such as cooktops rangehoods dishwashers microwaves sinks and taps There are models to comple ment your new Blanco oven Blanco now also has a premium range of laundry products Of course we make every effort to ensure that our products meet all you...

Page 3: ...s in the vicinity of the appliance when it is in operation Do not store flammable materials in or under the appliance eg aerosols Always turn the grill off immediately after use as fat left there may catch fire Do not cover the insert with foil as fat left there may catch fire Always keep the grill dish clean as any fat left there may catch fire Do not leave the grill on unattended To avoid a fire...

Page 4: ...your oven for the first time leave it empty and with the door closed turn it on to maximum temperature and let it heat up for 15 minutes During this time there may be some smell from the mineral wool that insulates the oven and there could be some smoke This is perfectly normal Normal use Always close the door properly The oven is fitted with a seal designed to work with a closed door Always ensur...

Page 5: ...flexible cord and plug which must be connected to a correctly earthed socket outlet The manufacturer is not liable for any direct or indirect damage caused by faulty installation or connection It is therefore necessary that all installation and connection operations are carried out by qualified personnel complying with the local and gene ral regulations in force 141 blanco 17 02 2004 10 55 Pagina ...

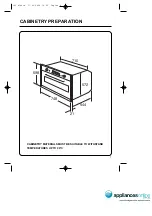
Page 6: ...CABINETRY PREPARATION 544 710 748 598 21 572 CABINETRY MATERIALS MUST BE SUITABLE TO WITHSTAND TEMPERATURES UP TO 90 C 141 blanco 17 02 2004 10 55 Pagina 4 7 ...

Page 7: ... cooking to ensure optimum performance from the oven DO NOT PLACE ALUMINIUM FOIL OR METAL OBJECTS ON THE BASE OF THE OVEN DURING COOKING Foil or dishes must never be placed on the base of the oven during cooking as the con centration of the direct and reflected heat will damage the enamel surface Provisions of the warranty do not cover damage resulting from such use NO YES 141 blanco 17 02 2004 10...

Page 8: ...ch before the appliance with minimum opening between contacts of 3 mm the grounding wire should not be interrupted by the switch Before connecting to the mains make sure that The electrical counter the fuse the feeding line and the socket are adequate to withstand the maximum load required see rating plate The supply system is regularly grounded according to the regula tions in force The socket or...

Page 9: ...lation around the oven thus granting its good operation and avoiding damages to the furnitu re Pay attention to fix the oven in an absolutely firm way as above indicated Once the electrical connection has been carried out apply voltage to the oven only after installing it Before using the oven we suggest to remove the special film covering the oven door glass when provided heat the empty oven at m...

Page 10: ...the thermostat controls allow you to select the various cooking temperatures most suitable for the products to be cooked The oven door must be closed The circular heating element and fan come into operation and the heat is spread evenly to all shelf positions Various types of food can be cooked on different shelves naturally with the appropriate cooking times The oven must be preheated before the ...

Page 11: ...s General operation Automatic programme Minute minder Setting the Timer Once the electronic connection is complete and power is applied the display blinks and shows 0 00 To set the time of day Press keys 1 and 2 at the same and set the actual time by pressing keys and within 4 seconds The oven remains in manual operation and can be used without any programming Important Information Between 22 00 h...

Page 12: ...o 0 00 to erase the preset programme and when the actual time reappears press key 4 to reset the manual function Once the cooking process is over the acoustic signal goes off and the oven automatically switched off Press one of the keys from 1 to 4 to return the programmer to the manual function Semi automatic Operation Setting the end of cooking time The oven can be programmed to switch off autom...

Page 13: ...s 1 2 at same time for about 10 seconds the display shows OF release the switches press switch the display shows ON Now the safety lock is deactivated and after about 5 seconds the display shows the cur rent time PILOT LIGHT FOR THE THERMOSTAT It comes on any time the thermostat settles the cooking temperature inside the oven and it is switched off when the oven reaches the preset temperature PILO...

Page 14: ...on General Advice It is necessary to pre heat the oven to the preset cooking temperature Only very fat meat can be placed into a cold oven To minimise food splashes into the oven which can sometimes produce smoke deep baking dishes are recommended The oven offers various kinds of heating Traditional heating for the cooking of special roasts that require slow cooking Fan forced for cooking cakes bi...

Page 15: ...inutes to the times shown in the table The times indicated in the table refer to the cooking of one product only for more than one product the cooking times should be increased by 5 10 minutes 141 blanco 17 02 2004 10 55 Pagina 13 Installing the Filter Mount the filter leaning it against the rear wall at the same level of the fan then push the filter downwards Reverse this operation to remove the ...

Page 16: ...00 70 90 Lamb 2 2 3 4 180 200 85 100 Bread and pizza Pizza 2 2 3 200 230 15 25 Muffins 2 2 3 4 175 20 30 Bread 3 2 3 4 180 200 40 50 Bakes Vegetable bake 2 2 3 175 185 30 40 The table below provides indicative shelf positions for use with your oven Please note the temperature and cooking times are indicative only According to different cooking habits it may be necessary to make further modificatio...

Page 17: ...e it is neces sary to clean the oven after each use Once the oven is cold you will be able to easily remove the fat deposits by means of a sponge or a cloth damp with warm soapy water and eventually a detergent to be found on the market Never use abrasive cloths or spon ges that could irreparably damage the enamel On white ovens even the parts of the control panel such as handgrip and knob have to...

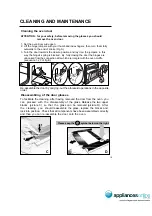
Page 18: ...le the door by carrying out the aforesaid operations in the opposite order C D Please keep the OK symbol below on the right O K To facilitate the cleaning after having removed the door from the oven you can proceed with the disassembly of the glass Release the two upper blocks picture C so that the glass can be removed picture D After the cleaning you should reassemble the glass replace the blocks...

Page 19: ...will collect on the catalytic liner After cooking a dish with high fat content or when you can see grease spots on the liners it is recommended that you Remove baking dishes and oven racks Wipe out the bottom of the oven and clean the door Turn oven to 220 C for approximately 20 minutes When oven is cool wipe out bottom of the oven Manual cleaning of the catalytic liner is not recommended Damage w...

Page 20: ...15 amp plug ...

Page 21: ......

Page 22: ......

Reviews: