background image


GUIDE  TO  INSTALLATION


SteamOven


BOSS382X


Summary of Contents for BOSS382X

Page 1: ...GUIDE TO INSTALLATION SteamOven BOSS382X...

Page 2: ...d cor It is easy to use and performs to a high standard Blanco also makes a range of products that will enhance your kitchen such as cooktops rangehoods dishwashers and microwaves sinks and taps Ther...

Page 3: ...ng and adjusting the time 17 Locking the control panel 18 Immediate steaming 19 Defrosting 20 Advice 21 Water management 22 Programmed cooking 23 Timer function 24 5 DESCRIPTION OF FUNCTIONS AND COOKI...

Page 4: ...them There is no need to add salt before cooking or even any cooking water To give meat a better appearance brown it first all over in hot butter in the frying pan Compared with boiling steaming only...

Page 5: ...even keeping warm especially sauces First of all put poultry veal pork etc in the frying pan with very little fat to give them an appetising golden appearance Then finish cooking them by steaming Cut...

Page 6: ...r mental capabilities or lack of experience and knowledge unless they have been given supervised instruction concerning use of the appliance by a responsible person for their safety Children must be s...

Page 7: ...ng your oven make sure that all the controls are in their stop position Maintenance and cleaning Do not use a steam cleaner For any cleaning operation inside the oven cavity the oven must be switched...

Page 8: ...re cooking Fit the tank in its housing by pressing it in AS FAR AS IT WILL GO until you feel it RUN OVER A NOTCH Warning The appliance becomes hot during cooking Hot steam escapes when you open the do...

Page 9: ...rity containers provided for this purpose Your appliance also contains many recyclable materials It is therefore marked with this logo to indicate that used appliances must not be mixed with other was...

Page 10: ...air circulation that allows it to achieve remarkable cooking and cleaning results if the following guidelines are followed Centre the oven in the unit so as to ensure a minimum distance of 10 mm betwe...

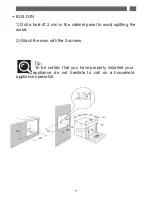
Page 11: ...N 1 Drill a hole 2 mm in the cabinet panel to avoid splitting the wood 2 Attach the oven with the 2 screws Tip To be certain that you have properly installed your appliance do not hesitate to call on...

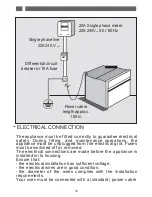
Page 12: ...ty During fitting and maintenance operations the appliance must be unplugged from the electrical grid Fuses must be switched off or removed The electrical connections are made before the appliance is...

Page 13: ...ce or remove the fuse corresponding to the sector where the oven is hooked up The safety wire green yellow is connected to the appliance s terminal and must be connected to the earth terminal of the e...

Page 14: ...NTIC STEAMING your oven comes with a set of dishes specially designed for perfect steaming Warning You MUST fill the water tank to the maximum level before cooking Fit the tank in its housing by press...

Page 15: ...To use the second set of cooking dishes 1 Clip the High level grid onto the grill 2 Place the first set of cooking dishes onto the grill 3 Place the second set of cooking dishes onto the High level gr...

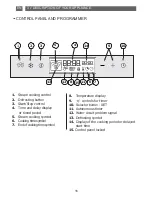
Page 16: ...tart Stop control 4 Time and delay display or timed period 5 Steam cooking symbol 6 Cooking time symbol 7 End of cooking time symbol 8 Temperature display 9 controls for timer 10 Selector button SET 1...

Page 17: ...alidate with SET Changing the time 1 The time is displayed Press on the and buttons simultaneously until the time starts to Validate with SET flash Adjust the time using the and button If the time set...

Page 18: ...ctivated when you are not using timed or delayed cooking features Hold down the START STOP button for a few seconds A beep sounds and a padlock appears on the screen From this moment no button is live...

Page 19: ...ggested Adjust the cooking time as necessary minimum 5 min and maximum 60 min by pressing on and button Confirm selection with the START button The symbol comes on When the temperature is reached 100...

Page 20: ...You can stop the cooking at all times by pressing on START STOP hold the button down for about 1 second If the steam production has not yet started about 1 minute the oven will stop immediately and th...

Page 21: ...ming golden brown For large pieces roasts etc proceed in steps by turning the piece over several times and adjust the time accordingly REHEATING You can reheat a cooked dish in your steam oven The dis...

Page 22: ...s related to the water circuit during cooking the no water symbol appears and a beep sounds This fault is specifically related to an empty tank a wrongly fitted tank After checking these two points th...

Page 23: ...ith the SET button The time and the end of cooking time symbol display and flash The adjustment of the end of cooking time is now possible Press the or buttons For example 12h00 Confirm selection with...

Page 24: ...time 1 2 Hold the SET button down for a few seconds 00m00s and the timer symbol flash Adjust to the period required maximum 59 minutes and 50 seconds using the and buttons After a few seconds the tim...

Page 25: ...liced fresh stir during cooking frozen trunk removed and cut in 2 lengthwise cut in 2 diced cut in 2 sliced whole These times depend on the nature thickness and freshness of the vegetables Follow the...

Page 26: ...her aromati herb At the end of cooking remove the skin which will come away very easily MEAT Beef Pork medallions Poultry white Paupiettes Sausages Puddings 15 to 30 min 25 min 20 to 25 min 25 min 20...

Page 27: ...e door slightly open CLEANING THE WATER SUPPLY PIPE ONCE A MONTH Remove the water supply pipe by unscrewing it Remove any lime scale deposit that there may be inside the pipe using a fine sharp object...

Page 28: ...Water or steam leaking through the door during cooking The door is not closed properly The door seal is faulty Call the After Sales Service The light in your oven no longer works The light is not work...

Page 29: ...ier to remove CHANGING THE BULB The bulb is located inside the oven on the back wall Disconnect your oven from the mains before any intervention on the bulb to avoid any electric shock Turn the viewin...

Page 30: ...agent for the brand appliances When making an appointment state the full reference of your equipment model type and serial number This information appears on the manufacturer s nameplate ORIGINAL PAR...

Reviews: