background image

12

Any electrical work required to install this appliance
should be carried out by a qualified electrician or
competent person.

Any plumbing work required to install this appliance
should be carried out by a qualified plumber or competent
person.

Remove all packaging before positioning the machine.

If possible, position the machine next to a water tap and a
drain.

Water supply connections 

This dishwasher may be fed with either hot (max. 60°C) or cold
water.

Nevertheless we advise a cold water supply.

A hot water supply is not always efficient with very soiled
crockery as it shortens the washing programmes.

Feeding the appliance with a hot water supply (max. 60°C) will
allow you to obtain considerably shorter programmes.

The water pressure must be within the limits given in the
technical specifications. 

Your local Water Authority will advise you on the average
mains pressure in your area. 

The dishwasher features fill and drain hoses which can be
turned either to the left or the right to suit the installation. 

Do not use, for connection, old hoses which have been
used in another appliance.

The locknut must be correctly fitted to avoid water leaks. 

Avoid bends or kinks in the hose which could prevent or slow
down the water supply. 

If the machine is connected to new pipes or pipes which have
not been used for a long time, you should run the water for a
few minutes before connecting the inlet hose. This will prevent
deposits of sand or rust clogging the inlet hose filter. 

Be sure to incorporate the
filter (A) supplied with the
machine onto the joint.

For making the connection
itself, the coupling nut fitted
to the machine’s supply hose
is designed to screw onto
either a 3/4" inch gas thread
spout, or to a purpose made
quick-coupling tap such as
the Press-block.

Water outlet hose connection

The end of the drain hose can be connected in the following
ways: 

1. To the sink outlet siphon, securing it if necessary with a 

clamp. 

2. To a stand pipe provided with vent-hole, minimum internal 

diameter 4 cm. 

The waste connection must be at a height of between 30 cm
(minimum) and 100 cm (maximum) from the bottom of the
dishwasher. 

The drain hose can face either to the right or left of the
dishwasher 

Ensure the hose is not bent or squashed as this could prevent
or slow down the discharge of water. 

If you use a drain hose extension it must be no longer than 2
metres and its internal diameter must be no smaller than the
diameter of the hose provided. 

Likewise the internal diameter of the couplings used for
connections to the waste outlet must be no smaller than the
diameter of the hose provided. 

The sink plug must not be in place when the machine is
draining as this could cause the water to siphon back into
the machine. 

Attention!
Our appliances are supplied with a security device to protect
against the return of dirty water back into the machine.
If the spigot of your sink has a "no return valve" incorporated
this can prevent the correct draining of your dishwasher.
We advise you therefore to remove it.

Electrical connection

Before plugging the appliance into the wall socket, make sure
that:

1. The mains voltage corresponds to the voltage given in the 

"Technical specifications".

2. The meter, fuses, mains power supply and wall socket can 

all take the maximum load required.
Make sure that the socket and plug are compatible without 
having to use any type of adaptor. If necessary, have the 
domestic wiring system socket replaced.

Safety standards require the appliance to be earthed.
The manufacture accepts no liability for failure to observe
the above safety precautions.

Installation instructions

A

CA03

CS13

min 30 cm

max 100 cm

min 4 cm

Ø 21

Ø 18

1

2

CS14

min 30 cm

max 100 cm

+ 2 m max

Ø 18

Ø 21

Summary of Contents for BSDW 640 S

Page 1: ...Instructions for the use and care of your BSDW 640 S Dishwasher ...

Page 2: ...ng 11 Installation instructions 12 Water supply connections 12 Water outlet hose connection 12 Electrical connection 12 Technical Assistance and Spare Parts 13 Contents DIMENSIONS Width 59 6 cm Height 81 8 87 8 cm Max depth 55 cm Max depth with open door 111 4 cm ELECTRICAL CONNECTION Voltage 220 240 V 50 Hz MOTOR RATING DURING WASH 200 W POWER OF HEATING ELEMENT 2100 W OVERALL POWER 2300 W WATER ...

Page 3: ...int steel or iron debris corrosive acidic or alkaline chemicals must not be washed in this dishwasher Under no circumstances should you open the door whilst the appliance is in operation Always turn off the appliance before opening the door Only use detergent specifically designed for use in dishwashers When finishing loading or unloading close the door as an open door can be a hazard Do not sit o...

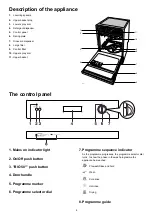
Page 4: ...e appliance The control panel 1 2 3 4 6 7 8 9 10 IN107 11 5 1 Mains on indicator light 2 On Off push button 3 BIO 50 push button 4 Door handle 5 Programme marker 6 Programme selector dial 7 Programme sequence indicator As the programme progresses the programme selector dial turns to show the phase in the wash programme the appliance has reached Prewash Rinse and hold Wash Cold rinse Hot rinse Dryi...

Page 5: ...sher is full before washing If necessary run the Rinse and Hold programme see Washing Programmes chart so that any food scraps do not become caked on the dishes while you are waiting to run the complete wash programme Do not prewash dishes under running water Select an economic programme when dishes are not very soiled following the instructions given in the Washing programmes chart For best washi...

Page 6: ...n diameter salad bowls cups and glasses Arrange items on and underneath the fold down cup racks so that water can reach all surfaces For taller items the cup racks can be folded upwards Light items plastic bowls etc must be loaded in the upper basket and arranged so they do not move In case that plates are loaded in the upper basket load them starting from the rear positions of the basket tilting ...

Page 7: ...e the lid 3 For all programmes with prewash place a portion of a further tablet on the lid of the detergent dispenser Insufficient quantities of detergent will produce poor washing results whereas an excessive amount of detergent will not improve washing results and is also wasteful Using no more than the correct amount also contributes to reducing pollution Attention Check that the detergent rece...

Page 8: ... Main wash up to 65 C 1 cold rinse 1 hot rinse Drying Cold prewash Main wash up to 50 C 1 cold rinse 1 hot rinse Drying Main wash up to 50 C 1 cold rinse 1 hot rinse 1 cold rinse to avoid food scraps from sticking together This is a special programme for quick washing a full load of lightly soiled dishes glasses and crockery except pots so that you may re use them promptly On Off BIO 50 On Off BIO...

Page 9: ...programme Depress the On Off push button The MAINS ON indicator light will come on and the machine will start If you wish to interrupt the washing programme at any time press this button again 9 At the end of the washing programme At the end of the programme the dishwasher will automatically stop The MAINS ON indicator light remains on until the On Off push button is depressed 10 Switch off the di...

Page 10: ...must not be used without filters Incorrect repositioning and fitting of the filters will produce poor washing results Cleaning the filters is vital to ensure correct operation of the machine External cleaning Clean the external surfaces of the machine and control panel with a damp soft cloth If necessary use only neutral detergents Never use abrasive products scouring pads or solvent acetone trich...

Page 11: ...he plug is not properly inserted in the power socket There is a power failure The machine does not fill Ensure the water tap is open with water Ensure the mains water supply has not been cut off The inlet hose may be squashed or bent Reposition the hose The inlet hose may be blocked Switch off the water supply and clean the filter The filters are blocked Clean the filters refer to Maintenance and ...

Page 12: ...as the Press block Water outlet hose connection The end of the drain hose can be connected in the following ways 1 To the sink outlet siphon securing it if necessary with a clamp 2 To a stand pipe provided with vent hole minimum internal diameter 4 cm The waste connection must be at a height of between 30 cm minimum and 100 cm maximum from the bottom of the dishwasher The drain hose can face eithe...

Page 13: ...and Spare Parts Tri Us Appliances Telephone 07 3290 4833 Facsimile 07 3290 2911 Endeavour Appliances Telephone 07 3872 7444 Facsimile 07 3852 2465 SOUTH AUSTRALIA NORTHERN TERRITORY Agent and Sales Office S C Lighting Electrical 47 North Terrace Hackney SA 5069 Telephone 08 8362 4599 Facsimile 08 8362 4591 Service and Spare Parts Prestige Appliance Repair Centre Telephone 08 8352 2022 Facsimile 08...

Page 14: ......

Page 15: ......
Page 16: ...152978 73 5 AUS DUE TO CONSTANT DEVELOPMENT WE RESERVE THE RIGHT TO PRODUCT SPECIFICATIONS CHANGES BLANCO IS NOT LIABLE FOR ANY INACCURACY OF CLAIMS OR DIMENSIONS IN THIS BROCHURE 5 11 03 ...

Reviews: