background image


CONTENTS


PRODUCT DESCRIPTION 


5


INSTALLER TECHNICAL INFORMATION


Installing the cooker  


Room ventilation  


Appliance gas connection  


Support legs 


             12 

Anti-tilt system   


13 

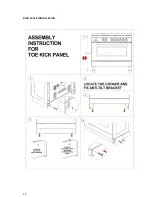
Kick plate installation 


15 

Adaption to different types of gas   


16 

Appliance electric connection  


18 

Appliance Maintenance   


20 

Replacing parts   


             21 


USE AND MAINTENANCE INFORMATION 


22


Gas burner information   


22 

Control panel description 


22 

Using burners    


23 

Using the oven function knob  


25 

Oven functions 


25 

Using the pre – heating function 


27 

Using the pizza function 


27 


Using the traditional function 


27 

Using the fan assisted function 


29 


Using the fan forced function 


30 


Using the grill function 


31 

Using the fan grill function   


31 

Cooling fan operation 


31 

Using the minute minder 


31 


3 key electronic programmer  


32 

Other functions   


             34 

Cleaning the appliance   


35 

Catalytic self -  cleaning liners – rear and sides 


35 

Removing oven door 


36 

Removing of inside glass   


36 

Removing of roof tray 


37 

Troubleshooting  


38  


Summary of Contents for FD906WX

Page 1: ...1 Instruction Manual for Blanco 90cm Freestanding Cooker FD906WX...

Page 2: ...fectly with your kitchen d cor It is easy to use and performs to a high standard Blanco also makes a range of products that will enhance your kitchen such as ovens cooktops rangehoods dishwashers micr...

Page 3: ...lopment Blanco reserves the right to alter specifications or appearances without notice DO NOT OPERATE THIS APPLIANCE BEFORE READING THE INSTRUCTION BOOK DO NOT PLACE ARTICLES ON OR AGAINST THIS APPLI...

Page 4: ...panel description 22 Using burners 23 Using the oven function knob 25 Oven functions 25 Using the pre heating function 27 Using the pizza function 27 Using the traditional function 27 Using the fan a...

Page 5: ...uter burner power details within manual Fully programmable touch control timer Single welded energy efficient cavity Triple glazed thermo reflective door Removable inner glass and door Partially exten...

Page 6: ...rtains The final act of any installation or gas type conversion must be the full testing of this appliance which includes leak testing ignition of each burner and the functionality of the burners sepa...

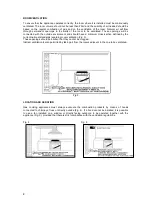
Page 7: ...7 Any walls of the adjacent furniture pieces and the wall behind the cooker must be made of heat resistant material that can withstand a minimum temperature of 75 C FIG 1 FIG 2...

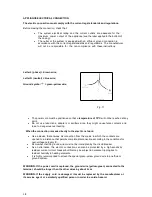
Page 8: ...cross section defined by the current national standards regarding room ventilation Fig 3 These openings should be built so that they cannot be clogged Indirect ventilation is also permitted by taking...

Page 9: ...dware store If using a fixed copper pipe connection Gas connection The cooker must be connected to the gas supply with upstream connection of an isolation valve in accordance with the respective valid...

Page 10: ...560 LP 645 Ref NG 590 LP 675 Max NG 595 LP 680 TABLE NO 1 Energy consumption FD906WX Burners Gas type Pressure kPa Injector mm Mj hr Watts Small Auxiliary Natural U LPG 1 0 2 75 0 92 0 56 4 00 4 2 30...

Page 11: ...11 The inner outer wok operates from the same control knob Please note that the inner wok can operate on its own and the inner and outer wok can also operate together...

Page 12: ...to insert the legs in their bases assembled on the lower part of the cooker and lower the range gently to keep any undue strain from legs and mounting hardware It is recommended to use a pallet or li...

Page 13: ...t be installed using the anti tipping system provided 1 Fit flat strap to rear of cooker at the center point on lower edge using supplied screws 2 Mark center position of the cooker installed position...

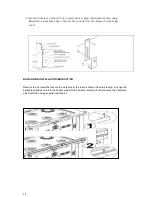
Page 14: ...ket on centerline Use bracket to mark fixing point BACKGUARD INSTALLATION INSTRUCTION Remove the 2 screws that secure the work plan at the rear as shown in below drawing Arrange the backsplash and sec...

Page 15: ...15 KICK PLATE INSTALLATION...

Page 16: ...ork REPLACING THE NOZZLES TO OPERATE WITH ANOTHER TYPE OF GAS BURNER ADJUSTMENT Follow the instructions below to change the burner nozzles on the work surface 1 Pull out the plug from the electric out...

Page 17: ...3 If the cooker is not equipped with safety valves on the surface burners insert a small slotted screwdriver into the hole on the valve rod Fig 9 and turn the choke screw to the right or left until t...

Page 18: ...se false contacts and lead to dangerous overheating When the connection is made directly to the electric network Use a device that ensures disconnection from the mains in which the contacts are opened...

Page 19: ...m 4x1 5mm 4x1 5mm 5x1 5mm Ventilated Electric Oven 3x2 5mm 4x1 5mm 4x1 5mm 5x1 5mm Ceran Electric Oven 3x2 5mm 4x1 5mm 4x1 5mm 5x1 5mm Ventilated Electric Oven 3x4mm 4x1 5mm 4x1 5mm 5x1 5mm ATTENTION...

Page 20: ...ers with electric ovens ATTENTION The accessible parts can become hot during use Keep children away from the appliance For the food warmer compartment or drop leaf in our case ATTENTION The internal p...

Page 21: ...the electric power supply WARNING The power cord supplied with the appliance is connected to the appliance with an X type connection in compliance with standards AS NZS 60335 1 AS NZS 60335 2 6 and su...

Page 22: ...dentifies the burner in object Shows the running of any oven Conventional static oven 9 position switch Shows the electric thermostat for the electric fan oven WARNING If the power is cut off the burn...

Page 23: ...lectric ignition Turn the knob counterclockwise that corresponds to the burner selected setting it to the MAXIMUM position large flame Fig 14 and keep on pressing the knob in correspondence with the i...

Page 24: ...s required The minimum setting for the central and outer burner is the lighter double ring position Tips for using burners correctly Use suitable pots for each burner see tab 3 and Fig 16 Fig 16 When...

Page 25: ...ow it functions is correct This oven has 11 functions as you will see explained below There are 4 levels in this oven as per the below diagram Fig 17 Fig 17 Also there are 2 partially extendable teles...

Page 26: ...8 The switch has 9 different fixed positions corresponding to 9 different types of oven operation the symbol indicates that all the elements and fan have been turned on pre heating the symbol indicate...

Page 27: ...fore you start cooking preheat the oven After preheating set the Pizza function this function ensures homogeneous cooking Ideal not only for pizzas but also for biscuits and cakes For cooking the pizz...

Page 28: ...60 80 ROAST TURKEY 250 4 50 60 ROAST GOOSE 225 4 60 70 ROAST DUCK 250 4 5 45 60 ROAST CHICKEN 250 4 5 40 45 FISH 200 225 3 15 25 PASTRY FRUIT PIE 225 3 35 40 TEA CAKE 175 200 3 50 55 BRIOCHES 175 200...

Page 29: ...nts is uniformly distributed Thanks to this type of operation the oven can be used for different types of cooking at the same time without changing the taste of each food Hot air circulation guarantee...

Page 30: ...circulation in the horizontal direction Thanks to this type of operation the fan forced oven can be used for different types of cooking at the same time without changing the taste of each food Hot air...

Page 31: ...e the grill element and the electric fan Generally to ensure excellent grilling place the oven shelf in the middle position while the oven tray should be inserted at the bottom IMPORTANT When using th...

Page 32: ...sound level 3 levels available 6 M Mode key to access the programming options of the programme 7 Increasing numbers when setting the timer Timer The purpose of the timer is a sound signal which can be...

Page 33: ...g time is finished a sound will be heard and the oven automatically switches off Please see the following paragraphs about how to disable the sound alarm and restarting the oven Automatic cooking Set...

Page 34: ...e remaining time appears on the display or a series of zero numbers if the timer is disabled Touch again the M key On the display appears the dur writing then alternately the remaining time or a serie...

Page 35: ...s using warm soapy water Then those parts should be rinsed and thoroughly dried Any liquid that overflows from pots must always be removed using a rag If it becomes difficult to open or close a valve...

Page 36: ...ng both hands pull it towards you until it is released from the attachment To replace the door do the opposite making sure to insert the two sectors correctly In addition the side racks can be removed...

Page 37: ...ll drop slightly allowing removal of the top liner Once cleaned and dried the top liner can be placed back into position above element and re secured with the two wing nuts The liner will only fit int...

Page 38: ...roblems Oven not pre heated Pre heat oven for 30 minutes Check oven door is closed properly Remove foil or trays from bottom of oven Change set oven temperature Preheat your oven before you put the fo...

Page 39: ...39 Affix spare rating plate of the product here or on easily accessible area or in an adjacent cupboard or similar...

Page 40: ...40 We appreciate your feedback Please review our products on www blanco australia com...

Page 41: ...41...

Page 42: ...42...

Reviews: