background image

12 


10


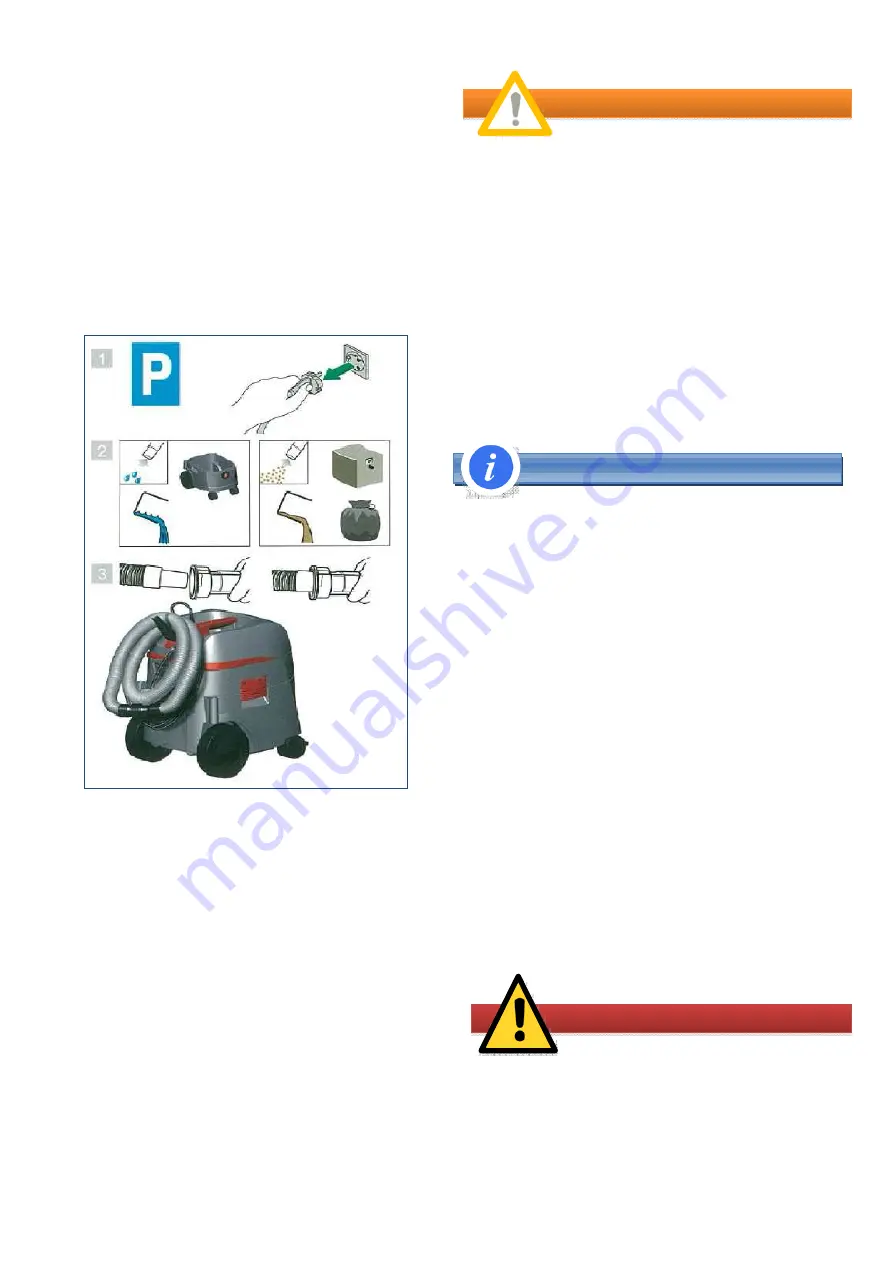
Transport 

▷▷


Insert the closing plug of the vacuum cleaner 

into the suction aperture. 

▷▷


The motor head must be securely fixed to the 

container (close the latches). 

▷▷


Place the accessories in a suitable plastic bag 

and seal the plastic bag or place it in the tool


storage compartment. 

▷▷


Plug the ends of the suction hose into each 

other.(3) 

▷▷


Place the hose around the vacuum cleaner and 

clamp onto the handle. 

Caution


Precautionary measures with vacuum


cleaners class H and M 

The outside of the vacuum cleaner should be


cleaned and wiped down or should be treated with


a sealing agent before being removed from the


dangerous area. All parts of the vacuum cleaner


must be considered to be contaminated when they 

are removed from the danger area and suitable


handling must be used to prevent dust distribution.


Contaminated items 

When carrying out maintenance or repair work, all


contaminated items which have not been


adequately cleaned must be disposed of. Such


items must be disposed of in impermeable bags in 

accordance with the applicable regulations


concerning the disposal of such waste. 


Information


Testing the effectiveness of the vacuum


cleaner 

NOTE: In addition, the effectiveness of the


vacuum cleaner class must be checked at least


once a year. There must be an adequate air


exchange rate L in the room if the 

exhaust air returns to the room. Further


information can be taken from your national


regulations. If the suction of the vacuum cleaner


reduces and the cleaning procedure of the folding


filter cassettes increases, the suction performance


is not adequate (provided that the container is


empty and the fleece filter bag has been replaced) 

then it is necessary to replace the folding filter


cassettes. 


11


Maintenance 

-Switch the vacuum cleaner off and pull out the


mains plug before any maintenance work. 

For maintenance by the user, the vacuum cleaner


must be 

-


dismantled, 

-


cleaned and 

-


maintained, 

as far as possible without creating any danger to


the maintenance personnel or other. 

Precautionary measures 

Suitable precautionary measures include 

-


Cleaning before dismantling, 

-


Provide local filtered positive ventilation where


the vacuumcleaner is to be dismantled, 

-


Clean the maintenance area and 

-


suitable personal protection equipment. 

11.1


Cleaning 

Acids, alkalis and solvents can corrode the vacuum


cleaner parts. 

▷▷


Clean the container and accessories with water. 

▷▷


Wipe the top section with a damp cloth. 

▷▷


Allow the container and accessories to dry. 


11.2


Repair 


DANGER! – WARNING!


▶▶


Inappropriately repaired vacuum cleaners


present a danger to the operator. 

▶▶


Have repairs carried out by specialists, e. g. 

customer service. Use only genuine spare parts. 

Summary of Contents for BDC-1114PH CA ASBESTOS

Page 1: ...Original Operating Instructions VERSION 1 9 BDC 1114PM BDC 1114PH BDC 1114PH CA ASBESTOS...

Page 2: ...K L A Driving handle ES 012834 F Accessory storage ES 512723 B Suction hose 35 mm ES 413235 G PE emptying and disposal bag E06260 5x C M class filter ES 423159 H PE bag for ASBESTOS ES 430249 5x Set...

Page 3: ...evices are suitable for aspiration clearing of BDC 1114PM M BDC 1114PH dry non combustible dusts non combustible liquids wood dusts and hazardous dusts with workplace limit values of 0 1 mg m Class H...

Page 4: ...ntenance operations including removal of the dust collection means must only be carried out by authorised personnel wearing suitable personal protection Do not operate without the full filtration syst...

Page 5: ...taken according to the best technical measures available At the end of work the tools including exhaust ducts work equipment and the work area must be carefully cleaned With asbestos fibres contamina...

Page 6: ...g or ageing or any invisible defect is suspected after a fall Do not allow the rotating brushes to get into contact with the power connection line Do not operate the vacuum device where there is dange...

Page 7: ...sical sensory or intellectual abilities or lack of experience or knowledge unable to safely use the vacuum device should not use it without supervision or instruction by a responsible person Particula...

Page 8: ...mitted Setting the suction hose diameter Determine the maximum negative pressure for automatic shaking Read the operating manual carefully before starting to use the vacuum cleaner It provides importa...

Page 9: ...to AR for standby mode The vacuum cleaner is ready for suction After vacuum cleaning set the switch to O The vacuum cleaner is switched off Pull the mains plug of the vacuum cleaner out of the plug so...

Page 10: ...r cleaning during the operation Thereby constant high air flow cleaning guaranteed during the operation even for critical types of dust 7 Emptying the container Information Only permitted for dust wit...

Page 11: ...erture with the mark pointing upwards 8 Changing the filter 8 1 Changing the folding filter Shake the folding filter cassettes before changing them Turn the lock on the latch through 90 in a counter c...

Page 12: ...checked at least once a year There must be an adequate air exchange rate L in the room if the exhaust air returns to the room Further information can be taken from your national regulations If the suc...

Page 13: ...to position see 6 4 Vacuum cleaner classes M or H with inserted paper filter dust in filter Position of rotary slider incorrect Set rotary slider to position see 6 3 Do not take any other action and...

Page 14: ...a SE 259 hPa SE 225 hPa SE 259 hPa SE 225 hPa SE 259 hPa SE Weight 17 1 kg 17 1 kg 17 1 kg Noise level Up to 69 5 dB A Up to 69 5 dB A Up to 69 5 dB A Dimensions for all models LxBxH 53 cm x 40 cm x 5...

Page 15: ...itions set out in the Machinery Directive 2006 42 EC ROHS Directive 2011 65 EU EMC Directive 2004 108 EC Where appropriate are in conformity with the following harmonized standards EN 60335 1 2002 A15...

Page 16: ...16 Inspection comments Inspection before initial operation on By Date of initial operation Recurring inspections Date Findings Repairs Cleaning Test on By...

Page 17: ...17 competent person Other comments...

Page 18: ...SERVICE MANUAL BDC 1114 VERSION 1 5...

Page 19: ...Index 1 Assembly plans Spare parts 04 Contact 07 2...

Page 20: ...3 1 Assembly plans Spare parts...

Page 21: ...Operating Unit 4...

Page 22: ...ket 110V 60Hz USA ES516776 Power tool plug socket 110V 50Hz UK 12 50 51 52 ES432694 Electronic plate pressure switch insulating disc vacuum tube 1 13 ES408460 Holding disc 4 14 ES417707 Motor plug soc...

Page 23: ...6 Suction unit...

Page 24: ...1 ES408767 Electrode clamping piece 2 40 41 ES414775 Motor 230V upper sealing 1 40 ES414836 Motor 110V ES403762 Set carbon brushes 1 41 41 1 ES408774 Motor sealings 1 42 ES411484 Lower housing 1 43 ES...

Page 25: ...1851 Container 1 2 ES511399 Axle 1 3 4 5 ES408347 Wheel complete 2 4 ES408903 Wheel plug 2 5 ES408941 Wheel over 2 6 ES408408 Castor wheel 2 7 ES512549 Discharge bolt 1 8 ES408958 Drain set 1 9 ES4069...

Page 26: ...noted on shipping receipt Hand Tool Products Blastrac warrants its BLASTRAC Hand Tool Products including hand grinders and accessories against defects in material and workmanship under normal and prop...

Page 27: ...otors batteries tires and all other parts See component manufacture warranty 7 Blastrac reserves the right to make product changes or improvements without prior notice and without undertaking any obli...

Page 28: ...Warranty Registration IMPORTANT To ensure that your Blastrac machine is covered under warranty please provide the information recorded here by registering online at blastrac com or complete this page...

Page 29: ...Contact Blastrac NA 13201 North Santa Fe Avenue Oklahoma City OK 73114 Tel 800 256 3440 Fax 405 478 8608 www blastrac com...

Reviews: