background image


   27 

6.3 

Replacing the upper belt 


NOTE

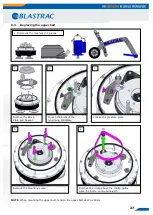
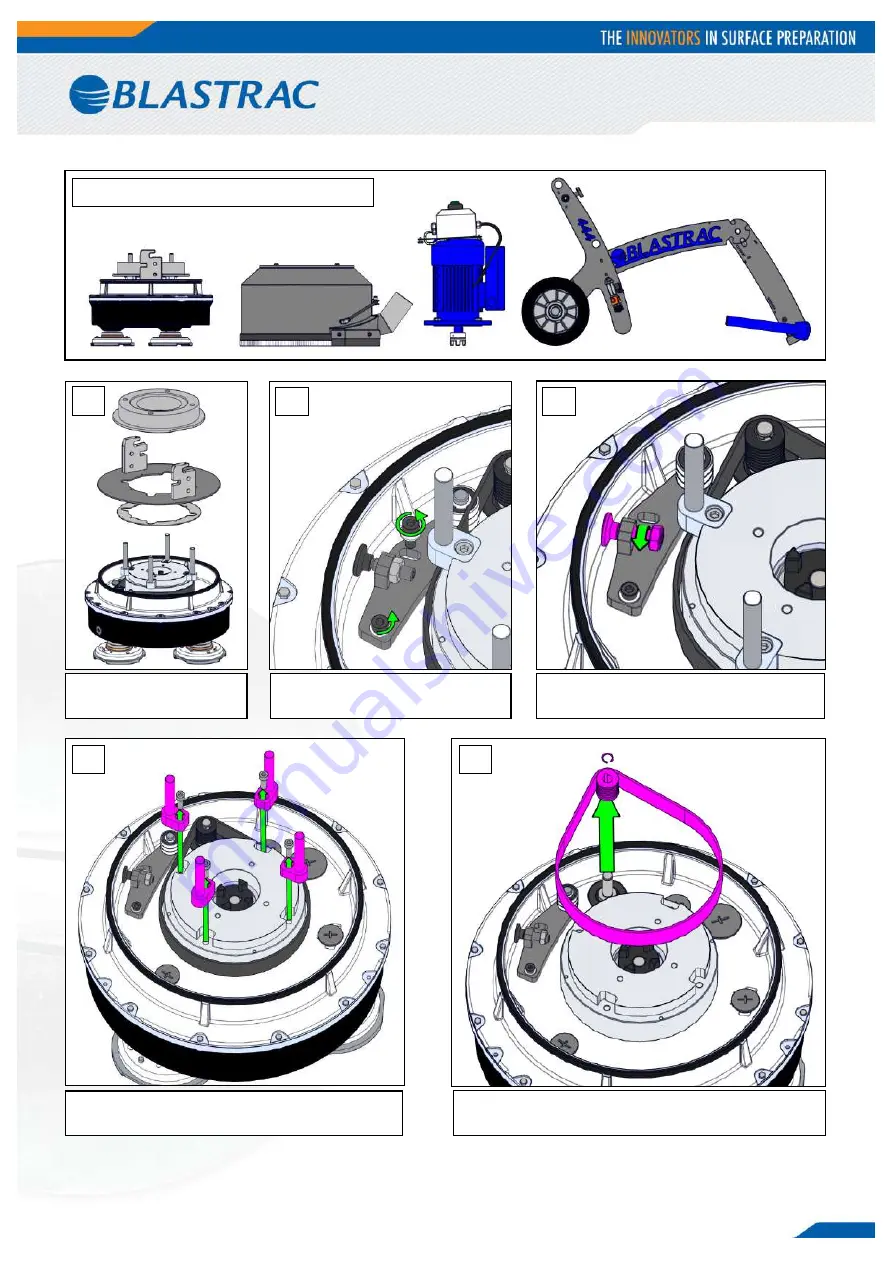
: When mounting the upper belt, tension the upper belt at 220-240 Hz. 


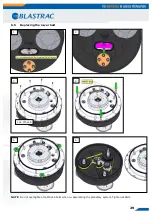
1. Dismount the machine in 4 pieces: 

Remove the Block, 
Plate and Spacer. 

Loosen the bolts of the 
tensioning slideplate. 

Loosen the pressure piece. 

Remove the mounting cams. 

Remove the circlip above the contra pulley.  
Slide the belt + contra pulley off. 

Summary of Contents for BMG-444

Page 1: ...Original Instructions OPERATING INSTRUCTIONS BMG 444 VERSION 1 0 ...

Page 2: ...gs Repairs Cleaning Test on By Inspection before initial operation on __________________________________________ By __________________________________________ Date of initial operation __________________________________________ Serial number Year of manufacture __________________________ _____________ ...

Page 3: ...he machine 12 4 4 Adjust the steering height 13 4 5 DIAMAG Grinding tools 15 4 6 Hardness graph and colour code 17 4 7 Before start up 18 4 8 Wheel height 18 5 Operating 19 5 1 Switch on the machine 19 5 2 Switch off the machine 19 5 3 Speed control version 20 5 4 Operating during grinding 21 5 5 Wet grinding 21 5 6 Dismount the BMG 444 22 6 Maintenance 23 6 1 Frequency inverter Speed Control vers...

Page 4: ...ysical sensory or mental capabilities or lack of experience and knowledge Blastrac BV offers a course on the use of the machine in order to make the operating and maintenance personnel familiar with all elements of the machine 2 Machine description The BMG 444 is an electrical driven planetary grinding machine This is a three headed machine for levelling grinding and polishing of floors The 3 plan...

Page 5: ...5 Control box BMG 444 Standard version BMG 444 Speed Control version SC A Stop button RED B Start button GREEN C Speed regulator D Switch for clockwise and counter clock wise grinding ...

Page 6: ...r tripping j Make sure that there are no cables or hoses in the driving direction of the machine k Make sure that there is nothing standing or situated on the surface to be treated l Make sure the machine can travel over all inequalities on the surface small inequalities like weld seams or floor joints are no barriers for the machine m Never stay in the rain with the machine n Check if there are a...

Page 7: ...in place d Never change anything on the safety devices on the machine e The machine specially the handle grips must be free of fats oils and has to be dry f If the length of the brushes is due to wear less than 5mm or they are extremely deformed the brushes have to be replaced Check the Service Manual for the order numbers g All repair work has to be done by qualified Blastrac personnel this guara...

Page 8: ...this to avoid dust e Make sure the diamond disc is not damaged or worn out f Always pull out the main plug before u start changing the wings or disks g When mounting or removing a diamond disc or wing lay down the machine so it is lying on the metal support Make sure the machine will not fall back down A second person can hold the handle down to make sure it will not fall back down h For changing ...

Page 9: ...of the ramp k Chock wheels for transport and keep control handle in neutral position l Don t leave the machine unsecured on jobsites m Park the machine always on a flat horizontal and levelled surface n Make sure the floating shroud is in transport mode when you transport the machine o Make sure the electrical cable and dust hose are disconnected p Store the cleaned and dry machine in a humid free...

Page 10: ...E mark on this machine Wear protecting gloves Safety shoes obliged Consult the manual before operating the machine Name address and CE mark The machine type The net weight of the machine in kilogram The year of manufacture The serial number of the machine Email address Website Telephone fax number Danger Hazardous voltage in motor even when solid state controller is OFF Disconnect main power befor...

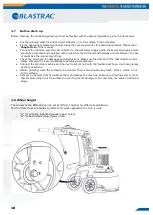
Page 11: ... machine specifications If the machine is to be operated using power from a generator the generator must be operated in accordance with the current legal regulations and directives in force this applies to the protective earth conductor in particular in order to ensure that all safety devices are functioning and to eliminate possible damage to electrical components 4 2 Checkpoints of machine safet...

Page 12: ...ake sure all rotating parts have come to a complete standstill before moving around the machine Be careful Make sure nobodies feet get under the wheels Wear appropriate safety shoes when you drive the machine to or from the work area Locking the floating shroud for transporting the BMG 444 There are sleeves on both sides to lock the floating shroud Step 1 Lift up the floating shroud Step 2 Turn th...

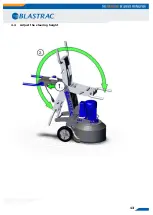
Page 13: ...13 4 4 Adjust the steering height ...

Page 14: ...14 Adjust the steering handle ...

Page 15: ...DIAMAG EU Changing the wings Warning Always wear Personal Protective Equipment The dust can be hazardous to the health Wear a dustmask The wings can get hot Don t risk burning your hands Wear protective gloves Make sure all moving parts of the machine have come to a complete standstill before changing the wings Pull out the mains plug before you start Always wear gloves and a dust mask of at least...

Page 16: ...on can hold the handle down to make sure the machine will not fall back down Slide the slide wings in to the adapter slide plate Removing the slide wings Read chapter 3 Safety Rules and wear personal protective equipment Make sure the machine is disconnected from the power supply Lay down the machine so it is lying on the metal support Make sure the machine will not fall back down A second person ...

Page 17: ...ter to measure floor hardness or carry out a scratch resistance test MoHs scale Once you know the hardness of your floor you can select the correct tools Colour code Blastrac has created a unique colour code system specially designed so you know which tool to use depending on the hardness of the surface Contact our experts at Blastrac for the correct application of the different tools and their co...

Page 18: ...obstructions Make sure the dust bin of the dust collector unit is empty Observe the local regulations regarding waste disposal Connect the grinding machine and the dust collector unit with the flexible dust hose Use hose clamps at the connections Before grinding clean the surface to be treated There should not be any trash stones cloths or oil on the surface Remove all objects from the surface tha...

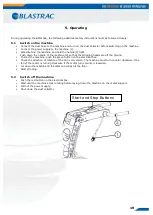
Page 19: ...e Grinding heads are off the ground To start the machine push the green button on the electrical box Check the direction of rotation of the 400 volt version The machine must turn counter clockwise the fan of the motor is turning clockwise if the motor turns counter clockwise Let down the machine till the diamond wings hit the floor Start grinding 5 2 Switch off the machine Push the red button on t...

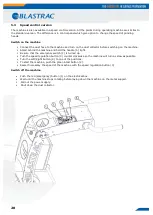
Page 20: ...he machine and hold the handle 5 tight Be sure that the emergency switch 1 is turned up Turn the speed regulation button 3 counter clockwise so the machine will turn as slow as possible Turn the Left Right button 4 to one of the positions To start the machine push the green Start button 2 Raise if necessary the speed of the machine with the speed regulation button 3 Switch off the machine Push the...

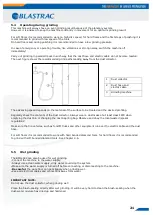
Page 21: ...collector Always wear a dust mask of at least class FFP3 when emptying the dust bin or changing the dust bag big bag Observe and obey the local waste disposal regulations Make sure that no vehicles such as forklift trucks and other equipment run over the electric cable and the dust hose For soft floors it is recommended to work with hard bonded diamond tools for hard floors it is recommended to gr...

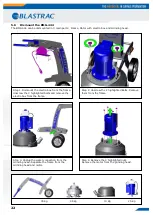
Page 22: ...Remove the motor from the grinding head Step 3 Unplug the water connection from the Grinding head Separate the frame from the Grinding head and motor Step 2 Unscrew the 2 highlighted Bolts Remove them from the frame Step 1 Dismount the electro box from the frame Unscrew the 3 highlighted bolts and remove the electro box from the frame 35 Kg 49 Kg 10 Kg 25 Kg ...

Page 23: ...ith a dust collector Every 3 months Clean the complete machine with a damp cloth Annually Full overhaul and cleaning of the complete machine The time indications are based on uninterrupted operation When the indicated number of working hours is not achieved during the corresponding period the period can be extended However a full overhaul must be carried out at least once a year Pay attention to u...

Page 24: ...ide and outside Clean the fans and filters from the inside of the electrobox with compressed air and a vacuum cleaner towards the outside air Check regularly to see if the diamond wings are in good condition Replace immediately when these are damaged or worn out 6 1 Frequency inverter Speed Control version Caution Work on the frequency inverter by unqualified personnel or failure to comply with wa...

Page 25: ...f the input cable and the detector used Check the configuration parameters of the encoder Check the wiring between the encoder and the drive Check the encoder EEF1 Control Eeprom Internal memory detected fault control block Check the environment electromagnetic compatibility Turn off reset return to factory settings Contact Schneider Electric Product Support EEF2 Power Eeprom Internal memory detec...

Page 26: ...akage current at the drive output if several motors are connected in parallel Check the cables connecting the drive to the motor and the motor insulation Reduce the switching frequency Connect chokes in series with the motor Check the adjustment of speed loop and brake Reduce the switching frequency SCF5 Motor short circuit Short circuit at drive output Check the cables connecting the drive to the...

Page 27: ...e upper belt at 220 240 Hz 1 Dismount the machine in 4 pieces 2 3 4 Remove the Block Plate and Spacer Loosen the bolts of the tensioning slideplate Loosen the pressure piece Remove the mounting cams 5 Remove the circlip above the contra pulley Slide the belt contra pulley off 6 ...

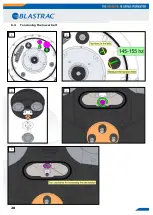
Page 28: ...28 6 4 Tensioning the lower belt 1 2 3 4 5 ...

Page 29: ...29 6 5 Replacing the lower belt NOTE Do not overtighten the M5x16 bolts when re assembling the planetary system Tighten at 6Nm 1 2 5 6 3 4 12x M5x16 ...

Page 30: ...r supply and wait for 1 minute until all power is out of the machine Connect again to power supply and start machine Motor triggers while running Motor protections switch triggered because of overload Motor has a defect Reduce additional load Check the motor Failure Cause Check Action Nothing starts No power supply Not the correct voltage only for 230v systems Is the supply cable plugged in the wa...

Page 31: ...Ø 155 mm Ø 155 mm Ø 155 mm Working width 444 mm 444 mm 444 mm 444 mm 444 mm Rotation speed 720 min 1 300 720 min 1 720 min 1 720 min 1 720 860 min 1 Length 1310 mm 1310 mm 1310 mm 1310 mm 1310 mm Width 507 mm 507 mm 507 mm 507 mm 507 mm Height 982 mm 982 mm 982 mm 982 mm 982 mm Weight 120 kg 127 kg 121 kg 121 kg 128 kg Noise level Uncertainty 76dB A 2 5dB 76dB A 2 5dB 76dB A 2 5dB 76dB A 2 5dB 76d...

Page 32: ...Cable length Cross section 16 A 32 A 63 A 125 A Calculated at a pre fuse GG 16amp 32amp 63amp 125amp 20m 1 5 mm 2 5 mm 10 mm 25 mm 20m 50m 2 5 mm 4 mm 10 mm 25 mm 50m 75m 4 mm 6 mm 16 mm 35 mm The cross sections need to be re calculated when using any other type or size pre fuse than mentioned Old equipment contains valuable materials which are valuable for re processing The machine parts must not...

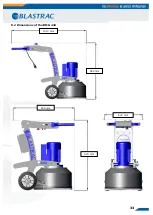
Page 33: ...33 8 2 Dimensions of the BMG 444 1310 mm 982 mm 940 mm 824 mm 507 mm ...

Page 34: ... info blastrac de WWW BLASTRAC DE BLASTRAC UKRAINE SALES SERVICE CENTRE Nezalezhnosti 14 of 21 07400 Brovary Tel 38 0 44 222 51 28 Fax 38 0 44 277 98 29 Email info blastrac com ua WWW BLASTRAC COM UA BLASTRAC SPAIN SALES SERVICE CENTRE Calle del Estío 9 E 28500 Arganda del Rey Madrid Tel 34 91 660 10 65 Fax 34 91 672 72 11 Email info blastrac es WWW BLASTRAC ES BLASTRAC UNITED KINGDOM SALES SERVIC...

Reviews: