www.blaubergventilatoren.de
11
VENTO V50-1 / V50-1 S / V50-1 Pro / V50-1 S Pro
All electric connection to the control unit and the ventilator are performed
with the socket connectors (detachable terminal blocks) for mounting and
servicing facilitation. Each mating part of the socket connector has colour
marking in compliance with marking on the circuit board to ensure correct
and quick electric installation.
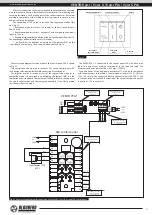
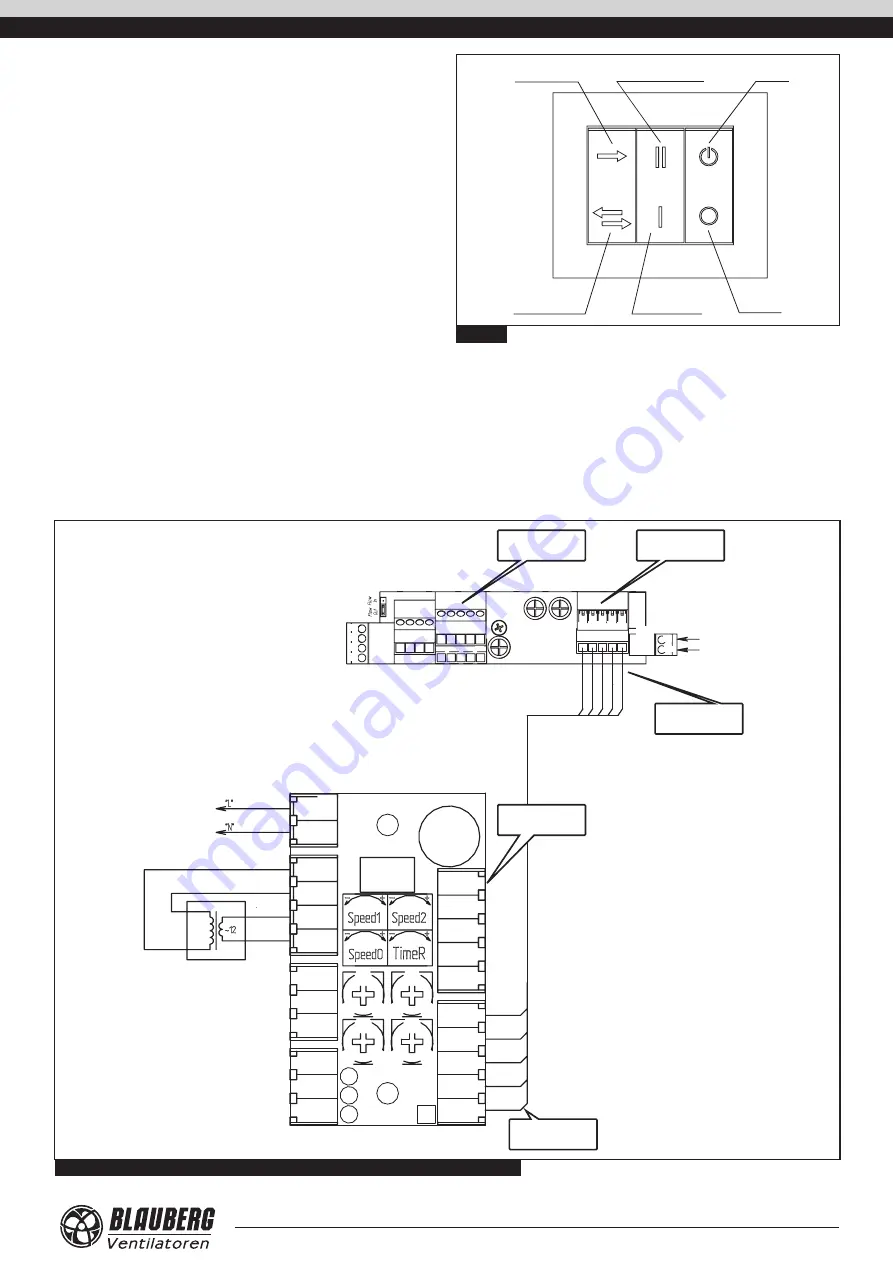
The control panel SEA is used to set one of four operation mode of the
unit, Fig. 23:
1. Ventilation mode (air extract / air supply)* at the first speed with air
flow 26 m
3
/h.
2. Ventilation mode (air extract / air supply)* at the second speed with air
capacity 53 m
3
/h.
3. Reversible (regeneration) operation at the first speed with air flow 26 m
3
/h.
The unit changes air flow direction every 70 seconds.
* - air flow direction depends on position of the jumper JMP1 on the
circuit board. The jumper is set to supply mode by default, Fig. 24.
Unit on
Unit off
First speed
mode
Reversible
operation mode
Second speed mode
Extract/supply mode*
Fig. 23
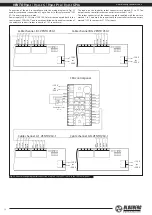
The total wiring diagram for connection to the control panel SEA is shown
in Fig. 24.
Two control channels are used to connect V50-1 to the control panel SEA.
Such design solution provides flexible connection of several units.
The impeller rotation direction at start of the regeneration mode or in
ventilation mode is determined by positioning the jumper JMP1 on the
ventilation unit circuit board. The jumper positioned in «Flow In» position sets
the unit to supply mode and the jumper positioned in «Flow Out» position
sets the unit to extract mode.
The VENTO V50-1 is connected to the control panel SEA with a five-wire
cable. The wire colour marking corresponds to the supplied cable. The
minimum conductor cross section is 0.25 mm
2
(23 AWG).
Type and power of the step-down transformer T1 must be in compliance
with the parameters in the table 2. Separate power supply (230 V / 50 Hz or
120 V / 60 Hz) must be connected both to the control unit SEA (SEA-T) and
to the ventilation unit to enable actuation of the automatic shutters (socket
connectors 31-32 in each case).
Fig. 24. General wiring diagram for connection of Vento V50-1 unit to a single SEA control panel
31
32
33
34
35
36
11
12
13
14
15
11
12
13
14
15
1
2
3
4
5
1
2
3
4
5
31
32
33
34
35
36
37
38
39
40
ÕÒ
3
25
21 22 23 24
15
14
13
12
11
5
1
2
3 4
1
2
3
4
5
31
32
33
34
35
36
37
38
39
40
ÕÒ
3
25
21 22 23 24
15
14
13
12
11
5
1
2
3 4
L
N
5
4
3
2
1
SEA control panel
VENTO V50-1
JMP1
Marking "1-5" on the
connecting cable socket
connector
Marking "11-15" on the
controller socket
connector
~120 V
or
~230 V
~120 V
or
~230 V
Marking "1-5" on the
connecting cable
socket connector
Marking "11-15" on the
controller socket
connector
Marking "21-25" on the
controller socket
connector
~120 V
or
~230 V
gre
y
br
own
yello
w
gr
een
whit
e
grey
brown
yellow
green
white
white
white
red
red
Transformer 12 W
АТ-12


