www.blaubergventilatoren.de
11
KOMFORT EC S/SB
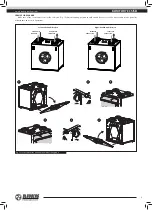
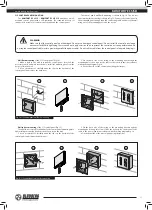
Wall surface mounting
of the S15 control panel (Fig. 15):
1. Lead all necessary cables and wires to the control panel mounting place
and install the mounting box from the delivery set on the wall.
2. Use a screwdriver to carefully undo the clips on the backside of the
control panel and remove the back cover.
3. Fix the back side of the casing to the mounting box through the
mounting holesusing two screws from the delivery set, then connect the
cable to the control panel in accordance with the wiring diagram Fig. 18.
4. Fix the front side of the control panel using the latches.
1
2
3
4
Fig. 15. S15 control panel wall surface mounting
S15 CONTROL PANEL MOUNTING
The
KOMFORT EC S S15 / KOMFORT EC SB S15
units have a wall-
mounted control panel with a LED indication. The standard delivery set
includes a 10 m cable for connection of the unit and the control panel.
The control panel wall fl ush mounting is shown in Fig. 14. The control
panel wall surface mounting is shown in Fig. 15. Connect the control panel to
the air handling unit using a supplied connecting cable and fi x it to the wall
using one of the mounting boxes and the screws.
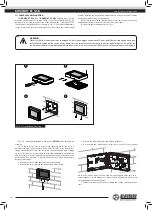
Wall fl ush mounting
of the S15 control panel (Fig. 14):
1. Make a hole in the wall to install the control panel. Insert all the
necessary cables and wires into the hole, install the mounting box from the
delivery set in the wall.
2. Use a screwdriver to carefully undo the clips on the backside of the
control panel and remove the back cover.
3. Fix the back side of the casing to the mounting box through the
mounting holes, then connect the cable to the control panel in accordance
with the wiring diagram Fig. 18.
4. Fix the front side of the control panel using the latches.
WARNING
Make sure that the control panel is not damaged. Do not use a damaged control panel! Do not install the control panel on an
uneven surface! While tightening the screws do not apply excessive force to prevent the control panel casing deformation. Do
not lay the control panel cable in close proximity parallel to a power cable! Do not coil the cable from the control panel in loops while laying it.
!
1
2
3
4
Fig. 14. S15 control panel wall fl ush mounting

