background image

Prior to mounting the fan:


•  Read the present User’s manual carefully. 
•  Check the fan for any mechanical damages caused by wrong transportation.
•  Manually check the impeller for smooth rotation.
•  Make sure there is no condensate on the motor
•  Check the electrical resistance of insulation between the motor windings and between each winding and the motor casing
Follow the safety regulations during the make-ready procedures and fan operation.

Fan mounting:

•  Install the fan on the building roof, out of possible fire areas.
•  Check the roof frameworks for sufficient rigidity in installation places.
•  The fan is designed for vertical installation only (vertical fan shaft) on a concrete or steel base plate of min 250 mm height (with 

respect to possible level of precipitation).

•  Remove the side shields and fix the fan to the mounting frame with four anchor bolts at the frame corners.
•  Check that the fan components do not get deformed during mounting.
•  Provide free and unhampered air extraction from the fan.
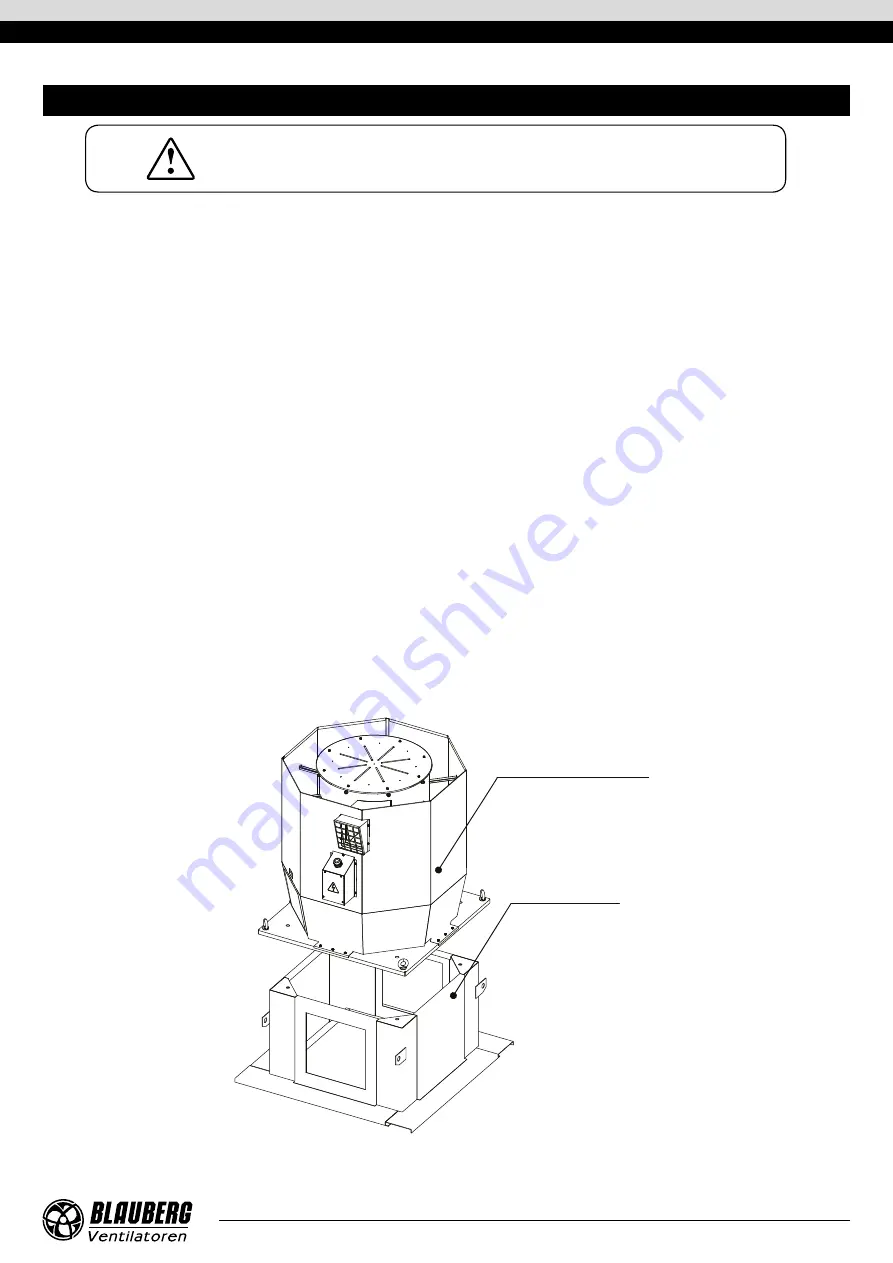
The fan delivery set may include a mounting frame (available separately). Install the mounting frame on a load carrying roof section true-
vertical inside a prepared opening. The opening size must be sufficient to ensure free passage of air ducts with connecting flanges of the 
corresponding diameter in accordance with the DIN 24154 Series 3.
Fix the mounting frame to the load-carrying roof surface in compliance with construction norms and standards applicable for standard 
building designs.
Attach the backdraft damper or the first air duct section directly to the fan prior to its installation. The backdraft damper is delivered 
separately. Provide additional fixing of the air ducts to the building structures to avoid load transfer from the air ducts to the fan.

Do not put the fan on the air duct while mounting to avoid its deformation.

Fastening the fan to the mounting frame is carried out with bolts and washers of the appropriate size.

After installing the unit, you need to make sure that the fan impeller rotates freely.

READ THE USER'S MANUAL BEFORE INSTALLING THE UNIT.

Mounting frame

Tower-SV-K2 fan

MOUNTING AND SET-UP

www.blaubergventilatoren.de

tower-sV-k2

9

Summary of Contents for Tower-SV-K2

Page 1: ...Roof mounted centrifugal smoke extraction fan USER S MANUAL EN Tower SV K2...

Page 2: ...al and national construction electrical and technical norms and standards must be observed when installing and operating the unit Disconnect the unit from the power supply prior to any connection serv...

Page 3: ...ck of experience and knowledge unless they have been given supervision or instruction concerning use of the unit by a person responsible for their safety Children should be supervised to ensure that t...

Page 4: ...nditions The fan handles smoke and air mixtures with temperatures up to 600 C for 60 minutes A characteristic feature of Tower SV K2 roof fans is an impeller with backward curved blades and an electri...

Page 5: ...U1 temperate climate HL1 cold climate T1 tropical climate M1 marine moderately cold climate Options K with a terminal box S1 built in external switch 1 5 motor power kW Motor phase and operation mode...

Page 6: ...0 75 2 15 910 8500 Tower SV K2 560 4D 3 X XX 600 2 XXX 3 0 6 48 1420 13000 Tower SV K2 630 8D 0 75 X XX 600 2 XXX 0 75 2 64 700 9000 Tower SV K2 630 6D 1 5 X XX 600 2 XXX 1 50 3 84 940 12500 Tower SV...

Page 7: ...Overall dimensions B A C H d 4 holes www blaubergventilatoren de Tower SV K2 7...

Page 8: ...0 75 K U1 600 2 Zn 1060 1010 750 1121 16 Tower SV K2 630 6D 1 5 K U1 600 2 Zn Tower SV K2 630 4D 5 5 K U1 600 2 Zn Tower SV K2 710 8D 1 1 K U1 600 2 Zn 1105 1180 980 1257 16 Tower SV K2 710 6D 2 2 K U...

Page 9: ...m the fan The fan delivery set may include a mounting frame available separately Install the mounting frame on a load carrying roof section true vertical inside a prepared opening The opening size mus...

Page 10: ...nal box located on the outer casing of the fan impeller located inside the support panel The motor with the impeller is rigidly fixed to the support panel Welded sheet steel construction The hub and c...

Page 11: ...gth and installation method Connection of the unit to the fixed power supply network must be carried out in accordance with the current regulations Caution The type of electrical connection is indicat...

Page 12: ...oth out the inrush the high startup torque has no adverse effects on the operation of the driven mechanism Soft start SS starting A soft starter gradually increases the voltage supplied to the motor f...

Page 13: ...ain relays and contactors go off and the supply generator shuts down Solution In the best case scenario an SS device may help reduce the in rush current to 250 of the motor rated current If this is in...

Page 14: ...OR TO COMMENCING ANY TECHNICAL MAINTENANCE PUT UP A PROHIBITORY SIGN ON THE FAN STARTING PANEL DO NOT SWITCH ON MEN AT WORK POSSIBLE MALFUNCTIONS AND THEIR ELIMINATION Problem Possible reasons Elimina...

Page 15: ...ace the fan with a unit of proper standard size The fan supplies less air than expected Wrong calculation of the ventilation network and wrong selection of the fan Re calculate the network parameters...

Page 16: ...ndling requirements applicable for the particular type of cargo The unit can be carried in the original packaging by any mode of transport provided proper protection against precipitation and mechanic...

Page 17: ...nation of faults in the unit operation to ensure its intended use by the user within the guaranteed period of operation The faults are eliminated by means of replacement or repair of the unit componen...

Page 18: ...www blaubergventilatoren de Tower SV K2 18...

Page 19: ...____________ is installed pursuant to the requirements stated in the present user s manual Installation Stamp Company name Address Phone Number Installation Technician s Full Name Installation Date Si...

Page 20: ...www blaubergventilatoren de B81 1EN 01...

Reviews: