background image

PL

OPCJE

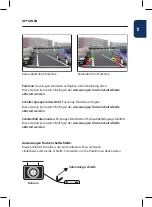
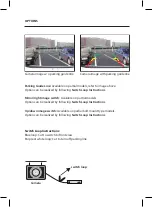
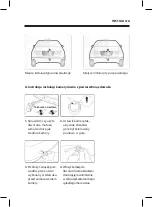
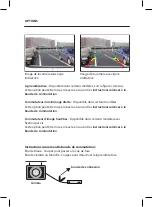
Linia prowadząca do parkowania: 

Dostępna w niektórych modelach, patrz 

ilustracja powyżej. 
Opcję tę można zrealizować, postępując zgodnie z 

instrukcjami dotyczącymi 

pętli przełączania

.

Przełącznik lusterka/prawego obrazu: 

Dostępny w niektórych modelach. 

Opcję tę można zrealizować, postępując zgodnie z 

instrukcjami dotyczącymi 

pętli przełączania

.

Przełącznik obrazu góra/dół:

 Dostępny w niektórych modelach z mocowaniem 

przy pomocy śruby. 
Opcję tę można zrealizować, postępując zgodnie z 

instrukcjami dotyczącymi 

pętli przełączania

.

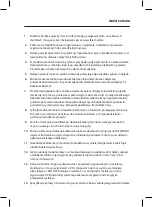
Instrukcja dla pętli łączeniowej:

Pętla niebieska: Przeciąć, aby przełączyć na widok z przodu
Pętla fioletowa lub biała: Przeciąć, aby wyłączyć linię parkowania

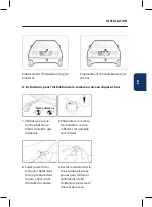
Obraz z kamery bez linii prowadzącej 
do parkowania

Obraz z kamery z linią prowadzącą do 
parkowania

EEqquuaall  D

Diiaam

meetteerr

U

UPP

U

UPP

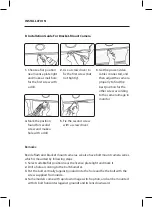
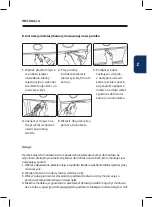
B. Installation Guide For Bracket-Mount Camera

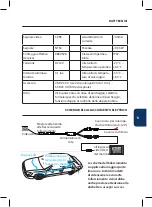
Blue loop: Cut to switch to front view

Purple or white loop: Cut to turn off parking line

 Switch Loop Instructions: 

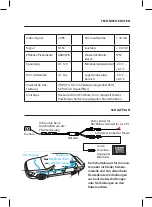
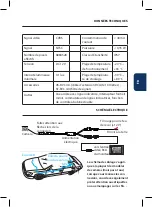
Wiring Diagram

Remarks:

Beside flush and bracket mount cameras, we also

have bolt mount camera series, which is mounted

by following steps:

1. Select suitable flat position near the license plate light and mark it.

2. Drill a hole according to the bolt diameter. 

3. Put the bolt vertically (against ground) into the hole  and fix the bolt 

with the screw supplied from inside.

4. Some models come with up/down image switch  option, and can be 
mounted with its bolt horizontal 

(against ground) and its lens 

downward.

1.Choose a flat position near license

plate light and make a small hole 

for the first screw with a drill.

2. Use a screw driver to fix the first

screw (but not tightly). 

3. Get the power/video cables connected, 

and then adjust the camera properly to find 

the best position for the other screw 

according to the camera image in monitor. 

4. Mark the position found for second

screw and make a hole with a drill.

5. Fix the second screw with a 
screw driver.

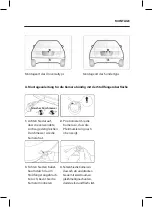
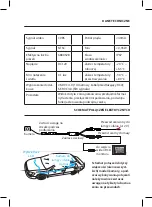
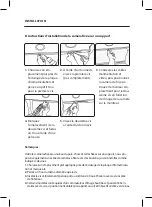
A. Installation Guide For Flush-Mount Camera

B

A

1.Check to be sure the hole saw 

used is with equal diameter to

that of camera.

2. Adjust the camera to turn the 

UP arrow mark straight upwards.

3. Put the harness through the

hole made on bumper before

fixing the camera.

4. Put the camera into the hole and

use your two thumbs to press it 

evenly for tight and flat mounting.

B

A

Special type installation location

Universal type installation location

Parameter

s


Current 

Consumption

Power

Waterproof Grade 

Operating 

temperature range


Other

Optional accessories


-

20


~


+

6

5

VK-RVC 4.X (10 meter RCA extension cable);  SF-RVC 4.X (signal filter)

Rear view with parking line, formal/ mirror switch, parking line swich,  dual-coil control dual  

functions

Video signal


Signal

Effective Pixels


Voltage

Min Illumination

CVBS


NTSC

 DC12V

0.1 Lux

688X528

 <40mA

IP6

7

Storage 

temperature range

-30

 ~ +80

 <0.35W

Kamera

pętla łączeniowa

EEqquuaall  D

Diiaam

meetteerr

U

UPP

U

UPP

B. Installation Guide For Bracket-Mount Camera

Blue loop: Cut to switch to front view

Purple or white loop: Cut to turn off parking line

 Switch Loop Instructions: 

Wiring Diagram

Remarks:

Beside flush and bracket mount cameras, we also

have bolt mount camera series, which is mounted

by following steps:

1. Select suitable flat position near the license plate light and mark it.

2. Drill a hole according to the bolt diameter. 

3. Put the bolt vertically (against ground) into the hole  and fix the bolt 

with the screw supplied from inside.

4. Some models come with up/down image switch  option, and can be 
mounted with its bolt horizontal 

(against ground) and its lens 

downward.

1.Choose a flat position near license

plate light and make a small hole 

for the first screw with a drill.

2. Use a screw driver to fix the first

screw (but not tightly). 

3. Get the power/video cables connected, 

and then adjust the camera properly to find 

the best position for the other screw 

according to the camera image in monitor. 

4. Mark the position found for second

screw and make a hole with a drill.

5. Fix the second screw with a 
screw driver.

A. Installation Guide For Flush-Mount Camera

B

A

1.Check to be sure the hole saw 

used is with equal diameter to

that of camera.

2. Adjust the camera to turn the 

UP arrow mark straight upwards.

3. Put the harness through the

hole made on bumper before

fixing the camera.

4. Put the camera into the hole and

use your two thumbs to press it 

evenly for tight and flat mounting.

B

A

Special type installation location

Universal type installation location

Parameter

s


Current 

Consumption

Power

Waterproof Grade 

Operating 

temperature range


Other

Optional accessories


-

20


~


+

6

5

VK-RVC 4.X (10 meter RCA extension cable);  SF-RVC 4.X (signal filter)

Rear view with parking line, formal/ mirror switch, parking line swich,  dual-coil control dual  

functions

Video signal


Signal

Effective Pixels


Voltage

Min Illumination

CVBS


NTSC

 DC12V

0.1 Lux

688X528

 <40mA

IP6

7

Storage 

temperature range

-30

 ~ +80

 <0.35W

Summary of Contents for RVC 4.1 KH

Page 1: ...REAR VIEW CAMERA RVC 4 1 KH RVC 4 2 W RVC 4 3 U RVC 4 4 A Enjoy it DE Bedienungsanleitung EN Owner s manual PL Instrukcja obs ugi FR Mode d emploi ES Manual de instrucciones IT Manuale di istruzioni...

Page 2: ...ss die Pfeilmarkierung nach oben zeigt 3 F hren Sie den Kabel baum durch das im Sto f nger angebrach te Loch bevor Sie die Kamera montieren 4 SetzenSiedieKamerain dasLocheinunddr cken SiesiemitzweiDau...

Page 3: ...benzieher ein B Montageanleitung f r eine an der Halterung montierte Kamera Hinweis Zus tzlich zu den b ndig und an der Halterung montierten Kameras bieten wir auch Kameras f r die Schraubmontage an d...

Page 4: ...auf die Pfeilmarkierung Wiring Diagram s Current Consumption Power Waterproof Grade Operating temperature range 20 65 C 4 X 10 meter RCA extension cable SF RVC 4 X signal filter iew with parking line...

Page 5: ...die Schaltschleife aktiviert werden Anweisungen f r die Schaltschleife Blaue Schleife Schneiden um zur Vorderansicht zu wechseln Lilafarbene oder wei e Schleife Schneiden um die Parklinie zu deaktivie...

Page 6: ...rzeugherstellers Airbags Alarmanlage Bordcomputer Wegfahrsperre usw 8 Die R ckfahrkamera Frontkamera ist ein technisches Ger t mit einer Fahrerassistenzfunktion Dies bedeutet nicht dass der Fahrer von...

Page 7: ...Adjust the camera to turn the UP arrow mark straight upwards 3 Put the harness through the hole made on bumper before fixing the camera 4 Put the camera into the hole and use your two thumbs to press...

Page 8: ...a hole with a drill 5 Fix the second screw with a screw driver B Installation Guide For Bracket Mount Camera Remarks Beside flush and bracket mount cameras we also have bolt mount camera series which...

Page 9: ...trol dual functions Watch the arrows when plugging Wiring Diagram Current Consumption Power Waterproof Grade Operating temperature range 20 65 4 X 10 meter RCA extension cable SF RVC 4 X signal filter...

Page 10: ...ructions Switch Loop Instructions Blue loop Cut to switch to front view Purple or white loop Cut to turn off parking line Camera Image w o parking guide line Camera image with parking guide line Blue...

Page 11: ...ety instructions airbag alarm system on board computer immobiliser etc 8 The rear front view camera functions technically as a driver assistance device which cannot be taken as substitute for driver s...

Page 12: ...strza ki w g r by skierowany pionowo w g r 3 Prze o y wi zk prze wod w przez otw r wykonany w zderzaku przed zamocowaniem kamery 4 W o y kamer do otworuidwomakciukami docisn j r wnomiernie wceluuzyska...

Page 13: ...omoc rubokr ta B Instrukcja instalacji kamery mocowanej na wsporniku Uwagi Opr cz kamer do monta u r wno z powierzchni zderzaka i kamer do monta u na wsporniku oferujemy r wnie seri kamer do monta u n...

Page 14: ...sterowania podw jn cewk Zwr ci uwag na strza ki podczas pod czania Wiring Diagram s Current Consumption Power Waterproof Grade Operating temperature range 20 65 C 4 X 10 meter RCA extension cable SF...

Page 15: ...instrukcjami dotycz cymi p tli prze czania Instrukcja dla p tli czeniowej P tla niebieska Przeci aby prze czy na widok z przodu P tla fioletowa lub bia a Przeci aby wy czy lini parkowania Obraz z kame...

Page 16: ...a pojazdu dotycz cych bezpiecze stwa poduszki powietrzne system alarmowy komputer pok adowy immobilizer itp 8 Tylna przednia kamera to urz dzenie techniczne o funkcji wspomagaj cej kierowc Nie mo e on...

Page 17: ...ent e vers le haut 3 Faites passer le fai sceau de c bles dans le trou pratiqu dans le pare chocs avant d installer la cam ra 4 Ins rez la cam ra dans le trou et utilisez les deux pouces pour l enfonc...

Page 18: ...se 5 Vissez la deuxi me vis l aide d un tournevis B Instructions d installation de la cam ra fix e sur un support Remarques Outrelescam rasfix esauniveaudupare chocsetcellesfix essurunsupport nouspro...

Page 19: ...ontr le bobine double Faites attention aux fl ches lors de la connexion Wiring Diagram Current Consumption Power Waterproof Grade Operating temperature range 20 65 4 X 10 meter RCA extension cable SF...

Page 20: ...nstructions relatives la boucle de commutation Instructions concernant la boucle de commutation Boucle bleue Coupez pour passer la vue de face Boucle violette ou blanche Coupez pour d sactiver la lign...

Page 21: ...bags syst me d alarme ordinateur de bord anti d marrage etc 8 La cam ra arri re avant est un appareil technique dot d une fonction d assistance au conducteur Il ne peut pas tre utilis pour exon rer le...

Page 22: ...de la flecha hacia arriba apunte verticalmente hacia arriba 3 Pase el mazo de cables por el orificio realizado en el parachoques antes de instalar la c mara 4 Introduzca la c mara en el orificio y pr...

Page 23: ...n destor nillador B Instrucciones de instalaci n de la c mara con soporte Observaciones Adem s de las c maras de montaje empotrado y de soporte tambi n ofrecemos una serie de c maras de montaje atorni...

Page 24: ...n de control de doble bobina Preste atenci n a las flechas al conectar Wiring Diagram s Current Consumption Power Waterproof Grade Operating temperature range 20 65 C 4 X 10 meter RCA extension cable...

Page 25: ...del bucle de conmu taci n Instrucciones para el bucle de conmutaci n Bucle azul Corte para cambiar a la vista frontal Bucle de color violeta o blanco Corte para desactivar la l nea de aparcamiento Ima...

Page 26: ...cciones de seguridad del fabricante del veh culo airbag sistema de alarma ordenador de a bordo inmovilizador etc 8 La c mara trasera delantera es un dispositivo t cnico con funci n de asistencia al co...

Page 27: ...o l alto sia rivolto vertical mente verso l alto 3 Far passare il fascio dei cavi attraverso il foro eseguito nel paraurti prima di montare la videocamera 4 Inserire la videocamera nel foro e usare du...

Page 28: ...e B Istruzioni di installazione della videocamera montata sulla staffa Note Oltre alle videocamere con montaggio allineato alla superficie del paraurti e quelle con montaggio sulla staffa offriamo anc...

Page 29: ...o della doppia bobina Prestare attenzione alle frecce durante l allacciamento Wiring Diagram Current Consumption Power Waterproof Grade Operating temperature range 20 65 4 X 10 meter RCA extension cab...

Page 30: ...il nodo di commutazione Istruzioni per il nodo di collegamento Nodo blu Tagliare per passare alla vista frontale Nodo viola o bianco Tagliare per disabilitare la linea di parcheggio Immagine della vid...

Page 31: ...costruttore del veicolo airbag sistema di allarme computer di bordo immobilizzatore etc 8 La telecamera posteriore anteriore un dispositivo tecnico con una funzione di assistenza alla guida Non pu sol...

Page 32: ...mer und Druckfehler vorbehalten Dieses Material darf nur f r den pers nlichen Gebrauch reproduziert kopiert oder verteilt werden Evo Sales GmbH alle Rechte vorbehalten Subject to technical changes err...

Reviews: