6
STM601
- you can use the window cleaning attachment with the squeegee or the ironing attachment,
respectively.
Connect the appliance to the power source. The steam mop will start to heat up and the signal light will
start flashing. When the mop is ready to use, the diode will be lit continuously.
Press the power switch to start the steam jet generation. Pressing the button again will change the
intensity level of the generated steam, then the next press will turn off the steam generation.
Take special care due to the steam coming out of the appliance. There is a risk of burns.
After finishing work, disconnect the appliance from the power source. The appliance remains hot until
cooled. Keep it out of reach of children.
If the appliance runs out of water, the pump will run louder. After 60 seconds, the mop will enter the
mode protecting the appliance against work without water, the diode will flash in three colours
cyclically, reminding the user to refill the water in the tank.
Exercise caution when replacing accessories while the appliance operates – some components may be
very hot.
Information diode indications:
- red, flashes – heating up in progress
- red, continuous – ready for use
- green – the mop generates a smaller amount of steam
- blue – the mop generates a greater amount of steam
- cyclical colour change – no water
CLEANING AND MAINTENANCE
Before cleaning, make sure the appliance is disconnected from the power source and has cooled down.
Clean the body with a slightly damp cloth, and then wipe it dry.
The nozzles can be cleaned under running water.
The mop pads can be washed in a washing machine.
If the steam mop is supplied with unfiltered or non-demineralised water, it is necessary to perform the
descaling process. Fill in the water tank with the descaler solution. Set the mop in a place where
moisture accumulation will not be a problem (e.g. in a bathtub, in a bowl). Turn on the mop in the
intensive steam generation mode. Wait for the entire tank to empty.
Then pour the water into the tank, and repeat the process.
Summary of Contents for STM601
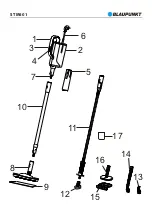
Page 2: ...STM601 1 2 3 4 5 6 7 8 9 10 11 12 13 14 15 16 17 ...
Page 16: ...STM601 14 ...
Page 24: ...22 STM601 ...
Page 31: ...STM601 29 ...
Page 32: ...STM601 30 ...
Page 39: ...STM601 37 ...
Page 40: ...STM601 38 ...
Page 47: ...STM601 45 ...
Page 48: ...46 STM601 ...
Page 54: ...52 STM601 ...
Page 60: ...58 STM601 ...
Page 68: ...STM601 66 ...
Page 76: ...74 STM601 ...
Page 88: ...STM601 86 ...
Page 101: ......


