background image

G:\InDATA\manuals\OM-PE E V1.03

December 6, 2012

Page 30

PRINCESS PE 1006

MAINTENANCE cont.

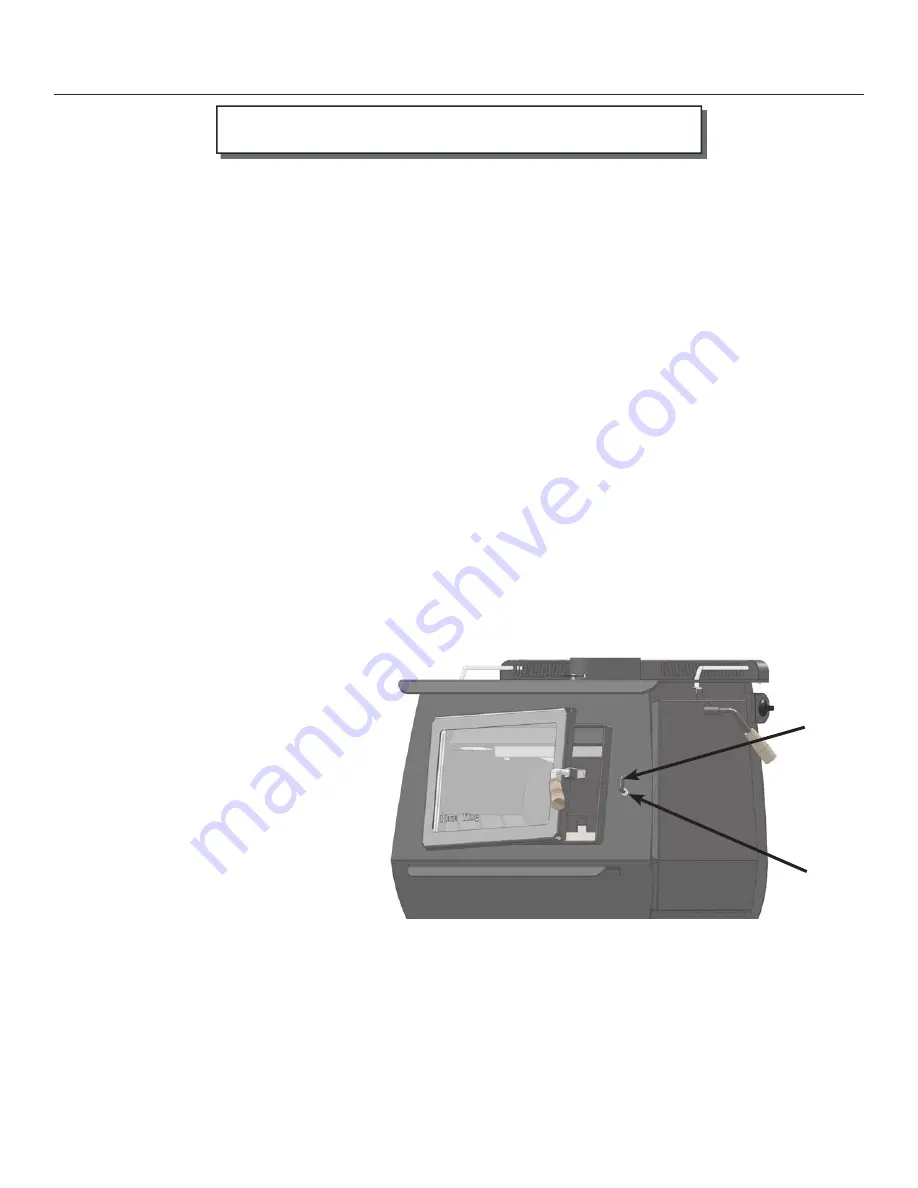
LATCH

CATCH

RETAINER

NUT

LOADING DOOR GASKET REPLACEMENT

(Blaze King recommends your dealer perform this task)

1.  If the door gasket is to be replaced, be sure you have Blaze King 7/8” fi ber glass gasket material, ready to 

re-install. See your Blaze King dealer.

2.  Be sure the fi re is out and the stove has cooled down. Th

  e door does not have to be removed from the 

stove.

3.  With a pair of pliers, pull the old door gasket out of the channel and dispose of it.
4. Th

  oroughly clean out the channel so the new silicone adhesive will adhere and the gasket will fi t 

smoothly

5.  Run a small bead of a high temperature silicone adhesive (such as G.E. Silicone Sealer, or the equivalent) 

along the center of the channel.  

DO NOT USE HOUSEHOLD SILICONE CAULKING.

 High 

temperature silicone may be obtained from most auto parts stores.

6.  Start the new gasket in the lower right corner. Do not stretch or cut the gasket. Distribute the gasket 

evenly around the frame.

7.  Allow the adhesive to dry before closing the loading door.
8.  Check the fi t of the door gasket. Insert a narrow strip of paper into the door opening and close and latch 

the door. Obvious resistance should be felt when pulling the paper out. Repeat this check several times 
around the perimeter of the door. If no resistance is felt, adjust door latch catch (see “LOADING DOOR 
TENSION ADJUSTMENT” below).

9.  A tight sealing door extends the burn times & protects the combustor.

LOADING DOOR TENSION ADJUSTMENT

To tighten the seal, use a 9/16” wrench 
to loosen retainer nut on the outside and 
tighten nut on inside fi rebox to move 
latch catch in (see fi gure beside). Secure 
retainer nut and (repeat) paper test. (see 
step 8 above)

Use penetrating oil if necessary to make 
turning easier.
DO NOT FORCE !!

WARNING: 

DO NOT OPERATE THIS WOOD STOVE IF THE DOOR GASKET IS MISSING OR DAMAGED.  

DANGEROUS OVER FIRING CAN OCCUR WHICH CAN DAMAGE THE APPLIANCE OR IGNITE 

CREOSOTE IN THE CHIMNEY, POSSIBLY CAUSING A HOUSE FIRE. IF ANY PART OF THE 

WOODSTOVE OR FLUE SYSTEM IS GLOWING THE STOVE IS BEING OVER FIRED.

Summary of Contents for PE1006

Page 1: ...ction such a municipal building department fire department etc should be consulted before installation to determine the need to obtain a permit Valley Comfort Systems Inc 1290 Commercial Way Penticton BC V2A 3H5 CANADA Phone 250 493 7444 Fax 250 493 5833 Blaze King Industries 146 A Street Walla Walla WA 99362 U S A Phone 509 522 2730 Fax 509 522 9803 Pour la version française de nos manuels S V P ...

Page 2: ...for PE1006 and PEJ1006 13 COMBUSTION AIR 14 DRAFT 14 VENTING SYSTEMS 14 MOBILE HOME AND RESIDENTIAL ALCOVE INSTALLATIONS 17 OPTIONAL ACCESSORIES 18 OPERATING INSTRUCTIONS ___________________________________________________ 21 CREOSOTE __________________________________________________________________ 26 MAINTENANCE ______________________________________________________________ 27 ASH REMOVAL 27 CA...

Page 3: ...ve completed the installation have it checked by your local inspector Disregarding inspection and code requirements may jeopardize your homeowner s insurance Since some insurance carriers require notification of a stove installation contact your insurance agent We want your Blaze King to give you a lifetime of trouble free operation While we have made every effort to make these instructions as com...

Page 4: ... cu ft Recommended Fuel length 16 17 Wood capacity approximate White oak 60 lbs Fir 40 lbs Construction 10 gauge 1 4 Firebox Brick Lined 16 gauge outer shields Shipping Weight 355 400 lbs This unit is certified by the United States Environmental Protection Agency to comply with July 1990 particulate emissions standards The following statement is required by the Environmental Protection Agency This...

Page 5: ...G InDATA manuals OM PE E V1 03 December 6 2012 Page 5 PRINCESS PE 1006 APPLIANCE DIMENSIONS Princess Classic PE1006BK PRODUCT INFORMATION ...

Page 6: ...G InDATA manuals OM PE E V1 03 December 6 2012 Page 6 PRINCESS PE 1006 APPLIANCE DIMENSIONS Princess Parlor PE1006LBK PRODUCT INFORMATION cont ...

Page 7: ...G InDATA manuals OM PE E V1 03 December 6 2012 Page 7 PRINCESS PE 1006 PRODUCT INFORMATION cont APPLIANCE DIMENSIONS Princess Ultra PE1006UBK ...

Page 8: ...G InDATA manuals OM PE E V1 03 December 6 2012 Page 8 PRINCESS PE 1006 CERTIFICATION LABEL ...

Page 9: ...y connector smaller then the stove exhaust unless approved by your local inspector NEVER vent the stove into a Class B gas vent chimney DO NOT CONNECT TO ANY AIR DISTRIBUTION DUCT OR SYSTEM Inspect the chimney connector and chimney at least twice monthly and clean if necessary Creosote may build up and cause a house fire DO NOT CONNECT THIS UNIT TO A CHIMNEY FLUE SERVING ANOTHER APPLIANCE NEVER in...

Page 10: ...eed at a later time Always follow the instructions in this manual Do not place clothing or other flammable items on or near this appliance Over firing the appliance may cause a house fire Never burn the stove so hot that the stove or chimney connector begins to glow Do not use a grate or other device to elevate the fire off of the firebox floor Burn the fire directly on the bricks Ashes should be ...

Page 11: ... the possibility of a house fire The instructions must be strictly adhered to Do not use makeshift methods or compromise in the installation Install at least one smoke detector on each floor of your home to ensure your safety It should be located away from the woodstove and close to the sleeping areas Locating a smoke detector too close to a woodstove can cause the smoke detector alarm to sound if...

Page 12: ... Parlor model standard on Pedestal model FLOOR PROTECTION If the stove sits on a combustible floor a non combustible shield must be used underneath the stove and extending 16 out from the front and 8 on either side of the fuel loading door in the USA In Canada a non combustible shield must be used underneath the stove and extending 8 on either side and rear and 18 out in front of the loading door ...

Page 13: ...se side shields 10 254mm 9 230mm 20 5 520mm 18 460mm 72 Wall exit reduced corner Use side shields and either fan kit or rear shield 7 180mm 17 75 451mm 72 Alcove roof exit Use side shields and either fan kit or rear shield 10 254mm 6 153mm 20 5 520mm 13 330mm 72 Mobile Home Installation Roof exit parallel and corner Use side shields either fan kit or rear shield and outside air kit 10 254mm 6 153m...

Page 14: ...warranty You must comply with the local authority having jurisdiction and or in Canada CSA installation standard B365 M87 The chimney connector must be 6 diameter 24 26 MSG Black Blue steel Do not use aluminum or galvanized steel They cannot properly withstand the extreme temperatures of a wood fire The chimney connector between the stove and the chimney should be as short and direct as possible B...

Page 15: ...n One method is to install the chimney inside the residence through the ceiling s and the roof The other method is to install an exterior chimney that runs up the outside of the residence not recommended If it is necessary to run the chimney outside build an outside chase around the chimney The chimney must be the required height above the roof or other obstruction for safety and for proper draft ...

Page 16: ...e connector The resulting space must remain empty A flush mounted sheet metal cover may be used on one side only If covers are to be used on both sides each cover must be mounted on noncombustible spacers at least 1 clear of the wall Blaze King recommends the use of a Stainless steel liner preferably insulated inside a masonry chimney This to maintain proper draft and overall better operation of t...

Page 17: ...onnector must be double wall close clearance type and must be of same brand and model as listed prefabricated chimney Single wall pipe is not allowed in Mobile Homes or in Alcove Installations Insulated chimney components must be a listed factory built chimney suitable for use with solid fuels and conforming to ULC629 in Canada or UL 103HT in the USA For Mobile home the chimney need to be removabl...

Page 18: ...fore the stove is placed into position INSTALLATION See instructions included with Fan Kit Tools needed Square Robertson nr 2 screw driver ELECTRICAL CONNECTION Your Blaze King fan kit is equipped with a three prong grounded plug to decrease shock hazard THIS PLUG SHOULD BE INSERTED DIRECTLY INTO A PROPERLY GROUNDED THREE HOLE RECEPTACLE DO NOT CUT OR REMOVE THE GROUNDING PRONG FROM THIS PLUG Do n...

Page 19: ... socket wrench INSTALLATION 1 Lean stove backwards to gain access to stove bottom NOTE Use extreme caution when leaning the stove over to avoid injury or damage to the flooring or appliance 2 Position each leg accordingly and fasten to stove using the supplied washer lock washer and 1 2 bolt 3 Lift stove back to its upright position 4 Adjust carriage bolts in order to level stove ...

Page 20: ...s WARNING DOOR IS HEAVY PLEASE HOLD FIRMLY INSTALLATION 1 Align bottom door hinge hole with bottom firebox hinge pin 2 Lower door onto bottom hinge pin then align top door hinge hole with top firebox hinge pin 3 Lower door onto pins until door hinge surface contacts firebox hinge surface NOTE Ifyourdoor hasagoldorsilverplatingonit pleasefollowtheinstructions on the PLATED DOOR TRIM CARE card found...

Page 21: ... located on the top of the stove It s purpose is to show you if the Combustor is active Always burn the stove in the active zone When the combustor is not active the stove will emit smoke and will not be efficient For an accurate reading turn fans off for approximately 10 minutes and then read the thermometer COMBUSTOR FLAME SHIELD BYPASS DOOR THERMOSTAT The Thermostat knob is located on the top r...

Page 22: ...r in the firebox and place a fairly large quantity 15 20 pieces of kindling on top of the paper 5 Lay two or three medium size approx 3 pieces of wood on top of the kindling Light the fire and allow it to get a good start but DO NOT LEAVE THE STOVE UNATTENDED FUEL Blaze King recommends using dry seasoned wood split and stacked and protected from rain for at least 24 months with a moisture content ...

Page 23: ...EN GLASS Probably the least understood requirement in maintaining a good fire is that of establishing a good base of coals Many new stove users hesitate to load enough wood to sustain a fire Put as much fuel into the stove as it will hold Don t be afraid to fill it completely With the Blaze King automatic thermostat the wood will only burn at the rate set on the thermostat Loading with a half load...

Page 24: ... increments for the most effective cleaner burning operation Changes generally speaking should be made as few times each day as possible When the thermostat knob is moved from high to low more gases is produced so the combustor has more fuel consequently the combustor thermometer may register a higher heat for several hours after the thermostat is turned down 3 Keep hot coals active so when you re...

Page 25: ...before the fan will come on Usually this takes about 1 hour if the stove is started from cold Conversely the fans may continue to operate one hour or longer after the fire goes out At this time you may wish to turn the fans off manually with the rheostat fan switch ICE FORMATION AND PREVENTION Most of what you see coming from the chimney of a properly operating catalytic stove is water vapor In ex...

Page 26: ...o remove it is mechanically with a proper chimney cleaner or brush A combination of wet fuel and poor operating procedure may necessitate weekly cleaning to remove creosote buildup Remember the hotter the fire the less creosote Small intense fires create less creosote than large smoldering fires We recommend that each day a small intense fire be built preferably in the morning This daily practice ...

Page 27: ... ground outside well away from all combustible materials pending final disposal If the ashes are disposed of by burial in soil or otherwise locally dispersed they should be retained in the closed container until all cinders have thoroughly cooled Other waste shall not be placed in this container WARNING NEVER STORE HOT ASHES IN A GARAGE OR BASEMENT HOT ASHES WILL GENERATE CARBON MONOXIDE AND OR FL...

Page 28: ...nd and the bottom The combustor should slide into position as far to the back of the stove as possible Don t be concerned if it appears a bit loose The insulation around the outside of the stainless band will expand during the first fire and will hold the combustor in 8 Replace the flame shield the Perforated plate by holding it inside the firebox with the triangular wings facing away from you Lif...

Page 29: ...much of the creosote on the inside of the glass Removing that moisture at the beginning of the burn cycle helps to keep the glass clean Leaving the thermostat on a higher setting for 30 minutes to an hour before turning to low for an overnight burn will also help Heavier deposits may require hand cleaning Manual glass cleaning should be done when the stove and glass are cool DO NOT CLEAN THE GLASS...

Page 30: ...Do not stretch or cut the gasket Distribute the gasket evenly around the frame 7 Allow the adhesive to dry before closing the loading door 8 Check the fit of the door gasket Insert a narrow strip of paper into the door opening and close and latch the door Obvious resistance should be felt when pulling the paper out Repeat this check several times around the perimeter of the door If no resistance i...

Page 31: ...sary to replace an individual fan snap disk or rheostat contact your local dealer PAINT If the finish on the stove ever becomes blemished you can repaint with high temperature paint available from your dealer DO NOT paint the stove while it is HOT THERMOMETER The combustor thermometer tells you what was happening 4 8 minutes ago And remember it is only an indication of the temperatures of the gass...

Page 32: ...re is out have your chimney and flue connector inspected by a certified chimney sweep A damaged masonry chimney should be repaired or rebuilt A prefabricated chimney factory built that is damaged should be replaced Any damage to the flue connector should be corrected before the system is used again Possible causes of a chimney fire and remedies for those causes can be found further in this section...

Page 33: ...LUTION Close by pass door By pass door not sealing tightly Inspect by pass door and seal for warping Ash or creosote buildup may occur on door or seat With stove cold scrape and vacuum area around by pass Be sure all mating steel surfaces are clean and smooth Improper operation Check thermostat setting and operating procedures See THERMOSTAT OPTIMAL THERMOSTAT SETTING Wood too green or wet Use sea...

Page 34: ...ersize or short flue etc Measure draft with Manometer See DRAFTS Consult your Blaze King dealer or a chimney sweep Obstruction in chimney or cap screen Remove obstruction Clean chimney and or cap screen Strong gusting winds causing downdraft in chimney Install wind resistant chimney cap Tightly sealed house inadequate air supply Open a window slightly near the stove Burning poorly seasoned wet woo...

Page 35: ...G InDATA manuals OM PE E V1 03 December 6 2012 Page 35 PRINCESS PE 1006 REPLACEMENT PARTS Princess Classic PE1006BK Princess Classic PE1006BK ...

Page 36: ...G InDATA manuals OM PE E V1 03 December 6 2012 Page 36 PRINCESS PE 1006 REPLACEMENT PARTS cont Princess Parlor PE1006LBK Princess Parlor PE1006LBK ...

Page 37: ...G InDATA manuals OM PE E V1 03 December 6 2012 Page 37 PRINCESS PE 1006 REPLACEMENT PARTS cont Princess Ultra PE1006UBK Princess Ultra PE1006UBK ...

Page 38: ...G InDATA manuals OM PE E V1 03 December 6 2012 Page 38 PRINCESS PE 1006 REPLACEMENT PARTS cont REPLACEMENT PARTS cont ...

Page 39: ...G InDATA manuals OM PE E V1 03 December 6 2012 Page 39 PRINCESS PE 1006 REPLACEMENT PARTS cont ...

Page 40: ...G InDATA manuals OM PE E V1 03 December 6 2012 Page 40 PRINCESS PE 1006 REPLACEMENT PARTS cont REPLACEMENT PARTS cont Princess Classic Brick Layout ...

Page 41: ...G InDATA manuals OM PE E V1 03 December 6 2012 Page 41 PRINCESS PE 1006 Princess Parlor Ultra Brick Layout REPLACEMENT PARTS cont Princess Parlor Ultra Brick Layout REPLACEMENT PARTS cont ...

Page 42: ...ner End User except as noted for replacement parts Warranty Period Components Covered Parts Labor Wood 1 Year X All parts materials and surface finishes flaking and peeling Subject to Conditions Exclusion and Limitations listed 2 Years X Fan assemblies and motors thermal sensors catalytic thermometer bi metallic thermostat assembly 5 Years 2 Years X Firebox Heat Exchanger Bypass Door Steel Compone...

Page 43: ...purchaser Please see the exclusions and limitation section below as certain restrictions and exclusions apply to this warranty How the Warranty Works 1 All warranties by the manufacturer are set herein and no claim shall be made against the manufacturer on any oral warranty or representation All claims under this Limited Warranty must be made in writing by your dealer 2 Any stove or part thereof t...

Page 44: ...e King will not be responsible for inadequate performance caused by environmental conditions 10 The Limited Warranty does not cover installation and operational related problems such as use of downdrafts or spillage caused by environmental conditions Environmental conditions include but are not limited to nearby trees buildings roof tops wind hills mountains inadequate venting or ventilation exces...

Page 45: ...hich the defect is brought to the attention of Blaze King During the 2nd year purchaser pays 20 3rd year purchaser pays 40 4th year purchaser pays 60 5th year purchaser pays 80 25 If a defect or problem is determined by Blaze King to be non warrantable Blaze King is not liable for travel costs for service work In the event of in home repair work the customer will pay any in home travel fees or ser...

Page 46: ...G InDATA manuals OM PE E V1 03 December 6 2012 Page 46 PRINCESS PE 1006 NOTES ...

Reviews: