background image


There are two ways to tighten the door: 

1)


Adjust door latch bracket – the bracket on the right side 
of the firebox upon which the door handle latches onto 
can be gently tapped with a hammer. Alternatively, 
loosen the two M6 Allen key screws, relocate the 
bracket into the desired location, and then fasten the 
two screws. Close the door to test if any improvement in 
the door closing firmly. 

2)


Remove washer from door handle assembly: 

a)


Remove the nut from the door handle shaft inside 
the door. 

b)


Remove the latch and remove one washer. 

c)


Replace the latch and then place the removed 
washer on the other side. 

d)


Refit the nut. Do not over tighten otherwise door 
handle will not turn easily. 

If door seal is still not tight enough remove another washer or 
replace door seal. 


The frequency used by the fan remote control can be changed 
if interferences are experienced in the home. 

NOTE: Unplug the power lead before proceeding. 

Remote Control Receiver 

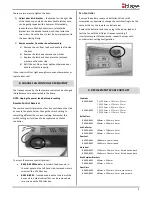
The remote control receiver has four tiny switches on the side, 
as seen in the photo below. Change the switch setting to 
something different than current setting. Remember this 
switch setting as it will need to be replicated on the fan 
controller. 


To access the remote control receiver: - 


B600 & B900 Models – located in the base unit, in 
the rear panel on the left hand side, removed via two 
screws with a M6 Allen key. 


B605 & B905 – located underneath at the rear of the 
base unit in a steel cabinet that can be removed via 
two screws with a M6 Allen key. 

Fan Controller 

Remove the battery cover and batteries. With a small 
screwdriver or equivalent, change the switch setting to be the 
same as that on the remote control receiver. 

Replace the batteries and cover, plug in the power lead and 
test the fan with the different frequency setting. If 
interferences are still experienced, repeat the steps with 
another switch setting configuration. 


Firebricks 

B600 & B605 

7  @  200mm  x  145mm  x  25mm


2  @  255mm  x  175mm  x  25mm


1  @  255mm  x  85mm  x  25mm


B900 & B905 

7  @  255mm  x  175mm  x  25mm


3  @  285mm  x  175mm  x 25mm 

Baffle Plate 

B600 & B605 

490mm  x  230mm  x  6mm 

B900 & B905 

590mm  x  286mm  x  6mm 

Ash Deflector 

B600 & B605 

495mm  x  130mm  x  5mm 

B900 & B905 

595mm  x  130mm  x  5mm 

Door Seal 

B600 & B605 

1600mm  x  16mm round 

B900 & B905 

1900mm  x  16mm round 

Glass Seal 

B600 & B605 

1550mm  x  19mm  x  3mm  flat  adhesive  back 

B900 & B905 

1840mm  x  19mm  x  3mm  flat  adhesive  back 

Brick Retainer Brackets 

B600 & B605 

495mm  x  290mm 

B900 & B905 

595mm  x  320mm 

Door Glass 

B600 & B605 

483mm  x  253mm  x  5mm  pyro  ceramic 

B900 & B905 

583mm  x  303mm  x  5mm  pyro  ceramic 


9. REPLACEMENT SPARE PARTS LIST 


8. CHANGE FAN CONTROLLER FREQUENCY 


Summary of Contents for B600

Page 1: ...nd Stylish Keep instructions in a safe place for future reference DO NOT DISCARD THESE INSTRUCTIONS Pecan Engineering Pty Limited proudly supports the activities of Landcare Australia through its membership of the AHHA B600 B900 B605 B905 ...

Page 2: ...ZS4013 WARNING DO NOT USE FLAMMABLE LIQUIDSOR AEROSOLS TO START OR REKINDLE THEFIRE WARNING DO NOT USE FLAMMABLE LIQUIDS OR AEROSOLS IN THE VICINITY OF THIS APPLIANCE WHENIT IS OPERATING WARNING DO NOT STORE FUEL WITHINHEATER INSTALLATION CLEARANCES WARNING WHEN OPERATING THIS APPLIANCE ASAN OPEN FIRE USE A FIRE SCREEN WARNING OPEN AIR CONTROL AND DAMPERWHEN FITTED BEFORE OPENING FIRINGDOOR CAUTIO...

Page 3: ... frequencies in the home such as wireless internet or child monitor refer to 11 Change Fan Controller Frequency in the Maintenance Servicing section for details on changing the frequency First few times the appliance is lit it will give off some odorous fumes This is caused by the paint curing Do not touch the paint work while it is curing otherwise it can leave a permanent mark on the appliance O...

Page 4: ... the air slide 4 5mm The air slide can be adjusted to any position so desired depending on wanted heat output versus burn time Fan may be turned to low speed setting or off if the heater is putting out sufficient heat without the fan on Reload with more wood 1 Open air slide before opening door 2 Rake break up any existing coals 3 Load the wood with the length orientated front to back 4 Better res...

Page 5: ...k inside of flue prior to each season for any build up of creosote wood tar To do this o First remove the baffle refer to 2 Replacement of Baffle under Maintenance Servicing section o Using a small mirror and torch hold the mirror on an angle below the flue with the torch shining at it and look for black creosote build up If only a fine black powdery layer then that is normal but if built up layer...

Page 6: ...ught Contact the installer should this happen Trouble starting the fire If all ash has been removed from the firebox then it can upset the supply of air to the base of the fire It can aid the fire by retaining some ash when cleaning out the firebox The purpose of the firebricks in the appliance is to increase thermal mass and to guarantee the longevity of the steel firebox Over time the firebricks...

Page 7: ...e rod Over time the screws securing the door hinge plate to the heater may loosen resulting in the door dropping i e visually appears on slight angle and no longer 100 horizontal This can result in a poor door seal and unnecessary amounts of oxygen entering the firebox and wood burning too quickly To fix this and reposition the door 1 With the supplied Allen key loosen the two screws on the hinge ...

Page 8: ...x screws 6 Dispose of the old glass in a responsible manner This task may be easier with the door removed from the appliance and laid horizontally on a work bench 1 Remove any old seal from the door 2 Clean out the groove in the door that the seal was bedded in using a flat end screw driver or equivalent 3 Run a thin bead of clear roof and gutter silicone along the groove 4 Starting at one end pre...

Page 9: ... To access the remote control receiver B600 B900 Models located in the base unit in the rear panel on the left hand side removed via two screws with a M6 Allen key B605 B905 located underneath at the rear of the base unit in a steel cabinet that can be removed via two screws with a M6 Allen key Fan Controller Remove the battery cover and batteries With a small screwdriver or equivalent change the ...

Page 10: ......

Page 11: ......

Page 12: ...Pecan Engineering Pty Limited 13 Acorn Road Dry Creek South Australia 5094 T 08 8349 8332 F 08 8260 6643 Email info pecan eng com au ...

Reviews: