background image

Table Assembly:

Step 1:

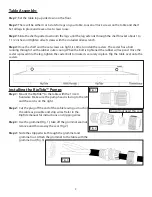
 Set the table top upside down on the floor.

Step 2:

 There will be either 4 or 6 slots for legs on your table. Loosen all lock screws on the table and shelf. 

Set all legs in place and leave all set screws loose. 

Step 3:

 Slide the shelf upside down onto the legs until the leg extends through the shelf bracket about 1 to 

1 1/2 inches and tighten all set screws with the included allen wrench. 

Step 4:

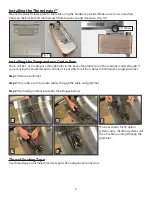
 Once the shelf and the set screws are tight, it’s time to install the casters. The caster has a bolt 

running through it with a rubber outer casing. When the bolt is tightened the rubber will expand. Once the 

caster is placed into the leg, tighten the caster bolt to insure its securely in place. Flip the table over onto the 

casters. 

Installing the RipTide™ Pumps

Step 1:

Step 2:

Step 3: 

Step 4:

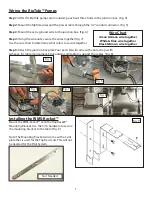
Mount the RipTide™ to the table with the 1/4-20 

hardware. Make sure the pump head is facing to the left 

and the cord is on the right. 

Cut the plug off the end of the cable leaving as much of 

the cable as possible and strip wires. Refer to the 

RipTide manual for instructions on stripping wires.

Use the grommet (Fig. 1), take off the grommet seal nut, 

remove and throw away the seal (Fig. 2).

Slide the stripped wire through the grommet and 

grommet nut. Attach the grommet to the table with the 

grommet nut (Fig. 3)

Fig. 1

You will not need this seal

Fig. 2

Fig. 3

2

Summary of Contents for Pro Series

Page 1: ...read and understand these instructions Sections labeled Caution can lead to equipment damage or unsatisfactory performance of the equipment Please read these sections thoroughly If you have any questions contact your retailer or Blichmann Engineering www BlichmannEngineering com before use Sections labeled Important are critical to the proper performance and life of the product Warning Caution Imp...

Page 2: ...t is tightened the rubber will expand Once the caster is placed into the leg tighten the caster bolt to insure its securely in place Flip the table over onto the casters Installing the RipTide Pumps Step 1 Step 2 Step 3 Step 4 Mount the RipTide to the table with the 1 4 20 hardware Make sure the pump head is facing to the left and the cord is on the right Cut the plug off the end of the cable leav...

Page 3: ...ep 5 Attach the junction box plate Your parts kit will come with velcro straps with adhesive for cable managment Stick underneath table to support the cables Fig 8 Wire Chart Green Green wire together White Blue wire together Black Brown wire together Fig 5 Fig 4 Fig 6 Fig 8 Fig 7 Installing the RIMS Rocket Mount the RIMS Rocket with the HopRocket Mounting Bracket Use the 5 16 hardware to secure t...

Page 4: ...are using the Dual Element Controller it is possible for all four cables to fit through a single grommet Step 1 Remove Grommet Step 2 One cable at a time route cables through the table and grommet Step 3 Re install grommet into table See images below Installing the Temperature Controllers 5 3 4 2 1 4 Fig 10 Use thread tape on all male threads except when using QuickConnectors Thread Sealing Tape 2...

Page 5: ...RipTide pump wires Use the large velcro straps to mount to the back of the table Your table will have 3 or 5 studs on the back to mount your large velcro straps to Attach the large Velcro straps to the back of the table with the adhesive and use the acorn nut to lock them in place This will add extra reinforcement to the straps The stud in the center of the table is for the RipTide cord and the 2 ...

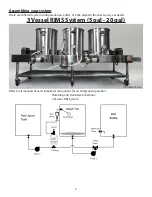
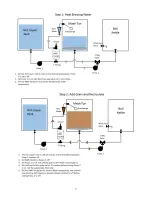
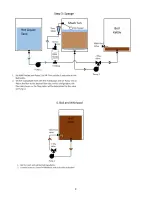
Page 6: ...m configurations we offer Use the diagram that best suits your needs 3 Vessel RIMS System 5 gal 20 gal Refer to all manuals of each individual component for assembly and operation 6 Plumbing and Hardware Schematic 3 Vessel 1BBL System 20 Gallon Shown ...

Page 7: ...7 ...

Page 8: ...8 ...

Page 9: ...9 ...

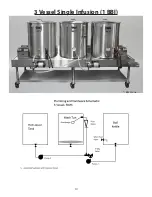
Page 10: ...3 Vessel Single Infusion 1 BBl 10 1 BBL Shown ...

Page 11: ...11 ...

Page 12: ...12 ...

Page 13: ...13 ...

Page 14: ...Horizontal BrewEasy 20 gal 1 BBl 14 1 BBL Shown ...

Page 15: ...15 ...

Page 16: ...16 ...

Page 17: ...17 ...

Page 18: ...his limited warranty and is limited in scope of coverage to this warranty Blichmann Engineering disclaims any express or implied warranty including any implied warranty of fitness for a particular purpose or merchantability on items excluded from coverage as set forth in this limited warranty Blichmann Engineering makes no warranty of any nature beyond that contained in this limited warranty No on...

Reviews: