background image

Getting Started 


Before initial use, please charge the LiPo battery at least 4 hours (from 4 to 
12 hours), using the automatic LiPo battery charger provided.  
 
Now that you have your BLISSTOOL charged, assembled and ready to go, 
let’s review the initial set up step by step.  We will also have these steps on 
our website 

www.BlisstoolUSA.com

 in printable form so you can have them 

out in the field if needed.   Your BLISSTOOL induction balance metal 
detector is unlike any other metal detector you have used before.  In some 
ways it will seem similar, in many ways it will not.  Find an open field 
without much trash or interference (power lines).  With the machine in the 
OFF position follow these steps: 
 

1.


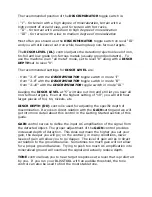
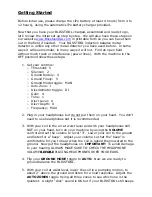
Set your controls: 


Threshold:  5 


Silencer:  2 


Ground Rudely:  4   


Ground Finely:   5 


Ground Mode toggle:  MAN 


Auto Zone:  I 


Discriminator toggle:  III 


Gain:  4 


Tone:  1 


Discr Level:  0 


Discr Depth:  0 


Frequency:  MAX 


2.


Plug in your headphones but do not put them on your head.  You don’t 
need to use headphones but it is recommended. 


3.


With your coil in the air at waist level and with your headphones still 
NOT on your head, turn on your machine by using the 

VOLUME


control and set the volume to level “3”.  Lower your coil to the ground 
and listen for a “beep”.  Adjust your volume so that the “beep” is 
comfortable for you to hear when the coil is raised then lowered to the 
ground.  Now put the headphones on. 

IMPORTANT:

 To avoid damage 

to your hearing ALWAYS MAKE SURE TO CHECK THE HEADPHONE 
VOLUME 

BEFORE

 PLACING HEADPHONES OVER YOUR EARS. 


4.


Flip your 

GROUND MODE

 toggle to 

AUTO

.  Now we are ready to 

ground balance the BLISSTOOL. 


5.


With your coil at waist level, lower the coil in a pumping motion, to 
about 2” above the ground and listen for a loud response.  Adjust the 

AUTO ZONES

 toggle trying all three zones to see which one is the 

quietest.  A slight “click” sound is OK but if your BLISSTOOL still beeps 

Summary of Contents for LTC64X v3

Page 1: ...4X v3 User Guide Version USA CP 2007 2012 BLISSTOOL Contents Introduction 2 Features 3 Assembling your Blisstool 4 Controls 5 Getting Started 7 Pointers 9 Battery Charging 11 Warranty 12 RHOS and WEEE...

Page 2: ...e target conductivity to be very stable while being able to process ferrous vs non ferrous targets extremely fast to deliver pulse induction PI type depth while being able to discriminate out iron to...

Page 3: ...ent modes of discrimination Adjustable Discrimination Level for detection rejection of iron tin foil and low grade non ferrous metals usually ground pollutants Adjustable Depth of Discrimination LED l...

Page 4: ...appropriate length the large fixing ring is hand tightened until it is fixed 3 The angle of the search coil is adjusted by holding the coil horizontally against the ground surface while the user is in...

Page 5: ...een MANUAL and AUTO ground balance The AUTO ZONES toggle switch is functional only when the GROUND MODE toggle switch is set to AUTO As a general guide Auto Zone 1 soils with black and or negative min...

Page 6: ...iron and still let you hear all non ferrous targets Even at the highest setting of 10 you will still hear larger pieces of foil tin nickels etc DISCR DEPTH DD control is used for adjusting the specifi...

Page 7: ...4 Tone 1 Discr Level 0 Discr Depth 0 Frequency MAX 2 Plug in your headphones but do not put them on your head You don t need to use headphones but it is recommended 3 With your coil in the air at wais...

Page 8: ...quiet Then use GROUND FINELY to fine tune if necessary 6 Now that you are ground balanced at the proper gain level for your BLISSTOOL to run smoothly raise your DISCR LEVEL to 5 and your DISCR DEPTH a...

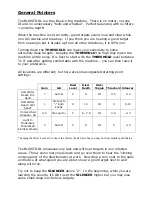
Page 9: ...ome suggested starting point settings Gain GB Discr Level Discr Depth Discr Toggle Threshold Silencer Salt Water Beach Dry Sand 7 Auto II 5 8 III 4 5 0 2 Salt Water Beach Wet Sand 1 Manual to both kno...

Page 10: ...TOOL when it comes to GAIN and DISCR DEPTH Don t be concerned if your BLISSTOOL only operates well at a GAIN of 1 You will still be going very deep When in Virginia detecting the Culpeper red dirt we...

Page 11: ...detector should be switched off Leaving your detector ON while charging could damage the electronics and or the battery CHARGING TIME Battery charging time takes from 2 to 12 hours depending on the di...

Page 12: ...coils batteries battery chargers or headphones Before returning your BLISSTOOL please email us at info blisstoolusa com with your serial number and the purchase date written on the warranty card so w...

Page 13: ...quality and built for long life For comparison the standard and cheaper technology that is not RoHS compliant includes the use of tin with a high content of lead and pcb boards with a final coating ti...

Reviews: