background image

Basic Operations with Touch Keys

9

This unit has 

Touch Screen

feature. You can select/adjust the functions by touchung 

touch keys

displaying on the monitor. 
You can touch the screen with finger or the plastic pen supplied with this unit.
1. Press the 

[OPEN/CLOSE]

button to open the monitor and turn on the power.

2.

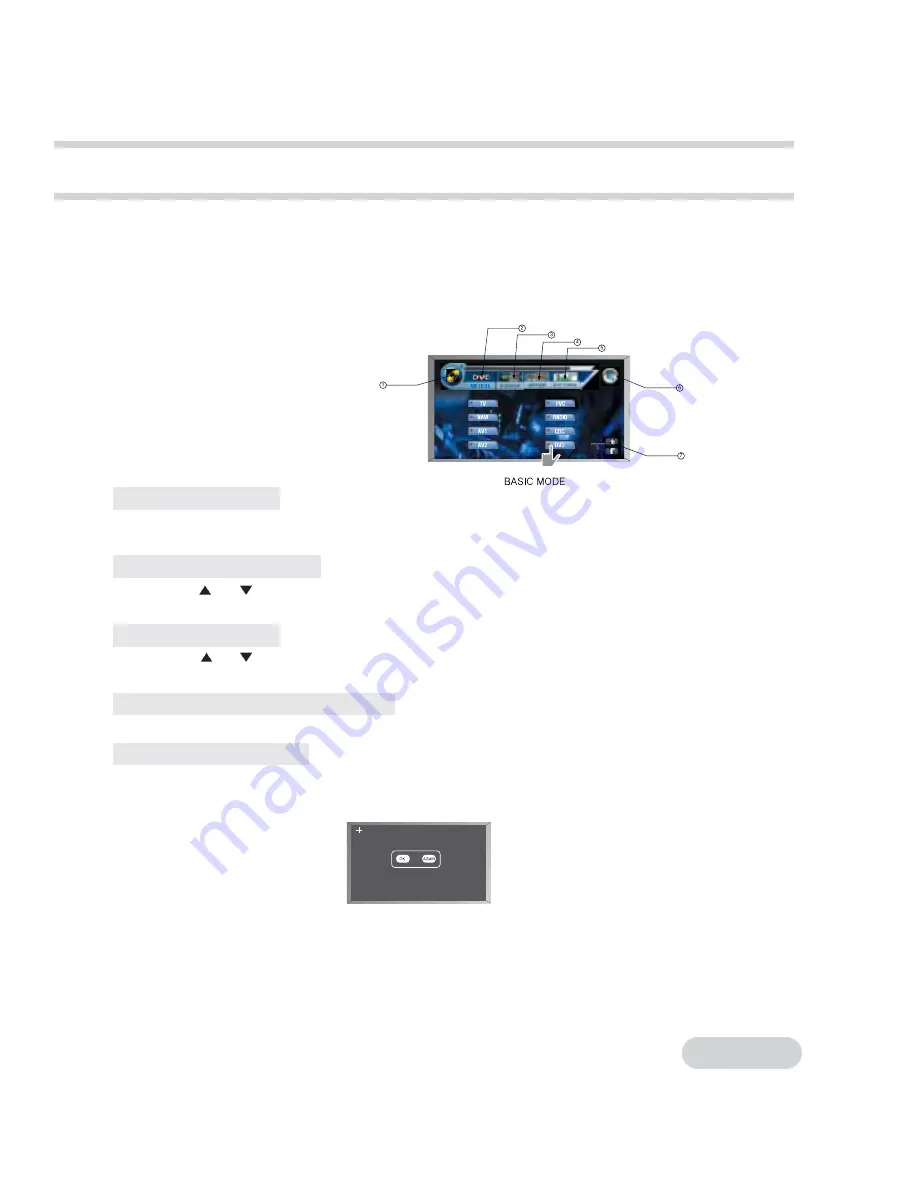
Touch anywhere of the screen softly with a finger to show the menu of touch keys.

BASiC MODE

1.

[MODE]

key

2.

Current mode display

3.

[EQ/DSP]

key

4.

[SETUP]

key

5.

[PICTURE]

key

6.

[EXIT]

Key

7.

[TILT]

Up/Down key

Selecting the Mode

1. Touch [MODE] to show the menu of each mode on the screen
2. Touch one of the mode key that you want.

Adjusting Sound Volume

Touch VOL [

] or [

] to adjust the volume of the sound. 

The adjusted sound volume is stored in memory. 

Adjusting Tilt Angle 

Touch TILT [

] or [

] to adjust vertical angle of the monitor. 

The adjusted angle is stored in memory. 

Removing the menu on the screen

Touch 

[EXIT]

to exit from the menu on the screen, or else the menu will disappear within 10 seconds.

Touch Point Calibration

The touch point may be moved a little after long using of the unit. 
In this case, reset the touch point as follows
1. Press [FUNC] button of the main unit for more than 10 seconds. The monitor shows following picture .

2. Press the center of cross mark on the left upper side with a plastic pen with a rounded end. 

The cross mark disappears and appears again on the right upper side.

3. Press the center of cross mark on the right upper side. The cross mark disappears 

and appears again on the left bottom.

4. Press the center of cross  mark on the left bottom side. The cross mark disappears 

and appears again on the right bottom.

5. Press the center of cross mark on the right bootom side. The cross mark disappears 

and appears. The correct touch point is set up.

Summary of Contents for BZDIN7

Page 1: ......

Page 2: ...sic Opreations with Touch Keys 9 10 System Settings with Touch Keys 11 Radio Opration with Touch Keys 12 TV Opration with Touch Keys 13 DVD CD Changer Operation with Touch Keys 14 Navigation Operation with Touch Keys 14 Rear View Camera Operation with Touch Keys 15 DVD System Settings with Touch Keys 16 General Setup 17 Speaker Setup 17 Audio Setup 18 Preference 19 20 DVD Video Operation with Touc...

Page 3: ... 2 When the temperature of the unit falls such as during winter the monitor screen will become darker than usual Normal brightness will return after using the monitor for a while 3 This unit uses a precision mechanism Even in the event that trouble arises never open the case disassemble the unit or lubricate the rotating parts Be sure to consult your supplier 4 Any changes or modifications to this...

Page 4: ...Discs Do not forcibly insert or remove discs Turn off the power after remove the disc loaded Do not use discs that have large scratches are misshappen cracked etc When those discs loaded the monitor shows Disc Error In this case eject the discs No ejecting those discs can damage the unit Do not touch the recording side of discs by hands Hold it carefully by the edges Donot expose discs to direct h...

Page 5: ...Left 8 JOG Ch Tune Up To the Right 9 JOG Center Band Enter 10 MUTE Mute 11 FUNC Setting Sounds 12 Preset 1 Preset 1 Track Chapter Fast Forward 13 Preset 2 Preset 2 Track Chapter Fast Forward 14 Preset 3 Preset 3 RPT Repeat 15 Preset 4 Preset 4 RDM Random 16 Preset 5 Preset 5 SUB T Sub Title 17 Preset 6 Preset 6 AUDIO Audio 18 Eject Disc Eject 19 R Sensor Remote Sensor 20 Reset Reset 21 PS AS Prese...

Page 6: ...ber Radio TV CDC DVD CD 1 POWER ON OFF 2 OPEN CLOSE 3 MODE 4 MUTE 5 Auto Store Preset Scan 6 Function 7 ASPECT 8 Preset 1 Ch No Preset 2 Ch No Preset 3 Ch No Preset 4 Ch No Preset 5 Ch No Preset 6 Ch No Ch No Intro Ch No Random Ch No Disc Up Ch No Disc Down Figure 10 9 Clear 10 Volume Up Down 11 TILT Up Down 12 I Track Chapter Down 13 I Track Chapter Up 14 Fast Backward 15 Fast Forward 16 II Pause...

Page 7: ...y Selecting a Mode 1 Press the MODE POWER button shortly to change the mode of operation 2 Each time this button is pressed the mode switches in the following order RADIO CDC DVDC DVD TV NAVI AV1 AV2 RVC RADIO OFF or NONE for set up CDC AV1 AV2 RVC is selected thoes modes do not appear on the monitor Adjusting the Volume Press the Volume or button on any mode to adjust the volume The volume level ...

Page 8: ...ds as the picture Adjusting the Picture Mode Aspect Each time the ASPECT button is pressed the picture mode changes in following order FULL WIDE NORMAL FULL FULL Original 4 3 picture is expanded sideways to fill the screen Top and bottom of the picture are squashed WIDE Only right and left portions of original 4 3 picture are expanded sideways NORMAL Original picture with 4 3 aspect ratio The fact...

Page 9: ...r button repeatedly until the desired station is selected The frequecy changes one step at a time Manual Memory 1 Tune in the station to be preset with seek or manual tuning 2 Press one of the PRESET buttons for more than 2 seconds at which you want to store the selected station 3 Each band can store 6 stations in the PRESET buttons as follows FM1 6 FM2 6 FM3 6 AM1 6 AM2 6 Total 30staions Auto Mem...

Page 10: ...to adjust vertical angle of the monitor The adjusted angle is stored in memory Removing the menu on the screen Touch EXIT to exit from the menu on the screen or else the menu will disappear within 10 seconds Touch Point Calibration The touch point may be moved a little after long using of the unit In this case reset the touch point as follows 1 Press FUNC button of the main unit for more than 10 s...

Page 11: ...Q mode Each time EQ is touched the EQ mode switches as follows OFF CLASSIC ROCK POPS JAZZ OFF Setting Up 3D Sound 1 Touch EQ DSP to show the menu 2 Touch 3D to select 3D sound ON or OFF ON 3D sound on OFF 3D sound off Setting Up 4 1 Channel Output 1 Touch EQ DSP to show the menu 2 Touch 4 1 Ch to select 4 1 channel ON or OFF ON 4 1 Ch on OFF 4 1 Ch off Setting Up A V 1 or A V 2 Input 1 Touch SETUP...

Page 12: ...adjust the brightness of picture Adjusting the Color Density of Picture 1 Touch PICTURE to show the menu 2 Touch COLOR or to adjust the color density of picture Adjusting the Tint of Picture 1 Touch PICTURE to show the menu 2 Touch HUE or to adjust the tint of picture Selecting the Brightness of Backlight 1 Touch PICTURE to show the menu 2 Touch DIMMER to select the brightness of backlight Each ti...

Page 13: ...store the selected station 3 Each band can store 6 stations FM1 6 FM2 6 FM3 6 AM1 6 AM2 6 Total 30staions Auto Preset Memory 1 Touch BAND to select the band for the stations to be preset 2 Touch AS to store the stations automatically The stations will be automatically stored in the PRESET buttons in order of signal strength Preset Scan The frequency of the stations stored in the preset CH1 CH6 is ...

Page 14: ...o scan and store TV channels All receivable TV channels are automatically stored in each TV band The 36 stations with good reception are stored in preset on each band Manual Tuning and Store 1 Touch BAND to select the desired band 2 Touch or for manual tuning and or for auto seek tuning 3 Touch one of PRESET 1 36 to store the selected station Caution For your safety this unit turns off the picture...

Page 15: ...ch CDC key to select CD DVD changer mode STATUS This shows the current CD status Disc check Seek Etc TIME This shows playing time of the disc being played Selecting a Disc Touch or button to select DISC Pausing Disc Play Touch II to pause playback Touch II again to resume playback Stopping Disc Play Touch to stop playback Touch II to resume playback Fast Forward Play Touch for fast forward Fast Ba...

Page 16: ...e menu 2 Touch NAVI The screen shows the picture of the navigation or press MODE button on the main unit repeatedly until NAVI mode is selected When your navigation unit is connected to AV1 or AV2 input of the AV control box set up AV1 AV2 ON and then select AV1 AV2 mode to watch the picture of the navigation The car navigation system is an optional item This unit only offers input for the system ...

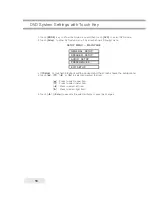
Page 17: ...u If Setup is touched playback will be paused and the screen shows the setup menu 3 Touch or to select and adjust the item Press to select upper item Press to select lower item Press to select left item Press to select right item 4 Touch Enter to execute the selected items or save the changes GENERAL SETUP SPEAKER SETUP AUDIO SETUP PREFERENCES EXIT SETUP SETUP MENU MAIN PAGE 16 ...

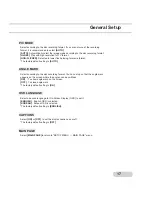
Page 18: ... MARK Select according to the disc recording format You can set up so that the angle mark appears on the screen where the angles can be swithced ON To show angle mark on the screen OFF To close angle mark The factory default setting is ON OSD LANGUAGE Select a desired language for On Screen Display OSD to set it ENGLISH English OSD is selected KOREAN Korean OSD is selected The factory default sett...

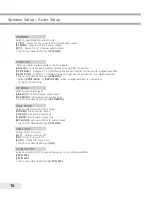
Page 19: ...ALOG Select SPDIF RAW or SPDIF PCM when a digital amplifier is connected to the AV control box Select audio output level LINE OUT Standard audio output level RF REMOD Increased audio output level The factory default setting is RF REMOD Select a desired audio output mode STEREO Stereo audio output L MONO Left audio output only R MONO Right audio output only MIX MONO Left and right both audio output...

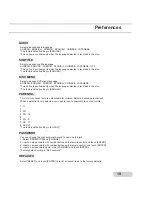
Page 20: ...selected is recorded in the disc The factory default setting is ENGLISH PARENTAL This is to cut scenes that are unfavorable for children Select a desired parential lock When a parential lock is selected you need to input a password to see the picture 1 G 2 3 PG 4 PG 13 5 6 PG R 7 NC 17 8 ADULT The factory default setting is 8 ADULT PASSWORD You can change the old password 4 digit to new one 4 digi...

Page 21: ...6X 32X 64X to normal playback Fast Backward play Touch for fast backward Each time is touched the fast backward speed goes from 2X 8X 16X 32X 64X to normal playback Chapter Search 1 Touch I to search the chapter number to backward 2 Touch I to search the chapter number to forward DVD Video operations with the remote control Disc Menu 1 Press the TITLE button to show root menu on the screen 2 Press...

Page 22: ... The scene from A to B continues repeating 3 Press the A B button again to cancel REPEAT A B Searching with a Chapter Title number 1 Press the SEARCH button to show chapter and title number 2 Press the or button to select chapter or title 3 Input the number of the chapter or title that you want to play back with the 0 to 9 key 4 Press the ENTER button to confirm and play the selected chapter title...

Page 23: ... Playback 1 Press the SLOW button Each time SLOW button is pressed the slow playback speed goes from forward 2X 4X 8x backward 2X 4X 8X to normal playback 2 Press II button to return to normal playback There is no sound during slow playback Frame by Frame Playback 1 Press the STEP button Press the button again to show next image 2 Press the II button to return to normal playback There is no sound ...

Page 24: ...d speed goes from 1X 2X 3X 4X to normal playback Track Search 1 Touch I to search the track number to backward 2 Touch I to search the track number to forward CD operations with the remote control Repeat Play Press the REPEAT button to select ONE ALL or OFF ALL All the track on the current disc plays repeatedly ONE The selected track on the current disc plays repeatedly OFF Repeat play will be off...

Page 25: ... goes from 2X 4X 6X 8X to normal play Fast Backward play Touch for fast backward Each time is touched the fast backward speed goes from 2X 4X 6X 8X to normal playback Track Search 1 Touch I to search the track to backward 2 Touch I to search the track to forward MP3 operations with the remote control Repeat Play Press the REPEAT button to select REP ONE FOLDER REPEAT or FOLDER REP ONE The selected...

Page 26: ...val Key x 2EA Hex Head Screw M5 x 15mm x 4EA Binding Head Screw 15 x 15 x 1EA Spring Washer 5 2 x 1EA Plate Washer 5 2x 1EA Power Cable x 1EA Cleaning Cloth x 1EA AV control Box Power Cable x 1EA Mounting Bracket x 2EA Binding Head Screw M4 x 6mm x 4EA Binding Head Screw M5 x 16mm x 4EA Installing the A V Control Box Install the A V Control Box on somewhere under a front seat ...

Page 27: ...he outer escutcheon 3 Insert the 2 keys as the figure between the spring and the mounting bracket then pull the unit out Keep the 2 keys in safe You cannot remove the unit without it 1 Make sure to ground the unit to a negative 12V DC power supply 2 When replacing a fuse only use a new one with the prescrived rating Using a fuse with wrong rating may cause the unit to malfunction 3 To prevent shor...

Page 28: ...nection 27 1 Be sure that the PARKING SENSOR WIRE must be grounded or opened If it is connected to ACC B The unit can be damaged 2 Do not ground the POWER ANTENNA wire If it is grounded the unit can be damaged ...

Page 29: ...Connection for AV Equipments 28 ...

Page 30: ...Connection for AV Equipments 29 ...

Page 31: ...are to close Attenuator is turned on The fader or balance settings are set all the way to one side The input output wires or wiring harness are connected in correctly Solution After checking for short circuits in the wires replace the fuse with one having the same rating Connect the same wire to the ignition as the battery wire Press the reset button on the unit For safety reasons the monitor does...

Page 32: ... are attempting to switch the angle in a DVD section where more than one angle is not recorded A viewing restriction RATING has been set for the disc The DVD disc being played does not contain the recording of the selected voice or subtitle language The battery runs out Solution Reset the fader and or balance settings Reconnect the speaker wires so that each output terminal is connected to a diffe...

Page 33: ...4 Decoder Linear PCM Dolby Digital Dolby Pro Logic DTS EQ Classic Rock Pops Jazz 3D Sound Available Bass Treble Control Range 10dB System DVD Video VCD CD dtsCD MP3 DVD Player Section D A converter 96 24bit Channels 5 1ch 4ch Don Mix MP3 Decoding Format MPEG 1 2 Audio Layer 3 Frequency Range 87 5 108 Frequency Step Manual Tuning 50 FM Radio Section Seek Tuning 100 Usable Sensitivity 15dB S N 30dB ...

Reviews: