9
102619 03/13
Operating Instruction
Inspection and servicing
Topping up oil
Do not mix different types of oil. Ex-
clusively use types of oil specified by
BLITZ.
Switch the compressor off and depressu-
rise.
Unscrew the oil filler neck 3 (cf. Fig. 3:
Compressor aggregate).
Slowly fill the oil until the oil level in oil in-
spection glass 1 is within the red circle.
Screw on the oil filler neck.
Types of oil
In normal mounting conditions (see 3.1 „Mount-
ing Conditions“) up to 16 bar, fill with Group
VDL mineral compressor oil of viscosity class
VG 100.
In normal mounting conditions (see 3.1 „Mount-
ing Conditions“) over 16 bar, fill with Group
VDL synthetic compressor oil of viscosity class
VG 150.
BLITZ will provide information on oil for special
applications.
5.3 Changing the oil
Danger
Scalding hazard by draining hot oil.
• Slowly open the oil filler neck.
• Avoid skin contact with hot oil
Used oil has to be disposed of accord-
ing to the local environmental regula-
tions.
Switch the compressor off and depressu-
rise.
Unscrew the oil filler neck 3 (cf. Fig. 3:
Compressor aggregate).
Undo oil drain plug 2 in operationally warm
condition.
Drain the oil into a suitable container.
Close the oil drain plug.
Slowly fill new oil (cf. chapter 5.2 “Types of
oil”) until the oil level in oil inspection glass
1 is within the red circle.
Screw on the oil filler neck.
5.4 Draining the condensation water
Required only in case of compressors with
compressed-air reservoir.
The condensation water contains oil
and has to be disposed of according to
the local environmental regulations
Drain condensation water every day, if no au-
tomatic condensation water drainage system
has been fitted (cf. chapter 4.5 “Original BLITZ
accessories”).
Switch the compressor off and depressuri-
se.
Place a suitable collecting pan below the
condensation water drain on the lower side
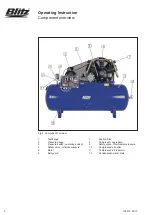
of the compressed-air reservoir (cf. Fig. 1:
Component overview).
Open condensation water drain.
Close the condensation water drain when
no liquid escapes any more.
5.5 Checking and changing the suc-
tion filter cartridge
Remove the cover of the suction filter (cf.
Fig. 1: Component overview).
In case of severe soiling, immediately
replace the suction filter (cf. list of BLITZ
spare parts in the chapter titled “Technical
annex”).
Refit the cover of the suction filter.
5.6 Tighten the screw connections.
Tighten all screw connections in regular
intervals.
Tighten the screws of the cylinder head
after the first one hundred operating hours.
In doing so, observe the torque (cf. Tab.: 3:
Torques).
Screw
Maximum torque
M 8
25 Nm
M 10
50 Nm
M 12
85 Nm
Tab. 2: Torques


