background image

Page 8

Torrent™ Streak User Manual - Rev. A  


(c) 2014 Blizzard Lighting, LLC

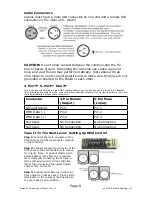
Cable Connectors

Cables must have a male XLR connector on one end and a female XLR 

connector on the other end.  (Duh!)

CAUTION:

 Do not allow contact between the common and the fix

-

ture’s chassis ground. Grounding the common can cause a ground 

loop, and your fixture may perform erratically. Test cables with an 

ohm meter to verify correct polarity and to make sure the pins are not 

grounded or shorted to the shield or each other.

3-Pin???  5-Pin???  Huh?!?

If you use a controller with a 5 pin DMX output connector, you will need to use a 5 pin to 3 pin adapter.  

They are widely available over the internet and from specialty retailers  If you’d like to build your own, the 

chart below details a proper cable conversion:

Conductor

3-Pin Female 

(Output)

5-Pin Male 

(Input)

Ground/Shield

Pin 1

Pin 1

DMX Data (-)

Pin 2

Pin 2

DMX Data (+)

Pin 3

Pin 3

Not Used.

No Connection.

No Connection.

Not Used.

No Connection.

No Connection.

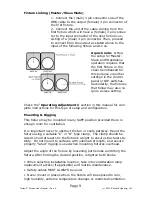
Take It To The Next Level:  Setting Up DMX Control

Step 1: 

Connect the male connector of the 

DMX cable to the female connector (output) 

on the controller.

Step 2:

 Connect the female connector of the 

DMX cable to the first fixture’s male connec

-

tor (input).  

Note:

  It doesn’t matter which 

fixture address is the first one connected.  

We recommend connecting the fixtures in 

terms of their proximity to the controller, 

rather than connecting the lowest fixture 

number first, and so on.

Step 3:

 Connect other fixtures in the chain 

from output to input as above.  Place a DMX 

terminator on the output of the final fixture 

to ensure best communication.

Summary of Contents for Torrent Streak

Page 1: ...Blizzard Lighting LLC www blizzardlighting com Waukesha WI USA Copyright c 2014 TORRENTSTREAK TM ...

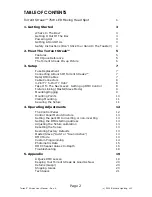
Page 2: ...n Huh 8 Take It To The Next Level Setting up DMX Control 8 Fixture Linking Master Slave Mode 9 Mounting Rigging 9 Mounting Points 10 Clamp Mounting 11 Securing the fixture 11 4 Operating Adjustments 12 The Control Panel 12 Control Panel Menu Structure 13 Setting the pan tilt to inverting or non inverting 13 Setting the DMX starting address 13 Adjusting the fixture calibration 13 Resetting the fixt...

Page 3: ...power supply See the label on the fixture or refer to the fixture s specifications chart for more information A fixture s listed current rating is its average current draw under normal conditions Check the fixture or device carefully to make sure that if a voltage selection switch exists that it is set to the correct line voltage you will use Warning Verify that the voltage select switch on your u...

Page 4: ...re servicing or replacing fuse and be sure to replace with same fuse size and type ALWAYS secure fixture using a safety chain NEVER carry the fixture by its head Use its carrying handles DO NOT operate at ambient temperatures higher than 104 F 40 C In the event of a serious operating problem stop using the unit immediately NEVER try to repair the unit by yourself Repairs carried out by unskilled p...

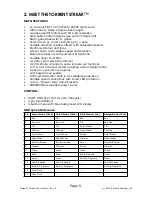
Page 5: ...lt in programs LCD based menu system DMX recorder editor built in for standalone operation Variable speed cooling fans with smart LED protection turn omega style clamp brackets POWERCON compatible power in out CONTROL USITT DMX 512 13 11 13 15 Channels 3 pin Input Output 4 button menu with blue background LCD display DMX Quick Reference Ch Vector Mode 15ch 16 Bit Mode 13ch 8 Bit Mode 11ch Design M...

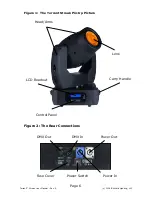
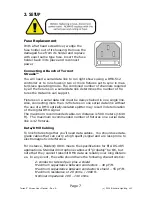
Page 6: ... Manual Rev A c 2014 Blizzard Lighting LLC Figure 1 The Torrent Streak Pin Up Picture Lens Control Panel LCD Readout Figure 2 The Rear Connections Power Switch Fuse Cover DMX In DMX Out Head Arms Carry Handle Power In Power Out ...

Page 7: ... fixtures on one serial data link without the use of a DMX optically isolated splitter may result in deterioration of the digital DMX signal The maximum recommended cable run distance is 500 meters 1640 ft The maximum recommended number of fixtures on a serial data link is 32 fixtures Data DMX Cabling To link fixtures together you ll need data cables You should use data grade cables that can carry...

Page 8: ... d like to build your own the chart below details a proper cable conversion Conductor 3 Pin Female Output 5 Pin Male Input Ground Shield Pin 1 Pin 1 DMX Data Pin 2 Pin 2 DMX Data Pin 3 Pin 3 Not Used No Connection No Connection Not Used No Connection No Connection Take It To The Next Level Setting Up DMX Control Step 1 Connect the male connector of the DMX cable to the female connector output on t...

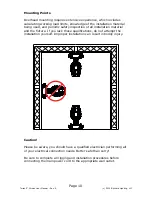
Page 9: ...k the Operating Adjustments section in this manual for com plete instructions for this type of setup and configuration Mounting Rigging This fixture may be mounted in any SAFE position provided there is enough room for ventilation It is important never to obstruct the fan or vents pathway Mount the fixture using a suitable C or O type clamp The clamp should be rated to hold at least 10x the fixtur...

Page 10: ...ty inspection of all installation material and the fixture If you lack these qualifications do not attempt the installation yourself Improper installation can result in bodily injury Caution Please be aware you should have a qualified electrician performing all of your electrical connection needs Better safe than sorry Be sure to complete all rigging and installation procedures before connecting t...

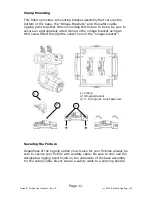
Page 11: ...ure an appropriately rated clamp to the omega bracket using an M10 screw fitted through the center hole of the omega bracket Securing the Fixture Regardless of the rigging option you choose for your fixtures always be sure to secure your fixture with a safety cable Be sure to only use the designated rigging point found on the underside of the base assembly for the safety cable Never secure a safet...

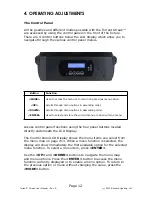
Page 12: ...s through menu options in descending order Used to select and store the current menu or option within a menu Access control panel functions using the four panel buttons located directly underneath the LCD Display The Control Panel LCD Display shows the menu items you select from the menu map on page 13 When a menu function is selected the display will show immediately the first available option fo...

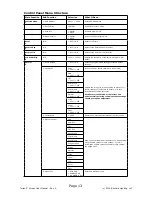
Page 13: ...Calibration Code 000 255 Lockout code for fixture calibration code 088 PAN 000 255 Adjusts the zero point for each setting to account for subtle variations from fixture to fixture or in case recalibration becomes necessary Each fixture is calibrated at the factory and under normal operating conditions these settings should not require adjustment TILT 000 255 Color Wheel 000 255 Gobo Wheel 000 255 ...

Page 14: ...e pre programmed Auto Program which the fixture uses in Auto and Sound active Modes using the DMX values for each channel or edit one of 8 built in programs which are available using DMX channel 15 For more information on DMX values available for each channel see pages 14 15 PAN Fine TILT TILT Fine Move Speed Color Wheel Gobo Wheel 1 Gobo Rotation Strobe Dimmer Focus Prism Iris Zoom Frost Scene Ti...

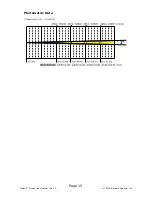
Page 15: ...Page 15 Torrent Streak User Manual Rev A c 2014 Blizzard Lighting LLC Photometric Data ...

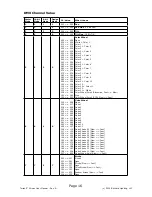
Page 16: ...or 9 Color 9 Color 9 Color 10 Color 10 Color 10 Color 11 Color 11 Color 11 White Color Wheel Scroll Clockwise Fast Slow Stop Color Wheel Scroll CCW Slow Fast 6 6 4 6 000 008 009 017 018 026 027 035 036 044 045 053 054 062 063 071 072 080 081 089 090 098 099 107 108 116 117 125 126 134 135 143 144 152 153 161 162 170 171 179 180 188 189 197 198 206 207 255 Gobo Wheel Open Gobo 1 Gobo 2 Gobo 3 Gobo ...

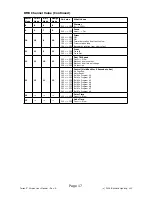
Page 17: ...rom slow to fast 11 11 9 11 000 199 200 255 Frost Frost In Frost Out 12 12 10 12 000 225 226 235 236 245 246 255 Pan Tilt Speed Fast Slow Blackout by movement Blackout by all wheel change No function 13 13 11 13 000 079 080 099 100 119 120 139 140 159 160 179 180 199 200 219 220 239 240 255 Control Hold Each for 5 Seconds to Set No Function Motor Reset Built In Program 1 Built In Program 2 Built I...

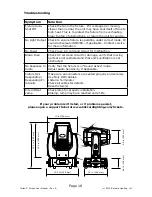
Page 18: ...alfunction Blown Fuse Check AC cord and circuit for damage verify that moving parts are not restricted and that unit s ventilation is not obstructed No Response to Audio Verify that the fixture is in Sound Active mode Adjust Audio Sensitivity If Applicable Fixture Not Responding Responding Er ratically Make sure all connectors are seated properly and securely Use Only DMX Cables Install a Terminat...

Page 19: ...al 3 pin mic cables although this does not conform to the defined standard DMX is connected using a daisy chain configuration where the source connects to the input of the first device the output of the first device connects to the input of the next device and so on The standard allows for up to 32 devices on a single DMX link Each receiving device typically has a means for setting the starting ch...

Page 20: ...nd wow factor That s what it s all about after all Returns Gasp We ve taken a lot of precautions to make sure you never even have to worry about sending a defective unit back or sending a unit in for service But like any complex piece of equipment designed and built by humans once in a while something doesn t go as planned If you find yourself with a fixture that isn t behaving like a good little ...

Page 21: ...mal Max Operating Temp 104 degrees F 40 degrees C ambient Control Protocol USITT DMX 512 DMX Channels 11 13 15 channel modes plus custom design mode Input 3 pin XLR Male Output 3 pin XLR Female Other Information Brooches account for nearly 80 of all conversations between women over the age of 75 Warranty 2 year limited warranty does not cover malfunction caused by damage to LEDs DISCLAIMER The pow...

Page 22: ...Page 22 Torrent Streak User Manual Rev A c 2014 Blizzard Lighting LLC This page intentionally left blank ...

Page 23: ...Page 23 Torrent Streak User Manual Rev A c 2014 Blizzard Lighting LLC This page intentionally left blank ...

Page 24: ...Enjoy your product Our sincerest thanks for your purchase The team Blizzard Lighting ...

Reviews: