background image

Lit. No. 40388, Rev. 00

6

May 15, 2008

UNDERCARRIAGE INSTALLATION

INSTALLATION INSTRUCTIONS

NOTE: For easier assembly and installation,
vehicle and all snowplow components should be
on a smooth, level, hard surface, such as concrete.

1.

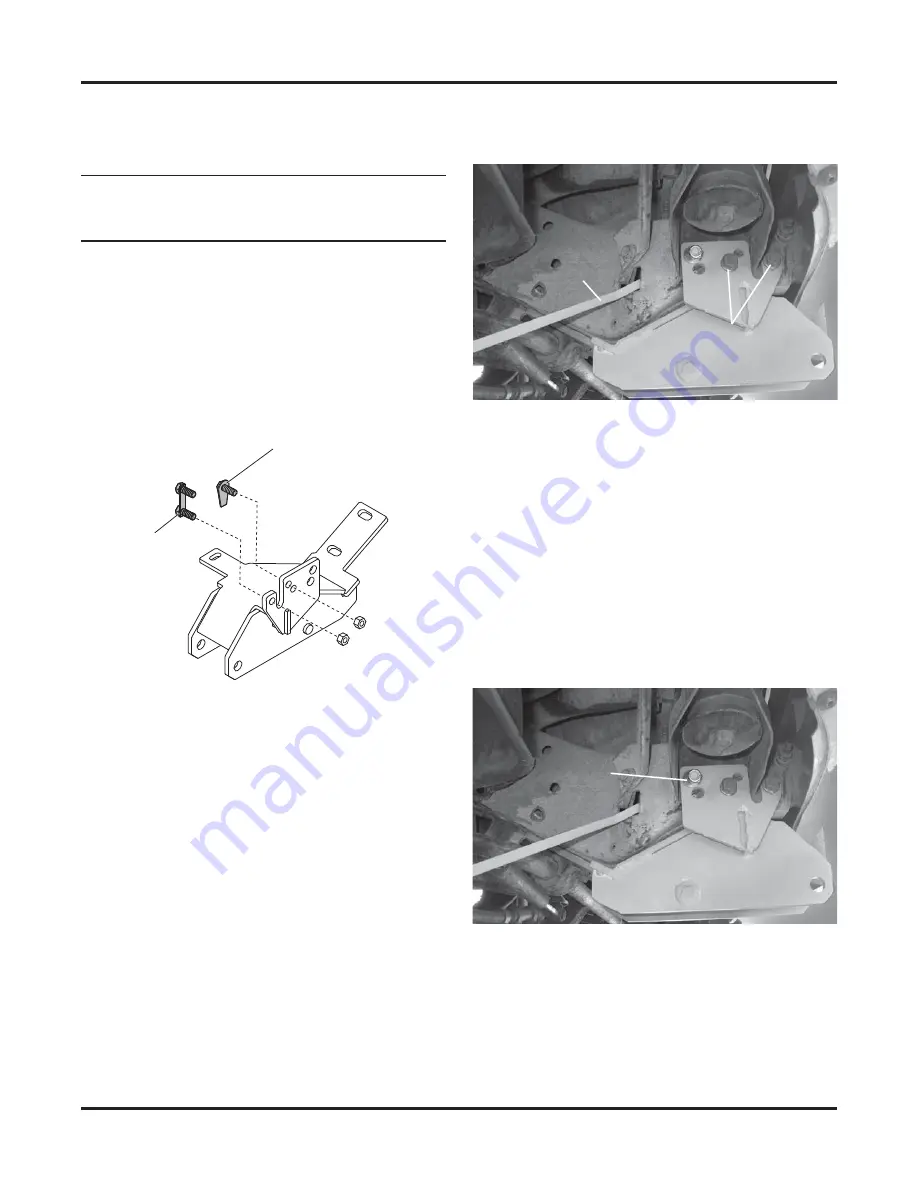
Remove the frame brackets from the sway bar
and discard the fasteners. Inspect the two forward
bumper bracket bolt-on clips. They must point out
from the vehicle centerline. If they are pointing
toward the centerline, remove and reinstall in the
proper orientation by loosely fastening the top nut
only (see illustration).

3.

Insert a 1/2" x 1-1/4" cap screw with handle and
1/2" washer through the square hole in the frame
located just behind the frame cross member. Pass
the cap screw through slot in frame and the larger
of the three holes in the mount. 

Care must be

taken to ensure the washer does not fall off
cap screw during this operation.

4.

Loosely fasten with a 1/2" washer and
1/2" locknut. Loosely reinstall the single bumper
bracket fastener through appropriate hole in the
mount.

If the bolt-on clips are pointing out from centerline,
remove the lower nut and loosen the upper.
Remove and save the remaining bumper bracket
fastener located to the rear of the bolt-on clip
fasteners. On 1500 model trucks the ground wire
tap screw interferes with the driver-side mount.
Remove and relocate the tap screw.

2.

Hang the driver-side mount by the hole in the front
of the hanger on the lower bolt in the front bumper
bracket. Loosely secure with original nut. 

Do not

tighten any fasteners until instructed to do so.

Swing the mount into place.

Reuse bumper 
bracket bolt-on clips 
on both sides.

Reuse bumper bracket 
fasteners on both sides. 
1994 to 1996 – top hole 
1997 to present – bottom hole

1/2" x 1-1/4"
Cap Screw
with Handle

Bumper Bracket
Fasteners

1/2" Washer 

and Locknut

Summary of Contents for 33980

Page 1: ...plication recommendations before installation The Undercarriage Selection Guide has specific vehicle and snowplow requirements CAUTION Read this document before installing the snowplow A DIVISION OF D...

Page 2: ...voided could result in death or serious personal injury CAUTION Indicates a potentially hazardous situation that if not avoided may result in minor or moderate injury It may also be used to alert agai...

Page 3: ...changes could change hydraulic pressure causing the blade to drop unexpectedly or damaging hydraulic components Failure to do this could result in serious personal injury CAUTION Refer to the Underca...

Page 4: ...ever operate a vehicle in an enclosed area without venting exhaust to the outside FIRE AND EXPLOSION Be careful when using gasoline Do not use gasoline to clean parts Store only in approved containers...

Page 5: ...54 540 680 ft lb 900 ft lb Grade Identification for Metric Grade 8 8 Bolt Grade Identification for Metric Grade 10 9 Bolt Metric Class 8 8 Torque Values Metric Class 10 9 Torque Values Tightening Torq...

Page 6: ...to ensure the washer does not fall off cap screw during this operation 4 Loosely fasten with a 1 2 washer and 1 2 locknut Loosely reinstall the single bumper bracket fastener through appropriate hole...

Page 7: ...Install a 7 16 x 1 1 4 cap screw with flat washer through slot in mount and frame cross member Place a 7 16 washer between the mount and cross member Loosely fasten 7 16 flat washer and locknut Do no...

Page 8: ...t adapter plates as described MOUNT ADAPTER INSTALLATION If adapter plates are required install as follows 1 Position the adapter plate against the driver s side portion of the mount adapter as shown...

Page 9: ...Lit No 40388 Rev 00 9 May 15 2008...

Page 10: ...ehicle manufacturer may require or recommend optional equipment for snow removal Do not exceed vehicle ratings with a snowplow Blizzard offers a limited warranty for all snowplows and accessories See...

Reviews: