GB
14
15
16
17
18
19
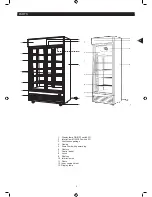
12. Inner compartment
13. Display lamp
14. Cooling indicator
15. Defrosting indicator
16. button (Note: The appliance is
provided with an automatic defrost
function. No need to set manually.)
17. SET button
18. LED display
19. buttons
Cabinet and Controller Operation Instruction
•
Connect the power plug (5) with the mains outlet.
•
The showcase starts to work.
•
The thermostat (digital temperature controller) is located at bottom of the appliance.
•
After a few seconds the LED display (18) shows the actual inner compartment (12) temperature. The cooling indicator (14) lights up. The
showcase automatically begins to cool down to the preset temperature.
•
After the inner compartment temperature reaches the preset value, the cooling indicator (14) turns off as long as the inner compartment
temperature is constant.
•
The factory pre-set temperature range is between 2°-8°C, dependent upon model. Do not adjust this within the
fi
rst 24 hours! After 24
hours adjust the temperature in gradual stages, if necessary.
Temperature adjustment
•
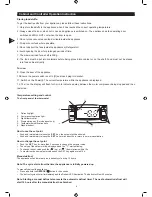
Press SET (17). The LED display (18)
flashes.
Select the desired temperature by pressing
buttons (19) and press SET
(17) again to
save the settings.
•
The LED display (18) shows the actual inner compartment temperature. The cooling indicator (14) lights up. The showcase automatically
begins to cool down to the preset value.
Defrosting
•
The appliance is provided with an automatic defrost function. The defrosting automatically starts every 6 hours and lasts 20 minutes (factory
setting).
•
Please do not change any factory settings! These determine how your appliance works. Changing these settings makes your warranty
void. Contact our service if you have any questions.
Switching the lamps on/off
•
Press the ON/OFF switch I/ 0 (1) to switch on/off the display lamp (13).
•
Press the ON/OFF switch I/ 0 (2) to switch on/off the interior lamps (10).
Locking the doors
•
Insert the key into the left lock (8) and turn 90° anticlockwise to lock the left door (11), insert the key into the right lock (8) and turn 90°
clockwise to lock the right door (11).
•
Please double check and confi
rm that there is no person inside the appliance before locking the doors (11).
7
Summary of Contents for GD1000
Page 1: ...Merchandisers GD350 GD1000 GD1000SL...
Page 14: ...GB WARRANTY 13...


