background image

GB

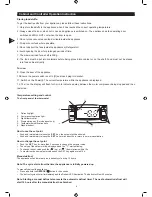
The front panel of the thermostat

1. 

Compressor operation light

2. 

Defrosting light

3. 

Energy saving light

4. 

Stand-by light

5. 

Programming key (service agent only)

6. 

Machine On/Stand-by (keep pushed)

7. 

Manual defrost (keep pushed)

How to unlock the keyboard (»Loc» message)

Push any button for more than 2s, «UnL» message will appear and the keyboard will be   unlocked.

Note:for safety reasons the keyboard locks automatically after 30s of keys inactivity. 

To execute any operation, please unlock the keyboard first.

How to see and modify the set point

Push and immediately release the         key, the set point will be showed and  starts blinking;

To change the set value push       or       arrows within 20s.

To memorize the new set point value push the          key again or wait 20s.

Manual defrost

The appliance will automatically run a defrost cycle every 12 hours.

Note: the cycle starts from the time the appliance is initially powered up.

To manually defrost the applicance:

Press and hold the DEFROST            button for 3s;

The defrost cycle will start immediately and the  LED illuminates. The defrost will last 20 minutes.

Note: starting a manual defrost also resets the automatic defrost timer. The next automatic defrost will start 

12 hours after the manual defrost has finished.

How to turn the machine in ON / STAND-BY status

Press and hold the       key for 4s, the machine will turn from ON to STAND-BY status and vice-versa.


During the button hold the         LED will blink to show status changing.

Cabinet and Controller Operation Instruction

8

Summary of Contents for GD1000

Page 1: ...Merchandisers GD350 GD1000 GD1000SL...

Page 2: ...o avoid damage through improper use 1 Keep this instruction manual for future use Should this appliance be passed on to a third party this instruction manual must be handed over 2 This appliance is he...

Page 3: ...t wrap the power cord around the appliance 16 This appliance must be earthed 17 Securely route the power cord that no unintentional pulling or tripping over it is possible 18 Connect the power plug wi...

Page 4: ...atures and catch re from electrical appliances sparking Danger of explosion 33 Make sure that no chemical substances get into the interior of the appliance 34 Warning This product is for food storage...

Page 5: ...an cause short circuit and too high temperatures can damage the synthetic covering of the appliance 44 Do not operate electrical appliances in the inner compartment 45 Take protective measures to prev...

Page 6: ...I O 2 Interior lamp ON OFF switch I O 3 Ventilation openings 4 Casing 5 Power cord with power plug 6 Castors 7 Control panel 8 Locks 9 Shelves 10 Interior lamps 11 Doors 12 Inner compartment 13 Displa...

Page 7: ...tor compressor being stopped and then restarted Temperature setting and control The front panel of the thermostat 1 Defrosting light 2 Compressor operation light 3 Digital thermostat 4 Programming key...

Page 8: ...e in gradual stages if necessary Temperature adjustment PressSET 17 The LED display 18 ashes Select the desired temperature by pressing buttons 19 and press SET 17 again to save the settings The LED d...

Page 9: ...value push or arrows within 20s To memorize the new set point value push the key again or wait 20s Manual defrost The appliance will automatically run a defrost cycle every 12 hours Note the cycle sta...

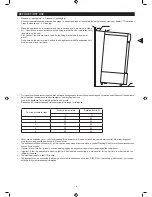
Page 10: ...moisture extreme heat or cold Please see the climate class and matched temperature range for reference Test room climate class Dry bulb temperature Relative humidity C 1 16 80 2 22 65 3 25 60 4 30 55...

Page 11: ...oors and discard separately Warning hazardous chemicals Do not allow children to play with the old appliance Do not damage the refrigerant circuit during storage and transportation of old appliances M...

Page 12: ...SQ1 TR1 TR2 TR3 L1 L2 L3 POWER PLUG LAMP SWITCH LAMP SWITCH LAMP SWITCH THERMOSTAT COMPRESSOR OVERLOAD RELAY CONDENSER FAN EVAPORATOR TEMPERATURE PROBE TRANSFROMER LAMP LAMP LAMP FOR CANOPY POWER PLUG...

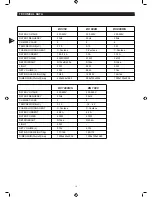
Page 13: ...LIGHT NET VOLUME L NET GROSS WEIGHT Kg DIMENSION WxHxD mm 220 240V 50Hz 4 0 10 C Pentane 1 9A 1 4A 255W 230W R134a R600a 22W 339L 75 85 620x595x1890 220 240V 50Hz 4 0 10 C Pentane 4 08A 650W R134a 90...

Page 14: ...GB WARRANTY 13...
Reviews: