40
41
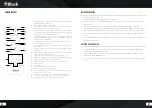
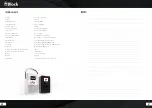
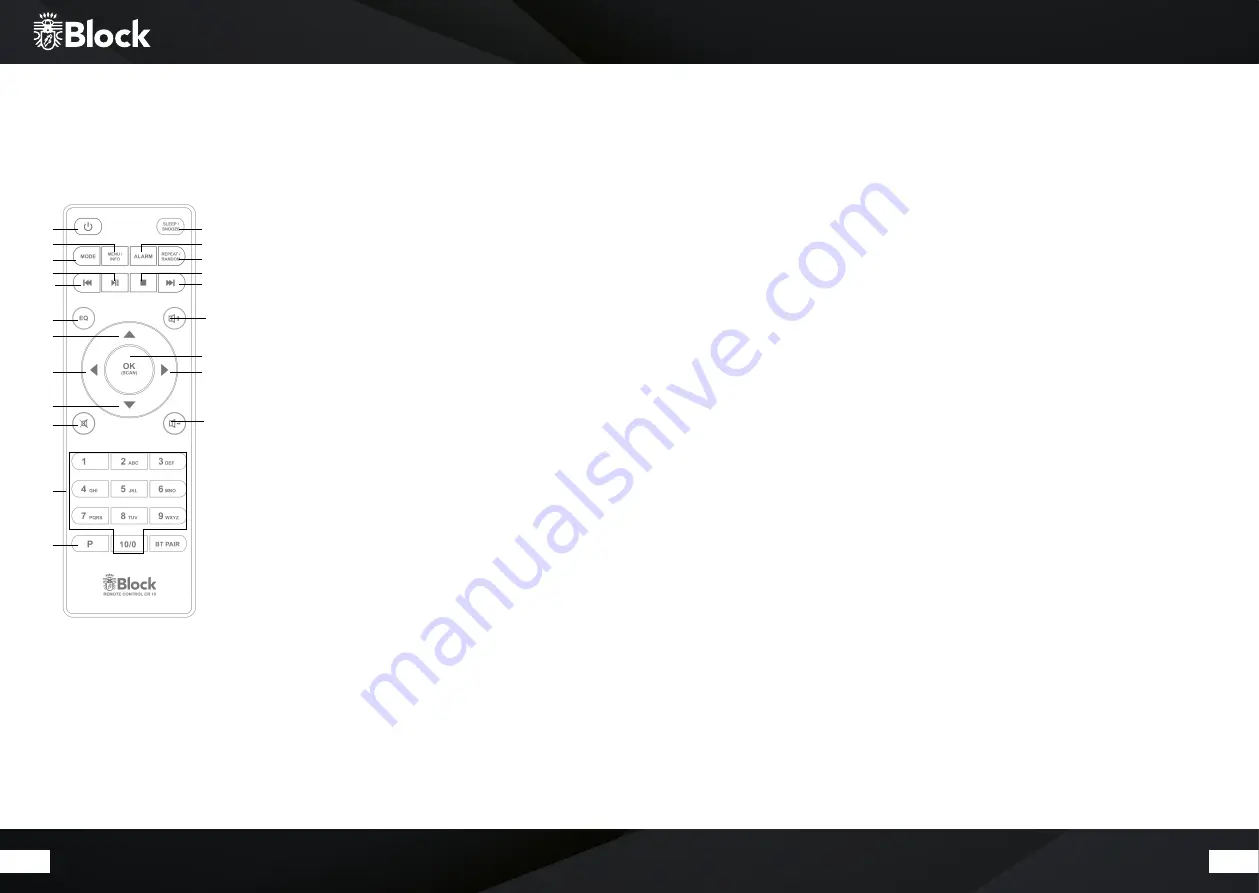
Remote control
1.
„Standby“ button: switches the device to „Clock“ mode, the display
will show the time and the date.
2. „Mute“ button: switches the sound off.
3. „Sleep / Snooze“ button: Button sets the sleep timer of the device in
the following time units: 15, 30, 45 and 60 min.
4.
„Mode“ button : By pressing, the display switches to the overview
mode. You can now use the multifunction knob or the arrow keys on
the Remote control select the music source
5.
Taste „Menu/Info“: One or more short presses will display additional
information about the music source (if any) on the display. Long press
calls up the menu of the device.
6. „Alarm“ button: A short press calls the „Alarm function“. Here you
can set your personal alarm time.
7.
„Back“ button: on radio mode, the device searches the previous lo
wer transmitter.
8.
„Forward“ button: on radio mode, the device searches the next higher
transmitter.
9.
Arrow upwards: on FM mode to increase the frequency in 0.05 MHz . In
menu to select the different points.
10. Arrow to the left: to reach the previous setting in the menu.
11. Arrow down: in FM mode by the frequency in 0.05 MHz increments to
reduce. To select the different points in the menu.
12. Arrow to the right: to access selected functions in the menu.
13. “Play” button
14. „Stop“ button.
15. „“ button: increases the volume
16. „Volume -“ button: reduces the volume
17. „BT“ button: Activates the Bluetooth mode of the device to be able
to connect it to a music source.
18. Button „1 - 10“: on radio mode, recalls on the stored transmitters
19. „P“ button: recalls or saves pre-set transmitters in radio mode
20. „EQ“ button: Short press calls up the equalizer menu.
4
7
20
10
9
11
2
19
18
1
3
17
8
15
12
13
16
5
13
6
14
Before operating
Before you can use your Internet radio, the streaming functionality or the operation via smart phone app, you need:
1. A fast internet connection.
2. A router, preferably with WLAN (wireless access point).
3. In case your router does not provide WLAN connection, you also could connect your equipment using
Ethernet cable.
4. Later, when setting up the device, you choose between wireless (WLAN) and cable connection.
5. If your wireless network is protected with Wired Equivalent Privacy (WEP) or with Wi-Fi Protected Access
(WPA), you will need a WEP or a WPA code, so that your Internet radio can be connected to the router.
6. Before proceeding, make sure that your wireless network is turned on and has a broadband internet
access.
7. In case of problems while connecting your device to the router, please try to solve them using the manual
instructions of the router.
Setting up the device
1. Connect the FM and DAB + telescopic antenna to the device. Then pull the telescopic aerial to full length.
Later, when setting up your channels, you can optimize the reception quality just changing the angle of
inclination and the tilt angle of the aerials.
2. If you want wirelessly to connect your CR-10 to the Internet via an existing wireless Network, please
mount the included WLAN antenna
3. Connect the connection cable of the enclosed power supply unit to the device and plug this into a power
outlet

