background image

Dishwasher

Use and Care Manual

USA

FOR MODELS
DW 14110 NBL00

DW 15110 NBL00 DW 15121 NBL00

DW 14120 NBL00

DW 15111 NBL00 DW 15140 NBL00

DW 14140 NBL00

DW 15120 NBL00 DW 15141 NBL00

Summary of Contents for DW 14110 NBLOO

Page 1: ...Dishwasher Use and Care Manual USA FOR MODELS DW 14110 NBL00 DW 15110 NBL00 DW 15121 NBL00 DW 14120 NBL00 DW 15111 NBL00 DW 15140 NBL00 DW 14140 NBL00 DW 15120 NBL00 DW 15141 NBL00...

Page 2: ......

Page 3: ...OADING OF DISHWARE 9 5 WHAT SHOULD NOT BE WASHED IN YOUR DISHWASHER 10 6 OPERATING THE DISHWASHER 11 7 DETERGENT RINSE AID DISPENSER 13 7 1 FILLING THE DETERGENT DISPENSER 13 7 2 FILLING RINSE AID DIS...

Page 4: ...our body weight To reduce the risk of injury do not allow children to play in on or near the dishwasher Use only detergents or rinse aids recommended for use in a household dishwasher and keep them in...

Page 5: ...disconnect the power supply to the work area by unplugging the unit tripping the circuit breaker or removing the fuse Only connect the dishwasher to the power supply when all installation and plumbing...

Page 6: ...ay arm 4 Lower rack 5 Salt container depending on model 6 Cutlery basket 7 Lower spray arm 8 Detergent dispenser 9 Filters 10 Door 11 Control panel 12 Model and Serial Tag 3 FOR MODELS DW 14110 NBL00...

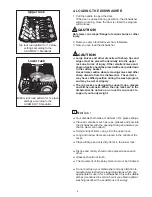
Page 7: ...are in the dishwasher do not lean on or use the cup racks to support your body weight Notice Your dishwasher holds a maximum of 12 place settings Place all containers such as cups glasses and pots in...

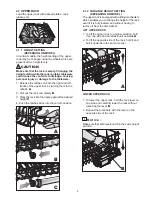
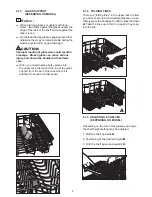
Page 8: ...ks again at the desired height C 4 Push the latches back into the correct position 4 1 2 VARIABLE HEIGHT SETTING DEPENDING ON MODEL The upper rack is equipped with a lifting mechanism which enables yo...

Page 9: ...ownwards C 4 1 5 ADJUSTABLE SHELVES DEPENDING ON MODEL A CAUTION A When placing glasses or goblets with long stems lean them against the glass support the edge of the rack or the shelf but not against...

Page 10: ...d them up again 4 2 2 INSET SHELF WITH VARIABLE HEIGHT SETTING TINES DEPENDING ON MODEL You can use this inset in the lower rack for glasses and long handled cutlery utensils If you do not need the in...

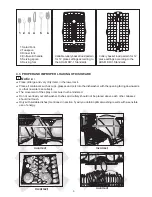
Page 11: ...y so that all items in the basket are surrounded by a sufficient water flow For larger items e g wire whisks the basket inset may be removed C Simply raise To make loading easier the cutlery basket ca...

Page 12: ...you obtain optimal washing results with a sensible use of energy Notice 9 incorrect incorrect incorrect incorrect 4 2 4 6 3 3 4 2 2 1 1 4 2 4 3 3 4 3 3 2 2 2 2 1 2 2 1 1 1 2 2 1 2 2 1 1 1 2 2 1 2 2 1...

Page 13: ...nd hand dry these items immediately when the program ends Decorated glasses porcelain fine china and china with gold rims are sensitive to machine washing They may lose their patterns and colors over...

Page 14: ...e wash cycle is completed Use the On Off button 8 to turn the dishwasher off 11 Allow your dishes to cool for 20 minutes with the door open 12 Unload the dishes Begin with the lower rack HOW TO USE YO...

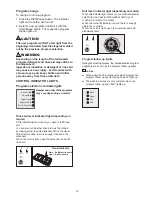
Page 15: ...s the Start Pause button The indicator light on the button will turn off 2 Select a new program and start it with the Start Pause button The respective program diode lights up The new program will NOT...

Page 16: ...mpany or county extension agent 1 Open the detergent container by pushing the lock to the right A 2 Pour put the detergent into the dispenser 3 Close the lid until it clicks in The detergent container...

Page 17: ...s If you use 2 in 1 or 3 in 1 detergents tabs you do not need additional rinse aid 1 Open the rinse aid dispenser by pressing the lock B 2 Carefully pour in rinse aid to the MAX mark 3 Close the lid u...

Page 18: ...ycle Select button before you switch the appliance on and keep this button pressed down 2 Switch the appliance on using the On Off button then release the switch 3 Hold the Cycle Select button down fo...

Page 19: ...this manual We recommend that the dishwasher only be repaired by an authorized service agent Only use special dishwasher salt in your machine to soften the water Do not use coarse grained salt Small g...

Page 20: ...wipe the surface in the direction of the grain Cleaning the door gasket Regularly clean the door gasket with a damp cloth to remove food particles and other debris Use a gentle household cleaner for...

Page 21: ...tighten the fastening screw by turning it around to the left 7 Insert the lower rack What if the dishwasher will not run Is the machine plugged in Are all fuses operative Is the water supply fully tur...

Page 22: ...ose a program with a longer washing time Evaporation of water is more difficult with these items Cutlery or dishes of this type is not suited for dishwashers Possible causes How to fix these problems...

Page 23: ...rs lose their efficiency when stored under unfavorable conditions Store detergents in a dry location Close the lid of the container securely Cleaning of these items is made difficult by their poor sur...

Page 24: ...th a damp cloth to remove food particles and other debris Use a gentle household cleaner for the outside and the door seals and rinse thoroughly Possible causes How to fix these problems Milky appeara...

Page 25: ...r filling in salt After the program is complete check whether the lid may have loosened Remove coarse dirt under running water and carry out the Rinse and Hold program every 2 days without detergent C...

Page 26: ...ng it Pour the detergent in just before washing When loading the dishwasher take care to ensure that you do not accidentally block detergent cup with large dishware or utensils Store detergents in a d...

Page 27: ...or ppm Adjust the water hardness level setting accordingly Detergents should not be stored longer than 2 months in open packages Store detergents in a dry location Close the lid of the container care...

Page 28: ...n hose is properly placed and open Load capacity 12 place settings Permissible water pressure 4 35 145 psi 0 3 10 bars Electrical connection 120 V volts 12 A amps 60 Hz hertz Total power 1200 W watts...

Page 29: ...ter functionality if the original model is no longer available Labor removal and installation charges are the responsibility of the consumer Disclaimers of warranties and exclusions Warranty does not...

Page 30: ......

Page 31: ......

Page 32: ...17 2564 01 00 B1 USA...

Reviews: