background image


08 


20180108/TT/K8/Version 1.0


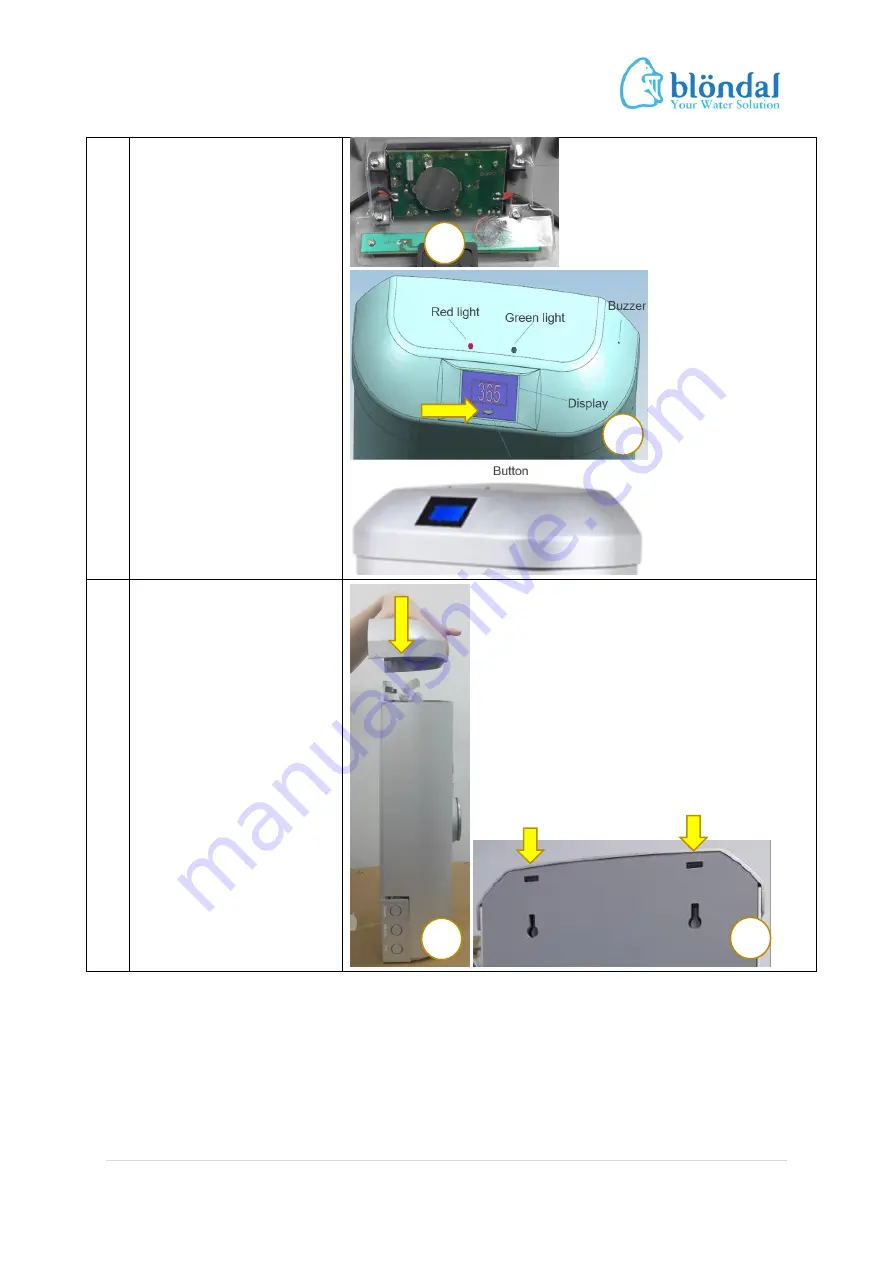
Insert 

2pcs 

AA 

batteries  to  the  black 
battery box. 

c.


Re-fasten 

the 

screws  together  with 

the  PCB  protector  to 
the top cover.   

d.


Press 

the 

Digital 

Display 

Module 

button to check if the 
day counter is shown 

as “365” and the

 LED 

light 

is 

ON 

or 

reposition 

the 

batteries.  


9  Cover the top cover. 

a.


Carefully place the top 
cover to the top of the 

assembly  and  ensure 

all  ribs  beneath  the 

top  cover  are  seated 
on  the  front  cover 

edge.    

b.


Gently apply force  on 

both  side  of  the  top 
cover  as  indicated.  A 

tick  sound  can  be 
heard to show the top 

cover  is  fully  seated 
onto the assembly. 


Summary of Contents for Kalla 2

Page 1: ...Källa 2 Point of Use Water Filter Operation Manual ...

Page 2: ...02 20180108 TT K8 Version 1 0 Table of Contents Page 1 System Briefing 03 2 Technical Specification 04 3 Installation 05 4 Warning 09 5 Troubleshooting 10 6 Parts 11 7 Contact 12 ...

Page 3: ...ption Flushing of the membrane is naturally done when the main water tap is turned on It helps to clean the membrane prevent it from choking and enhance its life span The flushed out water is safe to be used for cleaning purposes in the kitchen Filtration takes place when the filtration faucet is turned on Water passes through the UF membrane with particulate in the water reduced down to 0 01 micr...

Page 4: ...ane Activated Carbon Kinetic Degradation Fluxion Model UF K8 GAC K8 Filtration capacity 10 800 litres Standard Tap Water Quality 3 600 litres Standard Tap Water Quality Pressure range 1 3 bars 1 8 bars Temp range 5 40 degC 15 45 degC Remarks UF K8 Do not drop the cartridge or place under direct sunlight Do not remove the preservation pack while storing Standard storing duration 1 years from manufa...

Page 5: ...8 Version 1 0 3 Installation No Procedure Picture 1 Remove the product from its packing 2 Uncover the top cover a Push the locking of top cover from the back s holes to release the top cover b Lift the top cover up a b ...

Page 6: ...t connectors in order a Filter water 1 4 b Flush water 1 2 c Inlet 1 2 5 Connect tubing fittings a Connect tubing fittings to the inlet outlet of the UF GAC according to indication b Flush UF for at least 3 min prior connecting to the GAC ensure no whitish found in the water otherwise to continue flushing c Connect UF outlet side to the GAC inlet d Flush GAC for at least 3 min ensure no b a 15 deg...

Page 7: ...t connector according to the indication 7 Assemble front cover to back cover a Insert front cover ribs to the back cover slottings at 15deg tilt b Apply mild force at front cover top to lock the ribs to the back cover slot c Push front cover towards the back cover 8 Assemble batteries a Unfasten 4 screws as indicated to remove the PCB protector b Insert 1pc button cell CR2032 to the PCB as indicat...

Page 8: ...eck if the day counter is shown as 365 and the LED light is ON or reposition the batteries 9 Cover the top cover a Carefully place the top cover to the top of the assembly and ensure all ribs beneath the top cover are seated on the front cover edge b Gently apply force on both side of the top cover as indicated A tick sound can be heard to show the top cover is fully seated onto the assembly b a c...

Page 9: ...he buzzer as well as the red LED light will on It will remain for 90seconds every 24 hours until the module is reset c Press the screen s button for 10seconds to reset the timer to 365 and to turn off the buzzer d For normal operation both the daily counter screen and green LED will light when the screen s button is pressed for 1second Remark The Digital Display Module has a memory function to con...

Page 10: ...e filter inlet valve to pressure 3bars 5 No figure shows on display when button is pressed Check button battery CR2032 position Replace battery if no figure shows after battery repositioned 6 No green LED lights when button is pressed Check button battery CR2032 position Replace battery if no figure shows after battery repositioned 7 Unable to reset counter s display to 365 or to turn off the buzz...

Page 11: ...adation Fluxion Cartridge GAC K8 1 pc 3 Digital Display Module with buzzer 1 set 4 Pressure Gauge 0 10 bar 1 pc 5 90deg Angle Speed Fit for 1 4 OD tubing 2 pcs 6 90deg Angle Speed Fit for 3 8 OD tubing 2 pcs 7 Tee Speed Fit for 1 4 OD tubing 1 pc 8 NPT Speed Fit Connector 1 4 1 pc 9 NPT Speed Fit Connector 3 8 2 pcs 10 RO Tubing 1 4 OD 1 meter 11 RO Tubing 3 8 OD 1 meter ...

Page 12: ...san Malaysia Tel 603 5569 1888 Hotline 1300 88 0123 Singapore Blondal S Pte Ltd 52 Ubi Avenue 3 Frontier Building 03 29 Singapore 408867 Tel 65 6741 7277 Fax 65 6745 2204 Brunei Blondal B Pte Ltd Lot 11352 Jalan Kebangsaan Lama Off Jalan Muara Kampung Manggis BC4115 P O Box 448 BSB BS8670 Brunei Darussalam Tel 673 2336 788 Fax 673 2336 689 ...

Reviews: