background image

CLEANING INSTRUCTIONS

PROCEDURE:  Clean Tea Brewer

PRECAUTIONS:    Disconnect brewer from electric power. 


Allow brewer to cool.

FREQUENCY:    Daily

TOOLS:   

Mild Detergent, Clean Soft Cloth or Sponge


Bristle Brush, Bottle Brush

1.  Disconnect brewer from electric power. 


Allow brewer to cool before cleaning.

2.  Remove dispenser.
3.  Remove and empty brew chamber.
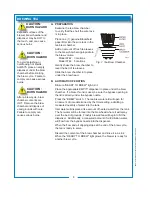
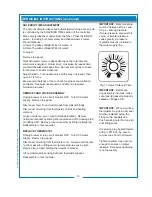
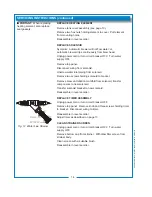
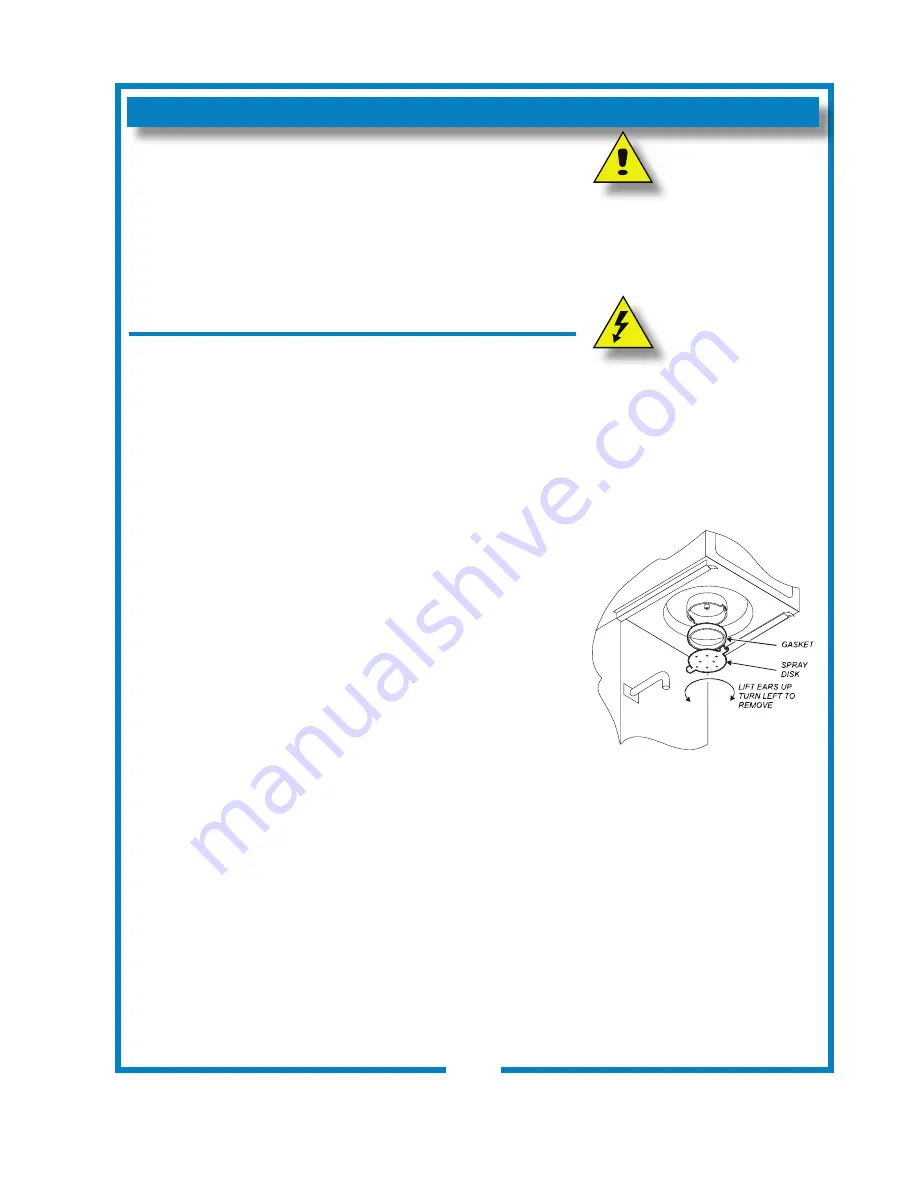
4.  Remove the spray disk from the brew head (See figure 8):

Press up on the spray disk ears, then turn the disk to the left  

to unlatch.  Remove the gasket from inside the brew head.

5.  Wipe inside of brew head and area around the brew head  

with a soft clean cloth or sponge moistened with clean water.

6.  Wash the spray disk in a sink using warm water and a mild


detergent.  A bristle brush may be used to clear clogged  

spray holes.  Rinse the spray disk with clean water and allow  

to air dry.

7.  Wash the brew chamber in a sink using warm water and a  

mild detergent.  A bristle brush may be used to clean the    

inside. Rinse with clean water and allow to air dry.  

8.  Wipe the exterior of the brewer with a soft clean cloth or  

sponge moistened with clean water.

10. Reinstall the gasket 

INSIDE

 the brew head, then reinstall the  

spray disk.

11. Be sure the wire rack is in place in the brew chamber, then  

reinstall the brew chamber.

12. Clean dispensers by filling with warm soapy  water.  Empty  

and rinse with clean water.  Wipe the exterior with a soft  

clean cloth or sponge moistened with clean water.  Invert and  

allow to air dry.

Procedure is complete

CAUTION:  

BURN HAZARD

Brewing and serving

temperatures of tea are 

extremely hot.

Hot tea will cause serious skin 

burns.

CAUTION:  

SHOCK HAZARD

Do not submerge or immerse 

brewer in water.  

IMPORTANT:

DO NOT use steel wool, sharp 

objects, or caustic, abrasive or 

chlorinated cleansers to clean 

the brewer or dispensers.

Fig. 8  Cleaning

9

IL1677

606 Owners Manual for 8742-8748 T

ea Brewer  2M-761

16 


606 

Owners 

Manual 

for 

8742-8748 T

ea 

Brewer 

 2M-761

16 
  

Summary of Contents for 8742 Series

Page 1: ...fax 314 781 2714 www bloomfieldworldwide com p n 2M 76116 Rev J M606 100915 606 OWNERS MANUAL for ICED TEA BREWING SYSTEM MODELS 8742 8748 Includes Installation Operation Use Care Servicing Instructions Model 8748 Brewer with optional 8602 Iced Tea Dispenser ...

Page 2: ...nters are not covered by this warranty THE FOREGOING OBLIGATION IS EXPRESSLY GIVEN IN LIEU OF ANY OTHER WARRANTIES EXPRESSED OR IMPLIED INCLUDING ANY IMPLIED WARRANTY OF MERCHANTABILITY OR FITNESS FOR A PARTICULAR PURPOSE WHICH ARE HEREBY EXCLUDED BLOOMFIELD LLC SHALL NOT BE LIABLE FOR INDIRECT INCIDENTAL OR CONSEQUENTIAL DAMAGES OR LOSSES FROM ANY CAUSE WHATSOEVER This warranty is void if it is d...

Page 3: ... AGENCY LISTING INFORMATION 3 INSTALLATION INSTRUCTIONS 4 OPERATION 6 BREWING TEA 8 CLEANING INSTRUCTIONS 9 TROUBLESHOOTING SUGGESTIONS 10 SERVICING INSTRUCTIONS 11 Deliming Instructions 15 EXPLODED VIEW PARTS LIST 16 WIRING DIAGRAMS 20 APPLICABILITY This manual applies to the following Bloomfield products 8742 8748 606 Owners Manual for 8742 8748 Tea Brewer 2M 76116 8742 8748 3 5 Gallon Ice Tea B...

Page 4: ...FEATURES AND OPERATING CONTROLS 2 IL1673 606 Owners Manual for 8742 8748 Tea Brewer 2M 76116 ...

Page 5: ...appliance is intended for use in commercial establishments where all operators are familiar with the appliance use limitations and associated hazards Operating instructions and warnings must be read and understood by all operators and users Except as noted this piece of equipment is made in the USA and has American sizes on hardware All metric conversions are approximate and can vary in size The f...

Page 6: ...ressure regulator must be installed in the water supply line to limit the pressure to not more than 90 PSI in order to avoid damage to lines and solenoid A water shut off valve should be installed on the incoming water line in a convenient location Use a low restriction type valve such as a 1 4 turn ball valve to avoid loss of water flow thru the valve The provided water line strainer must be inst...

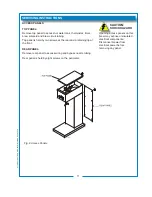
Page 7: ...trical shock in the event of internal damage Nev er cut off the ground prong nor twist a blade to fit an existing receptacle Contact a licensed electrician to install the proper circuit and receptacle NSF requires that the brewer be able to be moved for cleaning underneath A flex line or loops of copper tubing will satisfy this requirement See Figure 2 below ELECTRICIAN S INSTALLATION INSTRUCTIONS...

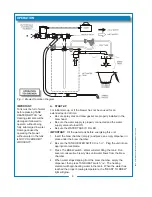
Page 8: ...nit into an appropriate receptacle 3 Press The BREW switch Water will start filling the tank Run several consecutive brew cycles until water flows from the brew chamber 4 When water stops dripping from the brew chamber empty the dispenser then press TANK HEAT switch on The heating element will begin heating water in the tank When the water has reached the proper brewing temperature the READY TO BR...

Page 9: ... an external water supply to flow into the water tank The incoming water forces heated water out of the tank to perform the brew Additionally a portion of the unheated water is bypassed into the dispenser to dilute and cool the brew The proportion of water delivered to the brew versus the amount water diverted to dilution is controlled by a restrictor in the bypass line and an adjustable needle va...

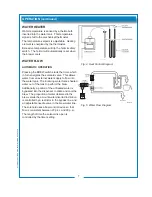
Page 10: ...ter from the tank The hot water will be forced into the brew head where it will spray over the bed of grounds Freshly brewed tea will begin to fill the dispenser Additionally a measured amount of cold dilution water will flow from the bypass nozzle into the dispenser When the flow and all dripping stops at the end of the brew cycle the tea is ready to serve Discard the contents of the brew chamber...

Page 11: ...7 Wash the brew chamber in a sink using warm water and a mild detergent A bristle brush may be used to clean the inside Rinse with clean water and allow to air dry 8 Wipe the exterior of the brewer with a soft clean cloth or sponge moistened with clean water 10 Reinstall the gasket INSIDE the brew head then reinstall the spray disk 11 Be sure the wire rack is in place in the brew chamber then rein...

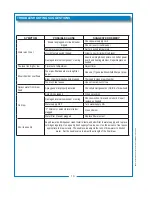
Page 12: ...ew Brew chamber dispense hole plugged Thoroughly clean brew chamber Too much tea leaves Use correct amount of tea Sprays water from brew head Spray gasket improperly installed Check reinstall gasket on INSIDE of brew head No brew Spray disk plugged Clean spray disk Damaged internal component or wiring Check switches timer and solenoid Repair replace as needed Water supply OFF Turn water supply ON ...

Page 13: ...S PANELS TOP PANEL Remove top panel to access hot water tank thermostat timer brew solenoid and brew circuit tubing Top panel is held by two screws at the rear and a retaining lip at the front REAR PANEL Remove rear panel to access wiring and bypass nozzle tubing Rear panel is held by eight screws on the perimeter Fig 8 Access Panels 11 IL1678 606 Owners Manual for 8742 8748 Tea Brewer 2M 76116 ...

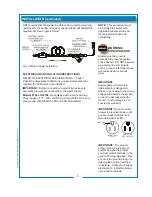
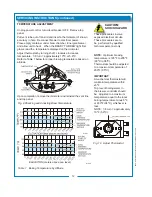
Page 14: ...usting Brew Temperature CAUTION SHOCK HAZARD These procedures involve exposed electrical circuits These procedures are to be performed by qualified technical personnel only NOTE Optimum brewing temperature is 195ºF to 205ºF 90ºC to 96ºC Thermostat should be adjusted to a maximum temperature of 200ºF 95ºC IMPORTANT A mechanical thermostat will maintain temperature within 5ºF To prevent boiling wate...

Page 15: ...del 8748 of water To adjust Remove top panel Total delivered volume is dependant upon the total time the solenoid is energized Adjust timer clockwise increases time counterclockwise decreases time Run several cycles to check total amount of water delivered Adjust dilution Turn needle valve all the way in closed then open 4 1 2 turns Brew several batches of tea to check for proper concentration and...

Page 16: ...on manifold from solenoid transfer components to new solenoid Transfer solenoid bracket to new solenoid Reassemble in reverse order REPLACE TIMER ASSEMBLY Unplug power cord or turn circuit breaker OFF Remove top panel Remove knob and three screws holding timer to bracket Disconnect wiring to timer Reassemble in reverse order Adjust timer as described on page 13 CLEAN STRAINER SCREEN Unplug power c...

Page 17: ...embly as described on page 13 3 Remove the water tank from the brewer body by lifting straight up Empty all water from the tank Set the tank back into the brewer 4 Mix 2 quarts of deliming solution according to the manufac turer s directions Carefully pour the deliming solution into the water tank Lower the lid assembly back onto the tank Allow to sit for 30 minutes or as directed by the manufac t...

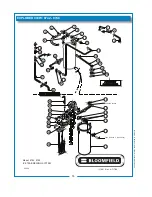
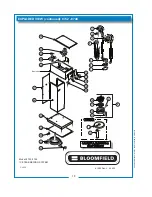
Page 18: ...WING SYSTEM PL606 IL1681 Rev A 7 7 09 46 29 Purchase Locally Tube Silicone 1 see above 31 32 33 34 35 37 38 39 40 41 42 43 44 45 1 2 3 7 8 9 10 11 12 13 14 15 16 17 18 19 20 22 21 28 27 23 24 25 26 4 5 6 606 Owners Manual for 8742 8748 Tea Brewer 2M 76116 ...

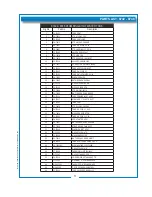
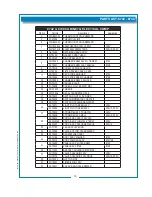
Page 19: ...16 20 HEX HD BRASS 21 2V 70111 TUBE FORMED INLET ASSY 22 2V 73027 STRAINER Y PLASTIC W FT 23 2V 70102 TUBE VENT 24 2K 70429 FTG NYLON Y 1 4X3 16 25 F4 70426 TUBE SIL 25 ID X 1 5 LG 26 2C 70414 WASHER RESTRICTOR 27 F4 70430 TUBE SIL 25 ID X 12 LG 28 F4 70423 SPOUT WATER ASSY 29 2C 73457 NUT 8 32 HEX HEAD KEPS MS 31 2C 70134 STRAP HOLD DOWN ASSY 32 F4 70420 ELBOW OUTLET ASSY 33 2I 70152 GASKET ELEM ...

Page 20: ...742 8748 18 Model 8742 8748 ICE TEA BREWING SYSTEM PL606 IL1682 Rev C 9 15 10 1 2 3 4 5 6 7 16 17 18 19 20 10 9 11 8 12 13 14 15 21 22 23 24 25 26 27 Basin Assy 28 29 30 31 32 606 Owners Manual for 8742 8748 Tea Brewer 2M 76116 ...

Page 21: ... 76058 COVER 3 GAL TEA DISP MOL 15 DD 70332 TUBE DIP 16 2M 70416 DECAL TEA BREWER 3 5 6 17 2E 70411 SWITCH ON OFF LITED RED 18 2E 70435 SWITCH MOMENTARY NC 125 2 19 2E 70733 SWITCH ROCKER BREW START 20 2J 72671 LIGHT PILOT GREEN 125V 120V 2J 70644 LIGHT PILOT GREEN 250V 230UK 230V 21 2K 70215 STRAIN RELIEF STR HEYCO 120V 2K 70648 STRAIN RELIEF SMALL 230UK 230V 22 2E 70353 CORD CAP ASSY 120V 15A F4...

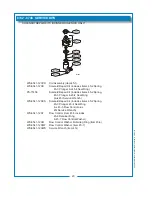
Page 22: ...ger 45 4 Seal Ring plus 45t Service Wrench WS 8541 120KS Solenoid Repair Kit includes items 45 2 Spring 45 3 Plunger 45 4 Seal Ring x 45 5 Flow Control plus 45t Service Wrench WS 8541 120F Flow Control item 45 5 includes 45 6 Retainer Ring 45 7 Flow Control Washer WS 8541 120R Flow Control Washer Retaining Ring item 45 6 WS 8541 120FW Flow Control Washer item 45 7 WS 8541 120WS Service Wrench item...

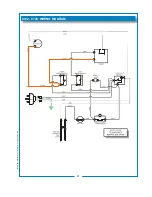
Page 23: ...8742 8748 WIRING DIAGRAM 21 606 Owners Manual for 8742 8748 Tea Brewer 2M 76116 ...

Page 24: ...10 Sunnen Drive St Louis MO 63143 telephone 314 678 6336 fax 314 781 2714 www bloomfieldworldwide com ...

Reviews: