For Customer Service:
Please call 877-713-3189 (Toll Free),
or email: Support@fot-usa.com
3
• Never try to split logs larger than those indicated in the
machine. Do not use the log splitter for anything other
than splitting logs. Do not force log through splitter.
• Never use an extension cord that is not rated for outdoor
use. The cord should not be longer than 30 feet. The cord
should be of a heavy-duty construction (12-10 AWG).
• Check that the electric circuit is adequately protected and
corresponds with the power, voltage and frequency of
the motor. Check that there is a ground connection and
splitter. Prevent body contact with ground surfaces: pipes,
radiatiors, ranges, refrigerator enclosures, etc. Never open
do not touch the plug’s metal prongs when plugging in or
unplugging the log splitter.
• Do not remove jammed logs with your hands. If an object
becomes lodged in the ram, unplug electric motor before
attempting to remove the foreign object.
• Do not use the log splitter in areas where fumes from
explosion hazard.
• Disconnect power by unplugging power cord when not in
use, before making adjustments, changing parts, cleaning,
or working on the log splitter.
• Maintain and keep the log splitter clean for the best and
safest performance.
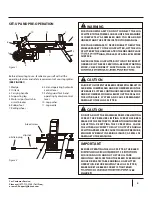
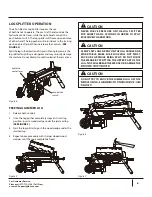
SAFETY DECAL
The Electric Log Splitter has been designed and manufactured
to provide you with the safety and reliability you would
expect from an industry leader in outdoor power equipment
manufacturing.
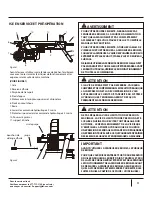
important information while you are operating the unit.
This important safety decal is illustrated below, and is shown
here to help familiarize you with the location and content of
the safety messages you will see as you perform normal log
splitting operations. Please review this decal now, and if you
have any questions regarding its meaning or complying with
these instructions, reread the complete safety instruction text
in this manual, or contact your local dealer.
the control lever guard.
Follow the safety instructions necessary
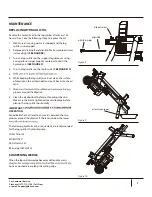
STEPS FOR WORKING ON ELECTRIC LOG SPLITTER
1.
2. Replace or repair the part on the log splitter.
3. Check all parts that were repaired, or removed during
NOTE: All repair parts must come from the factory. Never
splitter.
SPECIFICATIONS
33299
120V~60HZ
IP54
3550rpm
6 Ton
15.4"
2.36"
Log Capacity
Diameter
2"~9.8"
Length
20.5"
3.4L
Packing Size
Length
43.1"
Width
13"
Height
20.3"
101lb
Hydraulic Oil Capacity
Gross Weight
Model Number
Motor
Motor No-load Speed
Max. Splitting Force
Max. Cylinder Travel
Diameter of Cylinder
even if its diameter exceeds the maximum diameter described in the
ELECTRICAL REQUIREMENTS
Connect the main leads to a standard 110V ±10% electrical
supply which has protection devices under-voltage,
over-voltage, over-current, as well as a ground fault circuit
interrupter (GFCI) or a ground fault interrupter (GFI)
with a maximum residual current of 0.03A.
Reading this manual, and the safety instructions it contains,
will provide you with the necessary knowledge to operate
SPECIFICATIONS AND ELECTRICAL REQUIREMENTS
APPLICATION CONDITIONS
The 6-Ton Electric Log Splitter has been designed as a home use
model only. It is designed for operating at ambient temperatures
between 40° F. and 105° F. The log splitter can be stored or
transported under ambient temperatures between -10° F. and
130° F.
safety decal on the log splitter to remind you of some of the


