11
o
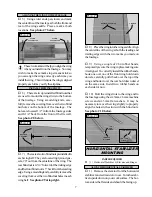
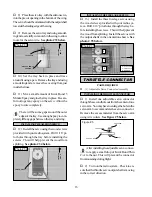
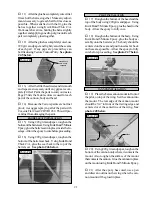
13) With the rudder tight against the stabi-
lizer, rotate the rudder to one side about 45º. Ap-
ply six drops of Kwik Bond Thin C/A to the ex-
posed area of each hinge. Allow the glue to cure
for about ten minutes. Once cured, the rudder
may be stiff and difficult to move. This is normal.
Gently move the rudder back and forth about five
to ten times to free it up.
MOUNTING THE TAIL WHEEL BRACKET
o
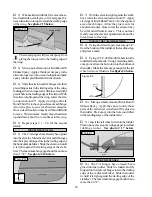
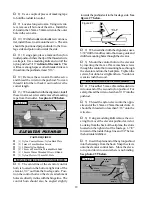
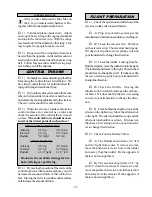
14) Align the tail wheel mounting bracket
with the centerline of the fuselage. Use a pen
and mark the three mounting locations on the
fuselage.
o
15) Move the mounting bracket to the side.
Using a 1/16” drill bit, drill three pilot holes through
the bottom of the fuselage at the marks you just
made.
o
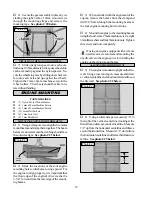
16) Secure the mounting bracket in place us-
ing three 3mm x 12mm wood screws. See photo
# 18 below.
Photo # 18
o
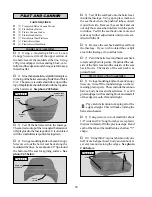
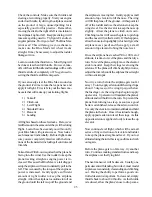
17) Slide the wheel collar that has been
preinstalled onto the tail wheel wire tight up
against the bottom of the bracket. Tighten the
3mm x 6mm machine screw to hold it in place.
o
18) Install the 25mm diameter tail wheel onto
the tail wheel wire. Secure the tail wheel in place
using one wheel collar and one 3mm x 6mm ma-
chine screw. Slide the wheel collar on enough so
it is up against the tail wheel, but not so tight that
the tail wheel won't turn. The tail wheel should
rotate without binding.
PARTS REQUIRED
MAIN LANDING GEAR
ALIGNING THE MAIN GEAR ASSEMBLY
o
{1} Wire Main Gear Assembly
o
{2} Nylon Mounting Straps w/4mm Slot
o
{2} Nylon Mounting Straps w/3mm Slot
o
{2} Nylon Axle Spacers
o
{2} Wheel Collars w/3mm x 6mm Machine Screws
o
{8} 3mm x 12mm Wood Screws
o
{2} 127mm Diameter Wire Spoke Wheels
INSTALLING THE TAIL WHEEL
o
1) Inspect each of the nylon mounting straps.
Some straps have 4mm molded slots and others
have 3mm molded slots. To attach the main gear
assembly you will need two straps with 4mm
molded slots and two straps with 3mm molded
slots.
o
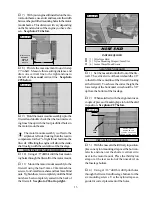
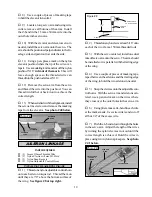
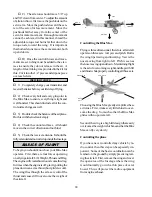
2) Set the main gear assembly in place on
the bottom of the fuselage. The larger diameter
wire (4mm) should face to the rear and the front
edge of the forward gear wire should be 4” back
from the firewall. See photo # 19 below.
Photo # 19
o
4) With the gear held firmly in position, place
two 3mm nylon mounting straps, equal distance
apart, over the front wire. Place two 4mm nylon
mounting straps, equal distance apart, over the
rear wire.
o
5) Using a 1/16” drill bit, drill pilot holes
through the fuselage for the mounting screws. Use
the nylon straps as a guide for correct placement
of the holes.
o
3) While holding the gear assembly in this
position, center it side-to-side on the fuselage.
When satisfied with the alignment use a couple of
pieces of masking tape to hold the gear in position.
INSTALLING THE MAIN GEAR ASSEMBLY
MOUNTING
BRACKET
3mm x 10mm
WOOD SCREWS
WHEEL
COLLAR
TAIL WHEEL
GEAR
WIRE
FRONT

