background image

®

Outdoor Patio Heater

Model No. GWU512B

OWNER’S MANUAL

Save these instructions for future reference.   
If you are assembling this unit for someone else,  give this 
manual to him or her to read and save  
for future reference.  

Manufactured in China for:
Blue Rhino Global Sourcing, LLC
Winston-Salem, NC 27105 USA
1.800.762.1142, www.bluerhino.com

© 2007 Blue Rhino Global Sourcing, LLC. All Rights Reserved
Endless Summer

®

 is a Registered Trademark of Blue Rhino Global Sourcing, LLC.  All Rights Reserved 

GWU512B-OM-104 EFS

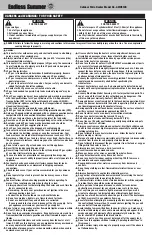
WARNING

FOR YOUR SAFETY:

   Improper installation, adjustment, 

alteration, service or maintenance can 
cause injury or property damage.  

   Read the installation, operation, and 

maintenance instructions thoroughly 
before installing or servicing this 
equipment.  

   Failure to follow these instructions could 

result in fire or explosion, which could 
cause property damage, personal injury, or 
death. 

DANGER

CARBON MONOXIDE HAZARD

•  This appliance can produce 

carbon monoxide which has no 
odor.

•  Using it in an enclosed space 

can kill you.

•  Never use this appliance in 

an enclosed space such as a 
camper, tent, car or home.

WARNING

FOR YOUR SAFETY:

For Outdoor Use Only 

(outside any enclosure)

Table of Contents

Important Safeguards . . . . . . . . . . . . . . . . . . . . . . . . . . . . . . . . . . . . . . . . . . . Page 2
Exploded View & Hardware . . . . . . . . . . . . . . . . . . . . . . . . . . . . . . . . . . . . . . . . . . .  3
Assembly Instructions. . . . . . . . . . . . . . . . . . . . . . . . . . . . . . . . . . . . . . . . . . . . . . .  4
Installling LP Gas Tank  . . . . . . . . . . . . . . . . . . . . . . . . . . . . . . . . . . . . . . . . . . . . . .  7
  Insert LP Gas Tank. . . . . . . . . . . . . . . . . . . . . . . . . . . . . . . . . . . . . . . . . . . . . . .  7
  Secure LP Gas Tank. . . . . . . . . . . . . . . . . . . . . . . . . . . . . . . . . . . . . . . . . . . . . .  7
  Connect LP Gas Tank. . . . . . . . . . . . . . . . . . . . . . . . . . . . . . . . . . . . . . . . . . . . .  7
  Disconnect LP Gas Tank. . . . . . . . . . . . . . . . . . . . . . . . . . . . . . . . . . . . . . . . . . .  7
Operating Instructions. . . . . . . . . . . . . . . . . . . . . . . . . . . . . . . . . . . . . . . . . . . . . . .  8
  Checking for Leaks . . . . . . . . . . . . . . . . . . . . . . . . . . . . . . . . . . . . . . . . . . . . . .  8
  Before Lighting . . . . . . . . . . . . . . . . . . . . . . . . . . . . . . . . . . . . . . . . . . . . . . . . .  8
  Lighting. . . . . . . . . . . . . . . . . . . . . . . . . . . . . . . . . . . . . . . . . . . . . . . . . . . . . . .  8
  When heater is ON. . . . . . . . . . . . . . . . . . . . . . . . . . . . . . . . . . . . . . . . . . . . . . .  8
  Re-Lighting . . . . . . . . . . . . . . . . . . . . . . . . . . . . . . . . . . . . . . . . . . . . . . . . . . . .  8
  Shutdown . . . . . . . . . . . . . . . . . . . . . . . . . . . . . . . . . . . . . . . . . . . . . . . . . . . . .  8
Cleaning and Care  . . . . . . . . . . . . . . . . . . . . . . . . . . . . . . . . . . . . . . . . . . . . . . . . .  8
  Cleaning Surfaces . . . . . . . . . . . . . . . . . . . . . . . . . . . . . . . . . . . . . . . . . . . . . . .  9
  Maintenance . . . . . . . . . . . . . . . . . . . . . . . . . . . . . . . . . . . . . . . . . . . . . . . . . . .  9
  Storage . . . . . . . . . . . . . . . . . . . . . . . . . . . . . . . . . . . . . . . . . . . . . . . . . . . . . . .  9
Product Registration . . . . . . . . . . . . . . . . . . . . . . . . . . . . . . . . . . . . . . . . . . . . . . . .  9
Limited Warranty  . . . . . . . . . . . . . . . . . . . . . . . . . . . . . . . . . . . . . . . . . . . . . . . . . .  9
Troubleshooting  . . . . . . . . . . . . . . . . . . . . . . . . . . . . . . . . . . . . . . . . . . . . . . . . . .  10
Specifications. . . . . . . . . . . . . . . . . . . . . . . . . . . . . . . . . . . . . . . . . . . . . . . . . . . . .10

The use and installation of this product must conform to local codes. In absence of local codes, 
use the 

National Fuel Gas Code, ANSI Z223.1/NFPA 54, CAN/CGA-B149.1, Natural Gas and 

Propane Installation Code.  

California Proposition 65: Chemicals known to the State of California to cause cancer, birth 
defects, or other reproductive harm are created by the combustion of propane.

English 

page 1

Français  page 11
Español  página 21

Summary of Contents for Endless Summer GWU512B

Page 1: ...n produce carbon monoxide which has no odor Using it in an enclosed space can kill you Never use this appliance in an enclosed space such as a camper tent car or home WARNING FOR YOUR SAFETY For Outdo...

Page 2: ...lean Inspect heater before each use Installation and repair should be done by a qualified service person Do not alter heater in any manner Do not use the heater unless it is COMPLETELY assembled and a...

Page 3: ...Wheel Assembly Cover 56 01 361 17 Base 56 01 350 18 Weight Plate 56 01 359 19 Tank Retention Chain 56 01 186 Exploded View Hardware A Screw 5 32 32 x 8 Stainless Steel Round Head 3 pcs B Screw 3 16 2...

Page 4: ...all hardware connections by hand first Once the step is completed go back and fully tighten all hardware Follow all steps in order to properly assemble your product To complete assembly you will need...

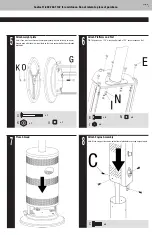
Page 5: ...up two outer holes in base with those in weight plate so that your anchor bolt will pass through both holes G x 1 K x 1 O x 1 6 Attach Platform and Post TIP To tighten use a 7 16 wrench on Bolt and a...

Page 6: ...ach Gas Line Clip B x 2 11 Assemble Dome Note Each dome section has a pin mounted in the rolled bottom edge If necessary for proper alignment of dome sections loosen each screw prior to assembly A x 1...

Page 7: ...Secure tank in place by attaching loose end of tank restraint chain to hole in right leg Connect LP Gas Tank Before connecting be sure that there is no debris caught in the head of the LP gas tank hea...

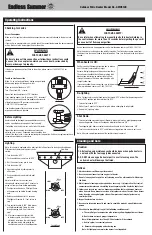
Page 8: ...urner flames b Heater does not reach proper temperature Note At temperatures less than 40 F heat output will be reduced c Heater s glow is excessively uneven d Burner makes popping noises during use N...

Page 9: ...roduct and to no other person that if this product is assembled and operated in accordance with the printed instructions accompanying it then for a period of two 2 years for the burners and one 1 year...

Page 10: ...er and replace Pilot won t stay lit Dirt built up around pilot Clean dirt from around pilot Connection between gas valve and pilot assembly is loose Tighten connection and perform leak check Thermocou...

Page 11: ...ser cet appareil dans un espace clos tel qu une tente caravane une tente une voiture ou une maison AVERTISSEMENT POUR VOTRE S CURIT Pour usage l ext rieur seulement hors de tout abri clos Table des ma...

Page 12: ...la circulation de l air demeurent propres V rifier le chauffe patio avant chaque utilisation L installation et les r parations doivent tre effectu s par un r parateur qualifi Ne modifier en aucune fa...

Page 13: ...d 3 56 01 193 15 Roulettes 56 01 360 16 Prot ge roulettes 56 01 361 17 Socle 56 01 350 18 Plaque de lestage 56 01 359 19 Cha ne de retenue 56 01 186 Vue clat e Quincaillerie A Vis Vis t te ronde en ac...

Page 14: ...n Lorsque n cessaire serrez toute les fixations et la visserie en premier puis une fois l tape termin e serrez les compl tement Suivez toutes les tapes dans l ordre afin d assembler correctement cet a...

Page 15: ...a plaque de lestage afin que le boulon d ancrage puisse passer par les deux trous G x 1 K x 1 O x 1 6 Fixez la plaque de support au montant tubulaire CONSEIL Utilisez une cl molette de 7 16 po 11 mm p...

Page 16: ...gaz B x 2 11 Assemblez le d me Remarque Chaque partie du d me comporte une cheville dans le bord roul Pour que les parties du d me soient correctement align es desserrez chaque vis avant l assemblage...

Page 17: ...a cha ne de retenue sur l orifice du pied droit Brancher la bouteille de propane Avant de proc der au branchement assurez vous qu il n y a pas de d bris au niveau de la t te de la bouteille de la t te...

Page 18: ...alimentation en gaz 2 NE placez aucune pi ce du chauffe patio dans un four autonettoyant La chaleur extr me endommagera le fini du chauffe patio Avis 1 N utilisez pas de produits de nettoyage abrasif...

Page 19: ...le pla ant debout l abri des intemp ries telles que la pluie la pluie vergla ante la gr le la neige la poussi re et autres d bris 4 Si vous le souhaitez recouvrez le chauffe patio afin de prot ger se...

Page 20: ...ure pas allum e Accumulation de salet autour de la veilleuse Nettoyez la salet autour de la veilleuse Le raccord entre la commande de gaz et la veilleuse est desserr Serrez le raccord et d terminez si...

Page 21: ...en un campero una tolda un autom vil o en la casa ADVERTENCIA PARA SU SEGURIDAD Solamente para uso en exteriores fuera de cualquier recinto Indice Salvaguardias importantes P gina 22 Diagrama de expl...

Page 22: ...ne el calentador antes de cada uso La instalaci n y reparaci n de la unidad deben ser hechos por personal de servicio calificado No altere el calentador de ninguna forma No utilice el calentador a men...

Page 23: ...1 350 18 Placa pesada 56 01 359 19 Cadena de retenci n del tanque 56 01 186 Diagrama de explosi n Elementos de ferreter a A Tornillo Tornillo de acero inox de cabeza redonda 5 32 pulgada M32 x 8 mm 3...

Page 24: ...ferreter a Una vez que ha terminado el paso apriete completamente todos los elementos de ferreter a Siga todos los pasos en el orden indicado para armar debidamente esta unidad Para terminar el armado...

Page 25: ...nes en la placa pesada de manera que el perno de anclaje pueda introducirse a trav s de ambas perforaciones G x 1 K x 1 O x 1 6 Fije la plataforma y el poste SUGERENCIA Para apretarlos use una llave d...

Page 26: ...Nota Cada secci n de la c pula tiene una espiga montada en el borde enrollado inferior de la c pula Si para alinear apropiadamente las secciones de la c pula se hace necesario afloje cada tornillo ant...

Page 27: ...lugar fijando el extremo suelto de la cadena de amarre del tanque en la pata derecha de la unidad Conecte el tanque de gas propano l quido Antes de conectar aseg rese que la parte superior del tanque...

Page 28: ...de este calentador en un horno de limpieza autom tica El calor extremo da ar el terminado Avisos 1 No use productos de limpieza abrasivos pues da ar n este aparato 2 No utilice nunca productos limpiah...

Page 29: ...lidad relacionada con la venta instalaci n uso remoci n devoluci n o reemplazo de este equipo y cualquier representaci n de esta naturaleza no obliga al fabricante Blue Rhino Sourcing LLC Winston Sale...

Page 30: ...lama piloto Limpie la suciedad que hay alrededor de la llama piloto Conexi n floja entre la v lvula de gas y el conjunto de la llama piloto Apriete la conexi n y lleve a cabo una comprobaci n en busca...

Page 31: ...Contact 1 800 762 1142 for assistance Do not return to place of purchase page no 31...

Page 32: ...Outdoor Patio Heater Model No GWU512B...

Reviews: