Specifications are subject to change. See bluesea.com/P12 for current information.
Specifications are subject to change. See bluesea.com/P12 for current information.
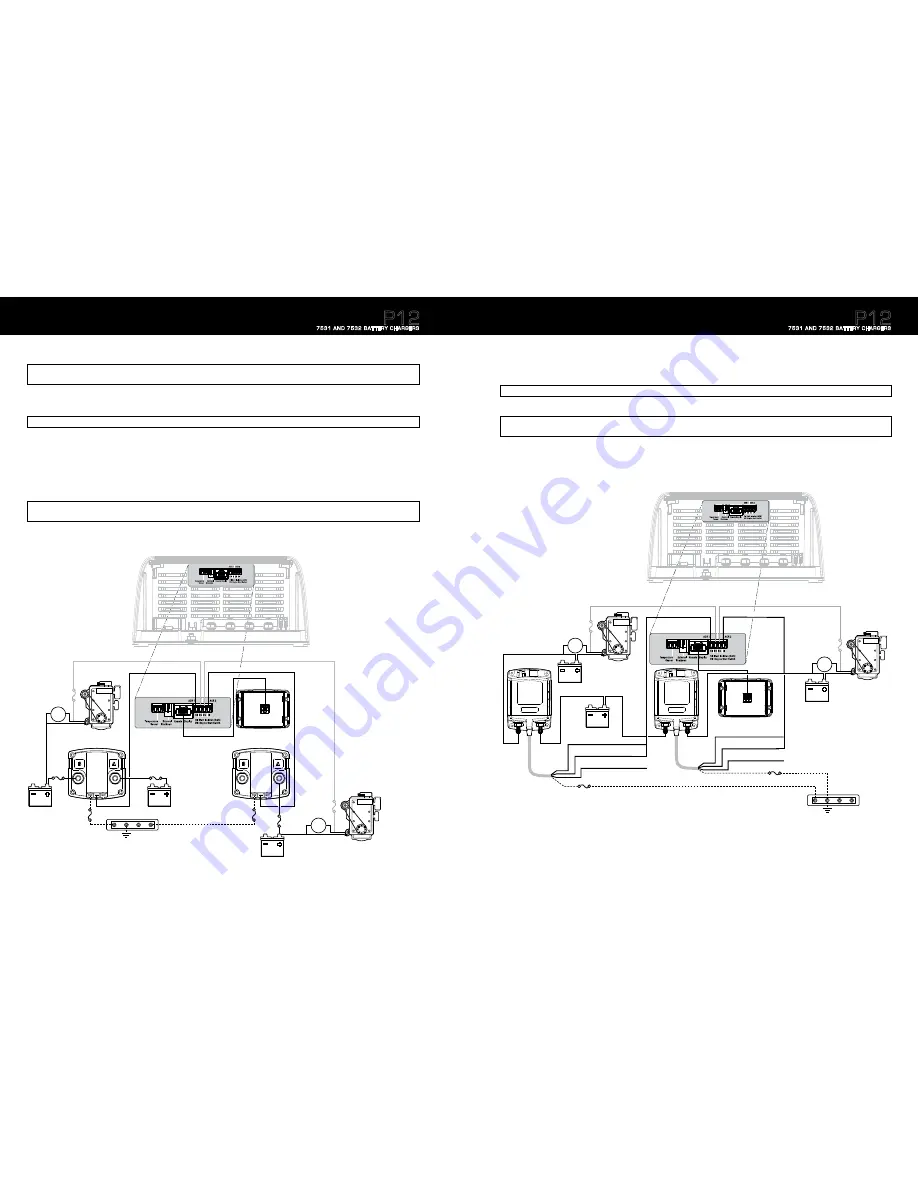
Optional Installation
SI-ACR and
m
-ACR Installation Instructions
(PN 7610 and PN 7601)
to Enable Start Isolation
1. Disconnect the DC Negative (Ground) wire going to the ACR.
2. If present, disconnect the Start Isolation wire connected to ACR.
3. Connect a wire from the ACR 1 port marked
“SI” (Start Isolation)
on the P12 Battery Charger to the Start Isolation terminal (SI) on the ACR.
4. Connect a wire from the ACR 1 terminal marked
“ES” (Engine Start Switch)
on the P12 Battery Charger to the terminal or wire running from the start key switch to
the starter solenoid. Make this connection through an in-line fuse of 1 to 10 Amps.
Integrate the P12 Battery Charger with Blue Sea Systems Automatic Charging Relays to take
advantage of Charge Coordination.
NOTE: If you have a Blue Sea Systems ACR with Start Isolation, it is possible to take advantage of your P12 charger’s ability to integrate in order to optimize
charging of your batteries.
Automatic Charging Relays (ACRs) combine battery banks when a charging voltage is present in order to share charge between battery banks. However, due to the P12 Battery
Charger’s ability to independently optimize charging for each battery bank it is favorable to isolate all battery banks by disengaging the ACR(s) ability to combine.
NOTE: The P12 Battery Charger can integrate with up to two Automatic Charging Relays (ACRs)
NOTE: This connection can be made at the start key switch or at the starter solenoid, but must be to the line that is +12V DC positive only when cranking. Connection
to a line that is positive while the engine is normally running will prevent the charging relay from working properly.
5. Re-connect DC Negative (Ground) wire on the ACR
6. If connecting two ACRs, repeat steps 1 through 5 using the second ACR, engine, and the P12 Battery Charger ports associated with ACR 2
22
P12
7531 AND 7532 BATTERY CHARGERS
Automatic
Charging
Relay
GR
OUND
ST
ART
ISOLA
TION
REMO
TE LED
Automatic
Charging
Relay
GR
OUND
ST
ART
ISOLA
TION
REMO
TE LED
ENGINE
START
SWITCH
ON
OFF
START
ENGINE
START
SWITCH
ON
OFF
START
FUSE
FUSE
7520
BATTERY CHARGER LED REMOTE
Sold Separately
START
START
HOUSE
FUSE
FUSE
FUSE
FUSE
DC GROUND
OPTIONAL CONNECTION
REMOTE DISPLAY
START ISOLATION (ACR 1)
START ISOLATION (ACR 2)
ENGINE START SWITCH (ACR 1)
OPTIONAL CONNECTION
ENGINE START SWITCH (ACR 2)
Optional Installation
(continued)
ML-ACR Installation Instructions
(PN 7620 and PN 7622)
to Enable Start Isolation*
1. Disconnect the black ground wire connected to the ML-ACR wire harness.
2. If present, disconnect all Start Isolation wires connected to the Brown, Green, and Orange wires in ML-ACR wire harness.
NOTE: This connection can be made at the start key switch or at the starter solenoid, but must be to the line that is +12V DC positive only when cranking. Connection to
a line that is positive while the engine is normally running will prevent the charging relay from working properly.
5. Re-connect the black DC Negative (Ground) wire in the ML-ACR wire harness
6. If connecting two ML-ACRs repeat steps 1 through 5 using the second ML-ACR, engine, and the P12 Battery Charger ports associated with ACR 2
4. Connect a wire from the ACR 1 terminal marked “
ES” (Engine Start Switch)
to the terminal or wire running from the start key switch to the starter solenoid.
NOTE: Connecting the
“SI” (Start Isolation)
wire to only one of the ML-ACR isolation wires will not properly integrate the P12 battery charger with your ML-ACR.
3. Connect a wire from the ACR 1 port marked
“SI” (Start Isolation)
on the P12 Battery Charger to both the Brown and Green wires in the ML-ACR wire harness.
23
* The ML-ACRs also support “Engine Isolation” which
keeps an ACR open if two engines are running
simultaneously. Operating in this mode while using
Charger Coordination requires a special installation.
See bluesea.com/P12 for details.
P12
7531 AND 7532 BATTERY CHARGERS
DC GROUND
ENGINE
START
SWITCH
ON
OFF
START
ENGINE START
SWITCH
A
B
ML-Series
Automatic
Charging
Relay
A
B
START ISOLATION #2 (GREEN)
ENGINE ISOLATION #3 (ORANGE)
START ISOLATION #1 (BROWN)
GROUND (BLACK)
ML-Series
Automatic
Charging
Relay
ISOLATION #2 (GREEN)
ISOLATION #3 (ORANGE)
ISOLATION #1 (BROWN)
GROUND (BLACK)
7520
BATTERY CHARGER LED REMOTE
Sold Separately
OPTIONAL CONNECTION
START
HOUSE
START
ON
OFF
START
REMOTE DISPLAY
START ISOLATION (ACR 1)
START ISOLATION (ACR 2)
ENGINE START SWITCH (ACR 1)
OPTIONAL CONNECTION
ENGINE START SWITCH (ACR 2)


