background image

Contents List 

BLUE SEAL GT18 - 400mm GAS FRYER (Single Tank - 18 Ltr) 


Part 1 

Introduction...................................................................................... 2 


Part 2 

Specifications .................................................................................. 3 

General ........................................................................................................................................ 3 
Gas Connection ......................................................................................................................... 3 

Gas Supply Requirements ......................................................................................................... 4 


Part 3 

Installation ........................................................................................ 4 

Installation Requirements .......................................................................................................... 5 
Unpacking ................................................................................................................................... 5 
Location ....................................................................................................................................... 5 
Clearances .................................................................................................................................. 5 

Assembly ...................................................................................................................................... 6 
Gas Connection ......................................................................................................................... 6 
Commissioning ............................................................................................................................ 7 


Part 4 

Operation ......................................................................................... 8 

Operation Guide ........................................................................................................................ 8 

Description of Controls .............................................................................................................. 8 
Before Use .................................................................................................................................... 9 
Filling the Tank ............................................................................................................................. 9 
Lighting the Pilot Burner ............................................................................................................. 9 
Lighting the Main Burner ......................................................................................................... 10 
Set the Operating Temperature ............................................................................................ 10 
Turning Fryer to ‘Pilot’ or ‘Off’ Positions ................................................................................ 10 
Guide and Care of Frying Oils and Fats ............................................................................... 10 


Part 5 

Cleaning and Maintenance ......................................................... 11 

General ...................................................................................................................................... 11 
Draining and Cleaning ............................................................................................................ 11 
Daily Cleaning .......................................................................................................................... 11 
Weekly Cleaning ...................................................................................................................... 12 
Periodic Maintenance ............................................................................................................ 12 


Part 6 

Gas Conversion ............................................................................. 13 

Gas Conversion Procedure .................................................................................................... 13 
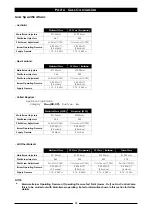
Gas Specifications ................................................................................................................... 15 


Part 7 

Replacement Parts List .................................................................. 16 

Summary of Contents for Evolution GT18 Series

Page 1: ...I N S T A L L A T I O N A N D O P E R A T I O N M A N U A L 236863 2 400mm Gas Fryer Model GT18 ...

Page 2: ...IONAL CONTACTS AUSTRALIA Moffat Pty Limited E Mail vsales moffat com au Main Office tel 61 03 9518 3888 fax 61 03 9518 3833 Service tel 1800 622 216 Spares tel 1800 337 963 Customer Service tel 1800 335 315 fax 1800 350 281 NEW ZEALAND Moffat Limited Web www moffat co nz E Mail sales moffat co nz Main Office tel 0800 663328 UNITED KINGDOM Blue Seal Web www blue seal co uk E Mail sales blue seal co...

Page 3: ...Operation 8 Operation Guide 8 Description of Controls 8 Before Use 9 Filling the Tank 9 Lighting the Pilot Burner 9 Lighting the Main Burner 10 Set the Operating Temperature 10 Turning Fryer to Pilot or Off Positions 10 Guide and Care of Frying Oils and Fats 10 Part 5 Cleaning and Maintenance 11 General 11 Draining and Cleaning 11 Daily Cleaning 11 Weekly Cleaning 12 Periodic Maintenance 12 Part 6...

Page 4: ...RNING INSTRUCTIONS TO BE FOLLOWED IN THE EVENT THE USER SMELLS GAS ARE TO BE POSTED IN A PROMINENT LOCATION THIS INFORMATION SHALL BE OBTAINED BY CONSULTING THE LOCAL GAS SUPPLIER WARNING GREAT CARE MUST BE TAKEN BY THE OPERATOR TO USE THE EQUIPMENT SAFELY TO GUARD IT AGAINST RISK OF FIRE THE APPLIANCE MUST NOT BE LEFT ON UNATTENDED IT IS RECOMMENDED THAT A REGULAR INSPECTION IS MADE BY A COMPETEN...

Page 5: ...tions the appliance will be used in Recommended Gas Hose Assembly Specification AS NZS 1869 Class B or D compliant or equivalent that meets the following requirements Model Covered in this Specification GT18 400mm GAS FRYER Single Tank 18 Ltr General A commercial gas fired fryer fitted with a 90MJ hr Multi Jet Target U Burner and pilot burner controlled by a single gas controller which controls bo...

Page 6: ...his manual for further details Natural Gas G20 Propane G31 Heat Input nett 22 5 kW 22 5 kW Gas Rate 2 26 m3 hr 1 75 kg hr Supply Pressure 20 mbar 37 mbar Burner Operating Pressure 9 0 mbar 25 mbar Gas Connection 3 4 BSP Male Gas Natural LP Gas Butane Input Rating 90 MJ hr 90 MJ hr N H G C 85 300 Btu hr 85 300 Btu hr Supply Pressure 1 13 2 0 kPa 2 75 3 0 kPa 4 5 8 0 w c 11 12 w c Burner Operating P...

Page 7: ...ety requirements This appliance shall be installed with sufficient ventilation to prevent the occurrence of unacceptable concentrations of health harmful substances in the room the appliance is installed in Blue Seal gas fryers are designed to provide years of satisfactory service and correct installation is essential to achieve the best performance efficiency and trouble free operation This appli...

Page 8: ...ryers do not require an electrical connection they function totally on the gas supply only 2 It is essential that the gas supply is correct for the appliance to be installed and that adequate supply pressure and volume are available The following checks should therefore be made before installation a The Gas Type the appliance has been supplied for is shown on coloured stickers located above the ga...

Page 9: ...the thermostat calibration once the oil is up to temperature If a discrepancy is found thermostat calibration should be referred to the supplier d Ensure that each operator has been instructed in the areas of correct lighting operation and shutdown procedures for the appliance Initial Start Up a For first time use of the new fryer prior to using for cooking product fill the fryer with oil and oper...

Page 10: ...2 Improper operation is almost impossible however bad operation practices can reduce the oil shortening life and produce a poor quality product To use this fryer correctly please read the following sections carefully Filling the Tank Lighting the Pilot Burner Lighting the Main Burner Setting the Operating Temperature Draining and Cleaning Single Tank GT18 Controls CAUTION This appliance is for pro...

Page 11: ...y is turned On 2 Check that there are no foreign articles in the tank Filling the Tank NOTE Blue Seal fryers can be used with both oil and shortening 1 Before filling the tank always check that the drain valve behind the access door is closed A locking slide is provided on this valve and this should always be locked in position during use a OIL Carefully fill fryer tank with oil until the FILL LEV...

Page 12: ...taken from fryer Fried foods should never be held Lighting the Main Burner 1 Ensure pilot burner is alight by visually checking through the Pilot Burner Viewing Opening 2 Rotate Thermostat Control Knob to temperature required 3 Rotate Gas Control Knob to Main Burner position 4 Main burner will ignite automatically off the pilot burner NOTE If main burner is turned On immediately after pilot burner...

Page 13: ...ults occur have them attended to promptly Don t wait until they cause a complete breakdown It is recommended that the appliance is serviced every 6 months Clean the fryer regularly A clean fryer looks better will last longer and will perform better NOTE DO NOT use abrasive detergents sharp scrapers strong solvents or caustic detergents as they could corrode or damage the fryer Ensure that any dete...

Page 14: ...e a small vessel with a handle as a ladle and dip into the hot frying medium from receptacle and pour vigorously around sides and bottom of the tank to wash out crumbs and particles adhering to them Continue to dip and pour until all crumbs are washed down and into the filter bag 7 Open drain valve fully check for any particles or crumb residue lodged in the valve Clean out with a stiff nylon brus...

Page 15: ...meets the following requirements 1 Ensure that the gas supply has been turned Off 2 Open the front door of the fryer to access the main burner and pilot burner in jectors 3 Disconnect 2 wires from the Thermostat to the Gas Control Valve 4 Disconnect 2 wires from the Overtemp at the electrical connector 5 Cut and remove any cable ties as required 6 Disconnect the flexi tube gas connection at the to...

Page 16: ...and refit blanking screw 5 Refit slotted cap to screw adjustment point Supply Pressure Test Point Operating Pressure Test Point Operating Pressure Adjusting Screw Pilot Burner Adjusting Screw Pilot Burner Flame Adjustment 1 Once main burner operating pressure has been set adjust pilot burner supply so that the impingement of the pilot flame on the thermocouple and thermopile is correct and main bu...

Page 17: ... Injectors Ø 1 55mm Ø 0 95mm Pilot Burner Injectors 0 62 0 35 Pilot Screw Adjustment Full Out CCW 1 turns out CCW Burner Operating Pressure 0 90 kPa 9 0 mbar 2 50 kPa 25 mbar Supply Pressure 1 13 2 0 kPa 2 75 3 0 kPa Natural Gas LP Gas Butane Main Burner Injectors Ø 1 55mm Ø 0 90mm Pilot Burner Injectors 0 62 0 35 Pilot Screw Adjustment Full Out CCW 1 turns out CCW Burner Operating Pressure 0 90 k...

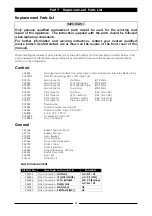
Page 18: ...hermostat MV Fryer 90 190ºC 236848 Knob 100 190ºC 018022K Overtemp Control Kit 018089K Gas Control Kit General 236768 Basket Support Rack 227747 Basket Hangar 018019 Fryer Basket 227856 Door Magnet 227466 Door Catch Receiver 236795 Drain Valve 018147 Drain Extension 227850 Adjustable Leg 150mm 229674 Rear Roller Assy 236933 Fryer Lid 018176 Drain Stick Gas Conversion Kits IMPORTANT Only genuine qu...

Page 19: ......

Reviews: