background image

INFLATING THE KAYAK

6

• Select a clean area free of stones, gravel, sticks or other sharp objects.

• Unfold the kayak so that it’s laid out flat and locate your pump.

• Use a hand or foot operated air pump to inflate the kayak. DO NOT use high-pressure air compressors. 

It’s very important to follow the numbered sequence when inflating: failure to do so will result in an 

improperly inflated kayak. Fill each chamber until it is firm. Use printed ruler on the kayak to check the 

main chamber for proper inflation.

• If the kayak is inflated during cold weather or without direct sunlight on the tubes, care must be 

taken not to over-inflate the tubes. As the air inside the tubes heats up, due to temperature rises or 

sunshine, the pressure will increase. The kayak is not fitted with a safety valve, so the pressure must 

be monitored at all times.

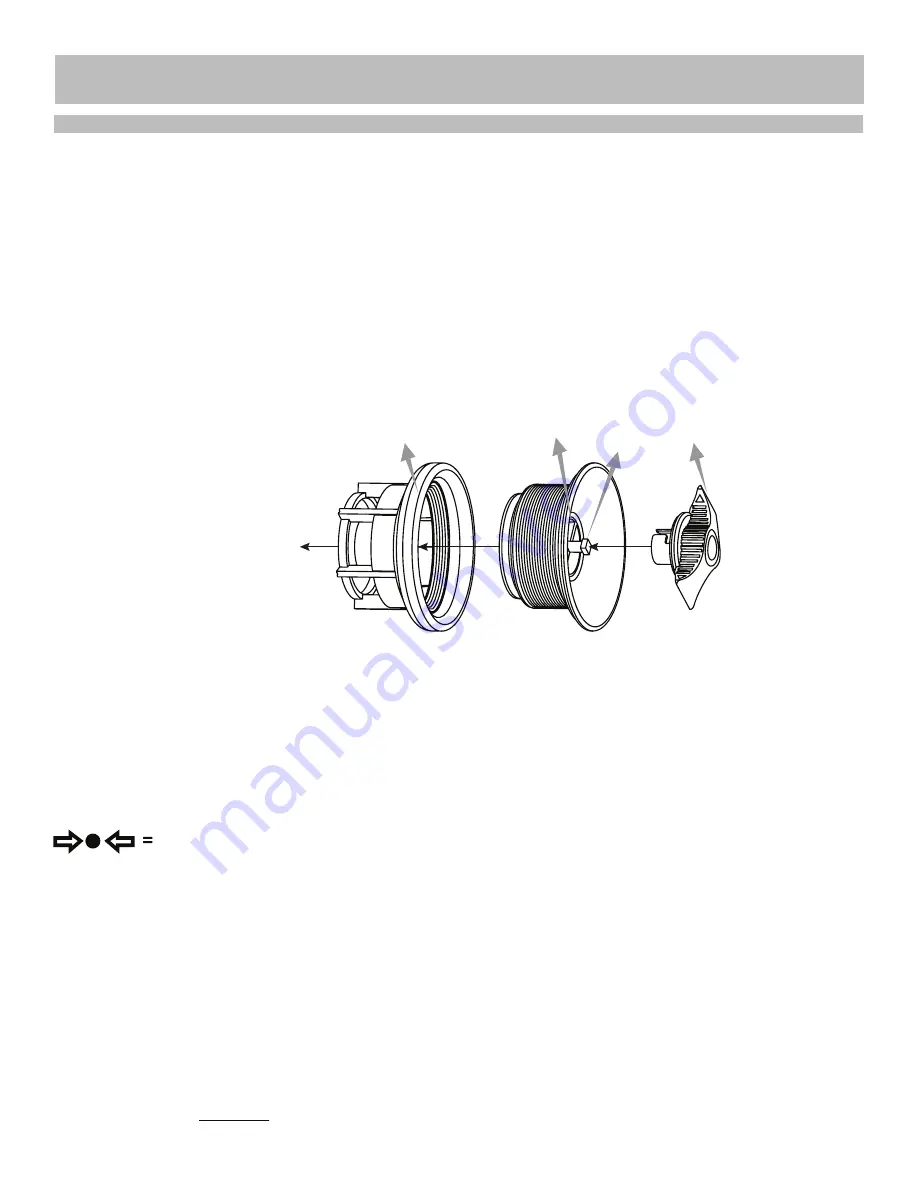
Inflation Adapter 

(pre-assembled)

A. Valve Cap

B. Deflation Button

C. Inflation Mouth

D. Protective Sheath

The Inflation Adapters are pre-assembled. If you ever need to remove or tighten them, there is a hand 

tool included for this purpose. Inflate the kayak by numbered sequence. Do not over inflate. Remove 

Valve Cap and attach Pump Adapter by inserting in Inflation Mouth and turning clockwise. After inflating, 

remove the Pump Adapter from Inflation Mouth before removing adapter from pump hose. Replace Valve 

Cap by hand turning in a clockwise direction. 

Note: Pump Adapter is not needed to inflate lower chamber.

Fill each chamber until it is firm. Use the enclosed flexible ruler to measure the 10cm rulers printed on 

each side chamber. Proper inflation is achieved when they match.

A

D

B

C

1.45 PSI (0.10 bar) for chamber 1, 2, 3

Inflating

Unscrew Valve Cap A, attach Pump Adapter to Pump Hose and insert it into the Inflation Mouth and 

turn clockwise to lock in place, then use Foot Pump to inflate to correct pressure.

Caution: DO NOT over inflate, or use a high-pressure pump! The maximum pressure for air 

chambers 1, 2, and 3 should be 1.45 PSI (0.10 bar). Over inflation will lead to bursting.

Deflating

Remove valve cap A, push down the deflation button B and turn the valve in a clockwise direction 90° 

until its locked, release the valve and the air will flow out. If you want to stop the deflation, push down 

the deflation button B and turn it in a counter-clockwise direction 90°. The deflation will stop when the 

valve is released. 

DO NOT USE VALVE WRENCH TO DEFLATE KAYAK

.

Summary of Contents for RL3601

Page 1: ...NOMAD 1 2 PERSON KAYAK OWNER S MANUAL RL3601 RL3602 Please Do Not Hesitate to Contact Our Consumer Hotline at 800 759 0977 with Any Questions That May Arise During Assembly or Use of This Product ...

Page 2: ... CONTENTS ISO 6185 BOAT Type III INTRODUCTION INFLATING THE KAYAK ASSEMBLY INSTRUCTIONS OPERATING INSTRUCTIONS MAINTENANCE AND STORAGE TROUBLE SHOOTING WARRANTY 3 6 7 8 9 10 11 PARTS LIST 4 SAFETY WARNINGS 5 2 ...

Page 3: ...dures and rules of the waterway that apply to all kayaks Always check the local weather conditions before taking the kayak out Do not let yourself get caught out by currents in tidal inlets open seas small channels or shallow water regions Always use good quality materials of the correct specifications whenever working on the kayak Maintenance work and repairs on the kayak should be done only by q...

Page 4: ...ssories Parts Specifications Inflated Size 376 x 77 x 34 cm 148 x 30 5 x 13 5 374 LBS 170 KG Description Part No RL3601 Nomad 1 Person Kayak RL3602 Nomad 2 Person Kayak Note Adhesive is NOT included with patch Valve Wrench RLP1017 1 1 The Valve Wrench is to be used ONLY for tightening or changing the valve when the SUP is DEFLATED It should NEVER be used when the SUP is inflated MAY CAUSE SERIOUS ...

Page 5: ...or climbing aboard the kayak Step into the center of the kayak for maximum stability Distribute the weight of passengers gear and accessories evenly so that the kayak sits even front to back and side and to side Uneven distribution of persons or loads in the boat can cause capsizing and drowning Do not use your kayak if you suspect a puncture or leak It may be unsafe WARNING BEWARE OF OFFSHORE WIN...

Page 6: ...d sequence Do not over inflate Remove Valve Cap and attach Pump Adapter by inserting in Inflation Mouth and turning clockwise After inflating remove the Pump Adapter from Inflation Mouth before removing adapter from pump hose Replace Valve Cap by hand turning in a clockwise direction Note Pump Adapter is not needed to inflate lower chamber Fill each chamber until it is firm Use the enclosed flexib...

Page 7: ...r Assembly Front Seat Fixed Buckle Middle Seat Fixed Buckle Middle Footrest Valve Back Seat Fixed Buckle Valve Front Footrest Back Footrest Footrest Installation Install the footrest in the Kayak as shown below Fin Installation Install the direction fin on the bottom of Kayak as shown below 7 ...

Page 8: ...rs repair kit and tool kit 3 The mandatory equipment 4 The boat papers and your boating license if applicable 5 Lights are required if operating after dark Rules to Observe During Navigation 1 Be responsible and strictly follow the safety rules Do not neglect the safety rules this could be hazardous to your life and lives of others 2 Learn to keep control of your kayak 3 Respect local regulations ...

Page 9: ...nal use If you live in a seasonal area in which the kayak will not be in use all year round it is STRONGLY RECOMMENDED to deflate the kayak and dry it thoroughly and store it in a protected area during the off season This will help extend your kayak s life and prevent a safety hazard from developing while the kayak is not in use WARNING Certain household cleaning solvents chemicals and other liqui...

Page 10: ...leak by spraying a mild soapy water solution over the suspicious area Any leak will produce bubbles 3 Check valve system for leak Repairs Small holes or punctures can be fixed with the repair patch included with the boat 1 Find the leak 2 Thoroughly clean the area surrounding the leak to remove any dirt or grime 3 Cut a piece of repair material in a round shape which should be larger than the dama...

Page 11: ...other use The user assumes all risk of injury resulting from the use of this product This warranty is expressly in lieu of all other warranties expressed or implied including warranties of Neither the manufac turer nor any of its representatives assumes any other liability in connection with this product All warranty claims must be made through the retailer where the product was originally purchas...

Page 12: ...NOMAD 1 ET 2 PERSONNE MANUEL DU PROPRIÉTAIRE DE KAYAK RL3601 RL3602 Contactez notre service à la clientèle au 800 759 0977 avec des questions sur le montage ou l utilisation de ce produit ...

Page 13: ... ISO 6185 BATEAU Type III PRÉFACE GONFLER LE KAYAK INSTRUCTIONS DE MONTAGE INSTRUCTIONS USAGE ENTRETIEN ET CONSERVATION SOLUTIONS PROBLÈMES GARANTIE 3 6 7 8 9 10 11 LISTE DES PIÈCES 4 CONSIGNES DE SÉCURITÉ 5 2 ...

Page 14: ...ègles appropriées de la voie d eau qui appliquent à tous les Kayakx Vérifiez toujours les conditions du temps local avant de partir avec le Kayak Ne vous laissez pas attraper par des courants dans les admissions de marée les mers ouvertes les petits canaux ou les régions d eau peu profondes Vous devez toujours user les matériaux de bonne qualité et les caractéristiques correctes toutes les fois qu...

Page 15: ...flée 376 x 77 x 34 cm 148 x 30 5 x 13 5 170 KG 374 LBS Description Référence RL3601 Nomad 1 Person Kayak RL3602 Nomad 2 Person Kayak Clé de valve RLP1017 1 1 La valve clé doit être utilisé SEULEMENT pour serrer ou remplacer la valve lorsque le SUP est dégonflé Il ne devrait jamais être utilisée lorsque le SUP est gonflé CELA POURRAIT CAUSER DES BLESSURES GRAVES Voir page 6 pour nstructions dégonfl...

Page 16: ...assure une stabilité maximum Diviser le poids des passagers les outils etc comme ça que le Kayak reste lisse sur l eau En cas on suspecte un trou ou une perte d air l emploie du Kayak n est pas permis Prendre compte de la forteresse du vent et les divers courants Ceux ci pu être des conditions dangereuses AVERTISSEMENT Il est la responsabilité de l opérateur du Kayak d identifier et obéir toutes l...

Page 17: ...écessaire pour gonfler la chambre basse Gonflez chaque chambre jusqu à ce qu elle soit dure Utilisez la règle souple clos pour mesurer les 10cm dirigeants imprimées sur chaque chambre latérale L inflation appropriée est atteint quand ils correspondent A D B C 0 10 bar 1 45 PSI for chambres 1 2 3 Gonfler Dévissez Valve Cap A branchez l adaptateur de la pompe à la pompe et l insérer dans la bouche i...

Page 18: ...ation du siège milieu Repose pied milieu Valve Boucle de fixation du siège arrière Valve Repose pied avant Repose pied arrière Installation de repose pieds Installez repose pied de kayak Suivre les instructions comme indiquées dans l illustration Installation de l aileron Installez l aileron de direction au fond du kayak Suivre les instructions comme indiquées dans l illustration 7 ...

Page 19: ... nuit vous devez utiliser de l éclairage S il vous plait suivre les suivant règles pendant la navigation 1 Rester toujours conscient de votre responsabilité et toujours suivre les règles Les règles de sûreté doivent être suivi avec beaucoup d attention Des petits inattention pourrait vous mettre en danger et aussi les autres 2 Apprenez vous de tenir toujours le Kayak sous contrôle dans chaque situ...

Page 20: ...teau est conçu pour être tenue en dépôt à la fin de saison Si vous vivez dans une zone saisonnière dans lequel le bateau ne sera pas en service pendant toute l année ON VOUS RECOMMANDE VIVEMENT de dégonfler le bateau et de le sécher complètement et le stocké dans un secteur protégé pour la fine de saison Ceci aidera à prolonger le plaisir de votre bateau et à empêcher les risques de sécurité qui s...

Page 21: ...rait y avoir un trou aspergez un mélange d eau et savon Dans le cas il se forme des bulles de savon là il y a un trou 3 Vérifier le système de soupape pour les fuites Réparation Des petits trous ou des pertes d air peuvent se réparer avec le pièce de réparation qui est incluse avec le bateau 1 Trouvées le trou 2 La zone où on trouve le trou on doit nettoyer très bien 3 Coupées un morceau du matéri...

Page 22: ... assume tous les risques de dommage résultant de l utilisation de ce produit Cette garantie tient lieu expressément de toute autre garantie exprimée ou implicite y compris les garanties de qualité marchande ou d adaptation à un emploi particulier dans la mesure permise par les lois fédérales ou provinciales Ni le fabricant ni aucun de ses représentants n assument aucune autre responsabilité en rap...

Reviews: