background image


Fig 3 


Fig 4 


Fig 5 


           Bluefin LED Underwater lights. YOU MUST INSTALL THIS GEL CONNECTOR OR                              
           YOUR WARRANTY WILL BE VOID !!! 


Please ensure that your product is installed as per our instructions below, failure to do so 

WILL 

INVALIDATE YOUR WARRANTY.  

Use these instructions in conjunction with the light instructions to ensure that all is fitted correctly. 

Warnings: 


Do not attempt to install the lights whilst the boat is in the water. 

Installation: 
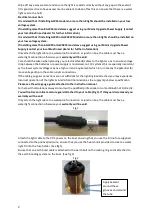
Fig 1 showing how the Gel connector is wired up.  
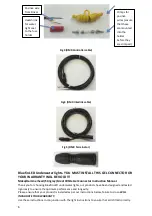
Fig 2 showing how the finished Gel connector should look when finished. 
Ensure that the black outer sheath is inside the gel connector. 
The IP68 GEL CONNECTOR MUST BE INSTALLED CORRECTLY OR YOU WARRANTY WILL BE VOID. 
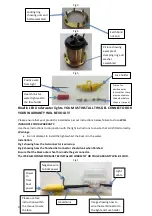
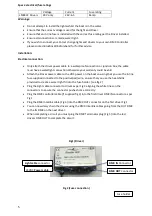
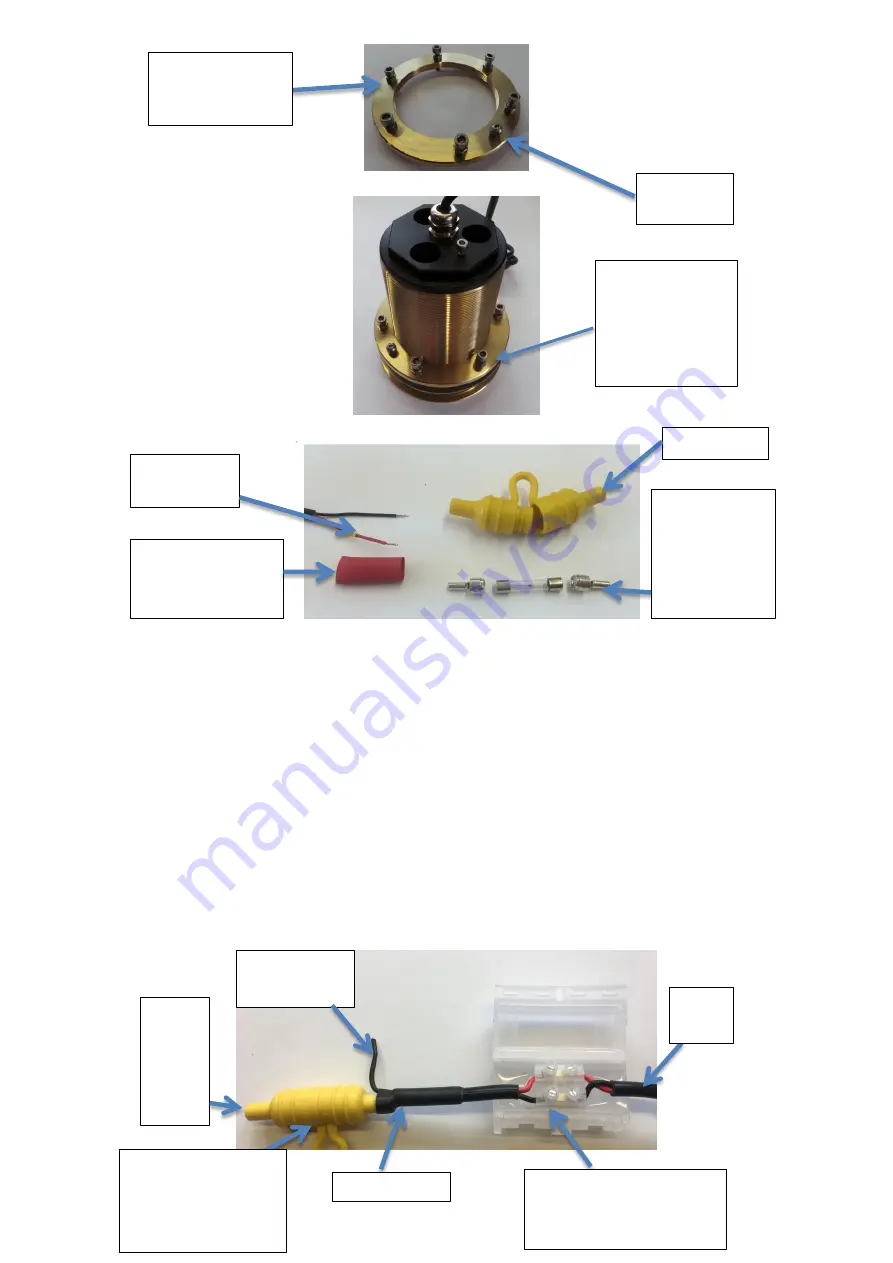
Fig 1 


Locking ring 
showing nuts and 
bolts assembled 

Earth bond 
nut and 
bolt 

Positive wire 
from Light 

Heat shrink for 
water tight seal to 
the fuse holder 


Fuse holder 

Crimps for 
positive wires 
(ensure that these 
are mounted into 
the holder before 
they are crimped) 


Picture showing  
example of 
clamping ring and 
washer 
assembled 

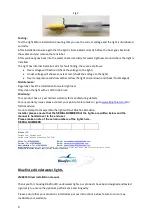
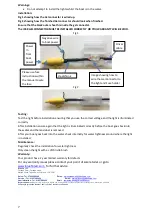
Image showing how to 
wire the Gel Connector to 
the light and Fuse holder 


Please use fuse 
instructions within 
the manual to wire 
the fuse 

Power 
In 
from 
boat 
power 

Light 
cable 

Negative wire 
to boat power 
in 

Heatshrink 

Summary of Contents for GW16IFM

Page 1: ...ng per the light installed Ensure all connections are made water tight or your warranty will be Void Do not remove the inline Moisture Guard Do not hold the light by the cable Do not use abrasives on...

Page 2: ...inimised on 12V systems this is especially important as the lower system voltage means a high current requirement which in turn means the potential for more voltage drop in the cable runs connections...

Page 3: ...connector should look when finished Ensure that the black outer sheath is inside the gel connector The IP68 GEL CONNECTOR MUST BE INSTALLED CORRECTLY OR YOU WARRANTY WILL BE VOID Fig 1 Locking ring sh...

Page 4: ...of sale retailer or go to www bluefinled com for further advice Do not attempt to disassemble the light without Bluefin LED advice Installer please ensure that the SERIAL NUMBERS of the lights are wr...

Page 5: ...iver power cable to the VDC power on the boat ensuring that you use the in line fuse supplied connected to the positive red wire ensure that you use the heatshrink provided to create a water tight fit...

Page 6: ...products have been designed and tested rigorously to ensure the optimum performance and longevity Please ensure that your product is installed as per our instructions below failure to do so WILL INVA...

Page 7: ...ntenance Regularly check the installation for water tightness Only clean the light with a soft bristle brush Warranty Your product has a 2 year limited warranty for defects For any warranty issues ple...

Page 8: ...8...

Reviews: