background image


Testing:  

Test the light before installation ensuring that you use the correct voltage and the light is illuminated 
correctly. 
After installation ensure again that the light is illuminated correctly before the boat goes back into 
the water and the lens label is removed. 
After your boat goes back into the water check internally for water tightness around where the light 
is installed. 
The light has internal indicator Led’s for fault finding, these are as follows: 


Over voltage will flash red.(check the voltage to the light) 


Under voltage will show a constant red. (check the voltage to the light) 


Over temperature will show amber.(allow the light to cool down and check if submerged) 

Maintenance:  

Regularly check the installation for water tightness. 
Only clean the light with a soft bristle brush. 

Warranty:  

Your product has a 2 year limited warranty for defects. 
For any warranty issues please contact your point of sale retailer or go to                   

www.bluefinled.com

 for further advice. 

Installer please ensure that the SERIAL NUMBERS of the lights are written below and the 
manual is handed over to the end user. 
Please make a note of the serial numbers of the lights here. 
SERIAL NUMBERS 


Bluefin 

LED


Cottage Farm, Cottage Lane, 
Norton Juxta Twycross, Atherstone. CV9 3QH


Sales - Tel: 07950 909048      

 Email:


simon.steadman@bluefinled.com


Service - Tel: 01827 880450                                                Email:


mark.branson@bluefinled.com


Administration - Tel: 01827 880450 

Email:


samantha.barrie@bluefinled.com


Registered Address:


Square Rig Limited, t/a Bluefin Led, Cottage Farm, Cottage Lane, Norton Juxta Twycross, Atherstone, CV9 3QH 

Company Registration Number:

 08871451  

VAT Number: 179 2690 64


Summary of Contents for H16

Page 1: ...provided failure to do so will invalidate your warranty Ensure all connections are made water tight or your warranty will be Void Do not remove the inline Moisture Guard Do not hold the light by the cable Do not use abrasives on the lenses Tools required for installation 2 5mm 3 32 drill bit 30mm 1 1 4 drill bit Drill Posi head hand screwdriver Marine sealant 3M 4200 or equivalent Installation For...

Page 2: ...age drop between the batteries or power supply is minimised on 12V systems this is especially important as the lower system voltage means a high current requirement which in turn means the potential for more voltage drop in the cable runs connections If the cable gauge connections are not sufficient for the lighting load attached you may experience incorrect operation of the lights intermittent il...

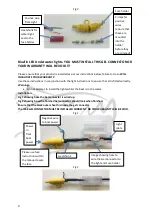
Page 3: ... connector is wired up Fig 2 showing how the finished Gel connector should look when finished Ensure that the black outer sheath is inside the gel connector The IP68 GEL CONNECTOR MUST BE INSTALLED CORRECTLY OR YOU WARRANTY WILL BE VOID Fig 1 Fig 2 Fuse holder Crimps for positive wires ensure that these are mounted into the holder before they are crimped Positive wire from Light Heatshrink for wat...

Page 4: ...e installation for water tightness Only clean the light with a soft bristle brush Warranty Your product has a 2 year limited warranty for defects For any warranty issues please contact your point of sale retailer or go to www bluefinled com for further advice Installer please ensure that the SERIAL NUMBERS of the lights are written below and the manual is handed over to the end user Please make a ...

Page 5: ...5 ...

Reviews: