

1
Bluefin LED Underwater lights.
Mako
M12IFM12V,M12IFM24V/M24CCIFM Installation manual.
Thank you for choosing Bluefin LED underwater lights, our products have been designed and tested
rigorously to ensure the optimum performance and longevity.
All Bluefin Led lights are water tested so please be aware there may be moisture present on the light.
Please ensure that your product is installed as per our instructions below, failure to do so may
invalidate your warranty.
If you are installing a M24CC please refer to the Driver instructions for electrical installation.
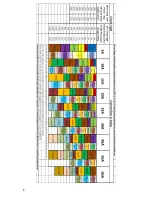
Specs: electrical/fuse ratings
Voltage
Current
Fuse rating
Mako M12IFM12V
12V only
(Absolute min of V
10V under load @ light).
12v-5Amp
8amp
Mako M12IFM 24V
24V only
(Absolute min of V
20V under load @ light).
24V-2.6Amp
8amp
Warnings:
Do not attempt to install the lights whilst the boat is in the water.
Ensure that the correct voltage is used for the light.
Ensure that an in line fuse is installed with the correct fuse rating per the light installed.
Ensure all connections are made water tight.
Do not remove the inline Moisture Guard.
Do not hold the light by the cable.
Do not use abrasives on the lenses.
Tools required for installation:
65mm(2.5”) hole saw
Drill
Marine sealant 3M 4200 or equivalent
Installation:
For optimum affect effect the light should be positioned between 8-12” (200-300mm) below the
water line and at a 90 deg angle.
Recommended spacing from 3-3”(1mtr) to 5-11” (1.8mtrs) between the lights.
Drill a 65mm (2.5”) hole for the light access through the hull, ensuring that there are no obstructions
internally in the hull.
Key the area to where the light is to be mounted with abrasive sand paper to ensure there is a clean
area for the marine sealant to bond too.
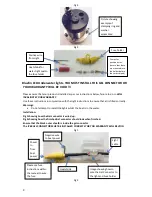
Apply marine sealant to the rear of the light on the circumference of the light and around the base of
the tube to ensure a complete continuous bead of sealant is applied in both areas. (See fig 2)
Feed the light through the hole and clamp internally in the hull using the clamping ring and washer
supplied ensuring a tight fit using the nuts and bolts supplied. (See fig 3 and 4)
Wipe off any excess sealant and ensure the light is seated correctly without any gaps in the sealant.
(It is good practice to have excess marine sealant to clean off as this can ensure that there is a water
tight seal to the hull)
Summary of Contents for Mako M12IFM12V
Page 8: ...8...


