background image

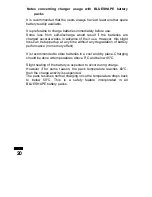
Notes   concerning   charger   usage   with   BLUESHAPE   battery

packs

It is recommended that the users always have at least another spare
battery readily available.

It is preferable to charge batteries immediately before use.
Some   loss   from   self-discharge   would   result   if   the   batteries   are
charged several weeks in advance of their use. However, this slight
loss can be topped up at any time without any degradation of battery
performance (no memory effect)

It is recommended to store batteries in a cool and dry place. Charging
should be done at temperatures above 0°C and below 45°C.

Slight heating of the battery is expected to occur during charge.
However  if  for some reason, the pack temperature reaches 60°C,
then the charge activity is suspended.
The pack resumes normal charging once the temperature drops back
to   below   50°C.   This   is   a   safety   feature   incorporated   in   all
BLUESHAPE battery packs.

20

Summary of Contents for CVS8XW

Page 1: ...INTELLIGENT BATTERY CHARGER FOR V LOCK LITHIUM ION BATTERIES ONLY Model CVS8XW Wall Mount OPERATING INSTRUCTIONS Revision 1 1 www blueshape net Printed in Malta 2016 ...

Page 2: ...spection or repair Clean only by using a dry cloth Unplug when not in use and avoid power surges Read the supplied instructions thoroughly and keep handy Avoid setting up near heat sources such as fire places radiators stoves or other heat generating equipment NEVER use without proper grounding Protect the AC mains power plug connector and cord If the equipment develops a fault have it repaired by...

Page 3: ... FREQUENCIES BETWEEN 43Hz AND 60 Hz The equipment is being supplied with a compatible AC mains power cord In the case when the UK plug is fitted this plug is equipped with a 13A replaceable fuse Package contents CVS8XW simultaneous eight position charger Wall hanging bracket AC power cord Safety operating instructions USB data cable to be used with BSCVMon software downloadable from our website at...

Page 4: ...1 to 4 2 Battery charging bays 3 Battery LED indicators see page 15 for explanation 4 LCD display 5 LCD keys 6 AUX output LED indicator see page 16 for explanation 7 AUX output connector 13 8V 110W 8 Mains switch 9 Lower Bank B channels from 5 to 8 4 5 2 4 7 6 8 9 1 3 ...

Page 5: ...description Side View 1 Carrying handle 2 Supporting lateral studs 3 Wall mount bracket see page 6 for explanation 4 Ventilation inlets 5 Data connector 6 AC Mains input 100V 240V 7 Ventilation outlets 5 4 1 2 3 6 5 7 ...

Page 6: ...oceed with the mounting bracket first put the bracket against the wall and mark the 4 holes screws and or fittings are not included choose proper screws or fittings to fix the bracket to the wall that are specially suited to the material in your wall and have sufficient holding power fix the bracket firmly tightening all the 4 screws lift the charger and align the 4 lateral golden studs with the c...

Page 7: ...T verify that that all the 4 studs are correctly and firmly inserted in the related slots connect the AC power cord if needed connect the USB data cable to the PC before switching on the charger to allow a correct detection and initialization of the communication hardware The charger is now ready to operate 7 ...

Page 8: ...ual charge station monitoring Pre charge function for protecting heavily discharged cells against high currents until their voltages rise to a safe level Maximum compactness and space utilisation IPCS and CTP Features see next pages Dual powerful auxiliary outputs at 13 8V 110W through 4 pole XLRs USB connection to interface the CVS8XW with a PC up to 4 chargers can be monitored by a single PC usi...

Page 9: ...5 91 BV090 76 126 BV100HD 76 126 BV150 125 207 BV180 150 248 BV190HD 165 273 BV225 188 310 BV270HD 225 372 The 8 channels are paired in this way chan 1 2 chan 3 4 chan 5 6 chan 7 8 To achieve the fastest charge performance install only one battery on each pair of channels in this way the charge current will reach approx 4 9A per battery but no more than 0 8C achieving a shorter charge time Instead...

Page 10: ...properly applied especially with low voltage discharged cells appropriate care must be taken The 2 step procedure implemented by IPCS initially boosts very low voltage cells to a state where charge can be applied with a medium low current without damage then starts to charge with a 300mA current for a while Finally when the pack reaches a reasonable voltage state it speed up the charge process by ...

Page 11: ...hing a high level the charging current is automatically reduced to avoid possible damage caused by internal overheating When the charging speed is reduced the internal temperature starts to descend As soon as the temperature reaches a safe level normal charging speed is resumed Through indoor usage CTP features do not normally intervene unless the air convection flow path is obstructed or the inte...

Page 12: ...serted and or removed at any time without affecting the operation of the others Procedure Plug the AC power cord provided into the charger AC input If the user wants to connect the charger to the PC to analyse and log the battery data through BSCVMon it is best done now before switching on the charger Plug and switch on the AC mains supply Insert batteries onto any one of the eight V plate adapter...

Page 13: ...cted to that of Bank B The AUX LED will light up and the paused battery LEDs will show WAITING Once the accessory has been unplugged the charger will resume the previous charging sequence and from the same point of interruption PLEASE NOTE THAT THE MAXIMUM LOAD THAT CAN BE CONNECTED TO ANY XLR OUTPUT MUST NOT EXCEED 110W ADDITIONAL SAFETY NOTES Chargers and or batteries may become hot during charg...

Page 14: ...5 123m Charge B2 no battery B3 no battery B4 100 Full B5 no battery B6 no battery B7 no battery B8 no battery Bank A Bank B Pressing the INFO button permits a detailed view of each battery scrolling cyclically from 1 to 4 for Bank A and from 5 to 8 for Bank B Pressing at anytime the BACK button returns the user to the previous screen The picture below shows a display example B1 55 123m Charge V 15...

Page 15: ...w 8V and is dangerous to attempt a charge 04 Timeout error in the charge session The battery does not terminated the charge in the expected time This error may occur charging pack with large capacity In this case simply remove the battery and install again to reset the timer and start a new session until the battery is full 05 Premature charge termination The charge process has terminated unexpect...

Page 16: ...ow show some display examples XLR Ouptut Active Voltage 13890 mV Current 2600 mA Power 36 W XLR Ouptut Idle Voltage 13990 mV Current 0 mA Power 0 W Pressing the INFO button further details are shown BLUESHAPE charger Model CVS8XW Serial No 15308 Fw x yy x yy x yy Explanation row 2 Charger model row 3 Serial number row 4 Firmware version for LCD control unit 1 and charger boards 2 and 3 16 ...

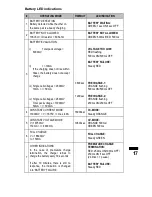
Page 17: ... 1200sec VOLTAGE TOO LOW RED flashing 500ms ON 500ms OFF BATTERY FAILURE Steady RED PRECHARGE 1 ORANGE flashing 500ms ON 500ms OFF PRECHARGE 2 ORANGE flashing 250ms ON 250ms OFF 4 CONSTANT CURRENT MODE 13000mV V 16750 I max 4 9A 18000sec CC MODE Steady ORANGE 5 CONSTANT VOLTAGE MODE V 16750mV 150mA I 4900mA 10800sec CV MODE ORANGE 500ms GREEN 500ms 6 FULL CHARGE V 16800mV I 150mA FULL CHARGE Stead...

Page 18: ...f a load is connected and an excessive current is absorbed I 8 2A SHORT CIRCUIT AUX LED Steady ORANGE 3 An Overload condition may occur when the AUX is powered up and an excessive current is drained as follow i 8 2A I 9 5A for 30sec ii 9 5A I 13A for 1sec iii I 13A OVERLOAD1 AUX LED BAT2 BAT4 Steady RED OVERLOAD2 AUX LED Steady RED OVERLOAD3 AUX LED Steady ORANGE 18 ...

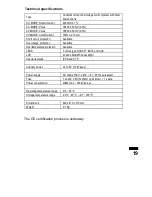
Page 19: ...ble Overtemperature protection Available LEDS 3 colour type for BAT1 BAT8 and AUX LCD 2x 20x4 Blue White backlight Special features IPCS and CTP Auxiliary power 2x 13 8V 110W max Power supply AC mains 100V 240V 47 63 Hz autoselect Fuse 1 x 220V 2 5A 5x20mm quick blow 1 spare Power consumption 200W max 180W typical Operating temperature range 0 C 45 C Storage temperature range 20 C 65 C 4 F 149 F D...

Page 20: ...ght loss can be topped up at any time without any degradation of battery performance no memory effect It is recommended to store batteries in a cool and dry place Charging should be done at temperatures above 0 C and below 45 C Slight heating of the battery is expected to occur during charge However if for some reason the pack temperature reaches 60 C then the charge activity is suspended The pack...

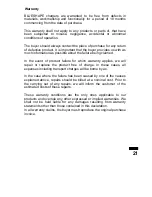
Page 21: ...f product failure for which warranty applies we will repair or replace the product free of charge In these cases all expenses including transport charges will be borne by us In the case where the failure has been caused by one of the causes explained above repairs should be billed at a nominal cost Prior to the carrying out of any repairs we will inform the customer of the estimated costs of these...

Page 22: ...This page has been intentionally left blank 22 ...

Page 23: ...This page has been intentionally left blank 23 ...

Page 24: ...NEW CELL TOP Srl VIA LIGURIA 4 6 42124 REGGIO EMILIA ITALY TEL 39 0522 518556 FAX 39 0522 277084 WEB www blueshape net EMAIL info blueshape net ...

Reviews: