background image

All specifications are subject to change without prior notice 

P/N 751001 Rev 1  

GAS CONNECTIONS 

1.  The installation of this appliance must 

conform with all applicable local codes.  
In the absence of local codes, the installa-
tion must conform to the latest level of the 
National Fuel Gas Code, ANSI Z223.1/
NFPA 54.  In Canada, the installation 
must be in accordance with the current 
CAN/CGA B149.1 and B149.2. 

2.  This appliance is designed to work with 

either natural gas or LP gas.  Verify that 
the appliance and the incoming gas supply 
are compatible.  Check the rating plate. 

3.  The gas supply line must be the same size 

or larger than the gas inlet of the appli-
ance.  Your appliance has either a ½” 
NPT or ¾” NPT gas inlet connection.  We 
recommend the supply line be ¼” NPT 
larger than the gas inlet of the appliance. 

4.  Sealant used on pipe joints must be re-

sistant to LP gas. 

5.  An installer provided manual shut-off 

valve must be installed in the gas supply 
line ahead of the appliance.  This shout-
off must be easily accessible in case of 
emergency. 

6.  All gas cooking equipment must have a 

pressure regulator on the incoming service 
line for safe and efficient operation.  This 
appliance is equipped with such a gas 
pressure regulator.  Incoming gas pressure 
should be checked with a manometer.  
The correct manifold pressure for natural 
gas is 5.0” wc.  For LP gas the correct 
manifold pressure is 10” wc. 

7.  Incoming line pressure upstream of the 

appliance should be 1.0” wc greater than 
the operating manifold pressure.  Service 
pressure may fluctuate for a variety of rea-
sons.  Under no circumstances should the 
factory installed regulator be removed or 
by-passed. 

8.  The factory installed pressure regulator 

will withstand an input pressure of ½ PSI 
(12” wc).  If the incoming pressure ex-
ceeds the maximum rating a step-down 
regulator is required. 

9.  The appliance and it individual shut-off 

valve must be disconnected from the gas 
supply line during any pressure testing in 
excess of ½ PSI [3.5 kPa]. 

10. The appliance must be disconnected from 

the gas supply by closing its individual 
shut-off during any pressure testing less 
than ½ PSI [3.5 kPa]. 

11. Check to see that all installer –supplied 

pipes and fittings are clear of direct, 
threading chips or other foreign particles 
before connecting the appliance to the 
supply line.  Such particles will clog ori-
fices and/or valves when pressure is ap-
plied.  

Service to clean such clogs is not 

covered by your warranty.


12. The incoming gas supply is brought from 

the inlet pipe.  This is the only connection 
required via the installer-supplied shut-off 
valve. 

13. If the appliance is to be installed with 

flexible couplings and/or a “quick discon-
nect” the installer must use a commercial-
ly approved AGA Design certified flexi-
ble connector at least ½” NPT that com-
plies with ANSI Z21.41.  In Canada the 
connector must comply with CAN 16.10-
88 and the “quick disconnect” device 
must comply with CAN 16.19M-79 and 
installed with a strain relief device. 

14. Before putting the appliance into service 

test all gas connections for leaks.  Use a 
soapy solution.  DO NOT USE AN OPEN 
FLAME TO CHECK FOR LEAKS.  Such 
a procedure is dangerous and it may not 
detect all the small leaks that a soapy so-
lution will. 

15. Air shutter adjustments are preset at the 

factory.  These adjustments may need to 


INSTALLATION 


Summary of Contents for RBCT

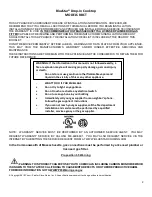
Page 1: ...1 DROP IN COOKTOP MANUAL Drop in Cooktop RBCT ...

Page 2: ...toreorusegasolineorotherflammablevapors and liquids in the vicinity of this orany otherappliance WHATTO DO IF YOU SMELLGAS Do not try to light any appliance Do not touch oractivateany electricalswitch Do not useany phonein yourbuilding Immediately call yourgas supplierfroma neighbor sphone Follow thegas supplier s instructions If you cannot reach yourgas supplier callthefire department Installatio...

Page 3: ... reference In the event you require parts or service this information will be needed to ensure you receive the highest quality service we can provide DATE OF PURCHASE DEALER S NAME DEALER S ADDRESS DATE OF INSTALLATION INSTALLER S NAME INSTALLER S ADDRESS MODEL NUMBER SERIAL NUMBER ...

Page 4: ...tant safety precautions 1 Before any maintenance or repairs are per formed disconnect the appliance from the electric supply 2 Your appliance should be installed by a qualified gas installation technician Have the technician show you the exact location of the gas shutoff valve on the incoming gas line so you know how to turn off the gas if necessary 3 In the event of a power failure do not at temp...

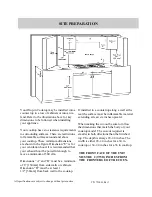
Page 5: ...ur exhaust hood be powerful enough to move a minimum of 300 cfm Dimensions A and B must be a minimum of 6 150mm from side walls or cabinets Dimension D must be at least 1 1 2 38mm from back wall to the cooktop If installed in a countertop along a wall at the rear the surface must be inflammable material extending at least six inches upward When making the cut out be sure to follow the dimensions t...

Page 6: ...sibility 6 Remove and unpack any accessories shipped with your appliance Make sure no hardware or accessories are left to be disposed of unintentionally POSITIONING 1 The importance of the proper installation of gas cooking equipment cannot be over stressed Proper performance of the equipment is dependent in great part on the compliance of the installation with the manufacturer s specifications 2 ...

Page 7: ...ea sons Under no circumstances should the factory installed regulator be removed or by passed 8 The factory installed pressure regulator will withstand an input pressure of PSI 12 wc If the incoming pressure ex ceeds the maximum rating a step down regulator is required 9 The appliance and it individual shut off valve must be disconnected from the gas supply line during any pressure testing in exce...

Page 8: ...appliance is equipped with a three pronged grounding plug for your protec tion against shock hazard and should be plugged directly into a properly grounded receptacle Do NOT cut or remove the grounding prong from this plug If the appliance is not grounded or its po larity is reversed severe shock hazards can exist If present the optional rotisserie motor must be also be grounded in accordance with...

Page 9: ...po sure to moisture may cause these cast parts to rust To light a burner turn the corresponding control knob to HIGH This knob is a gas control valve and an electric switch Turning to the High posi tion begins the ignition sequence The igniters begin to click As gas flows through the piping to the burner the sparking ignites it After the flame lights the igniter senses its heat and the clicking au...

Page 10: ...spatula or sim ilar or any metal tool to scrape these sur faces Do NOT permit citrus or tomato juices to sit and dry on these surfaces Wipe such spills immediately Citric acid will dis color stainless steel BURNERS The ring grates and top grates of your ap pliance may be effectively cleaned with ho soapy water In the event of heavy soiling a commer cially available oven cleaner may be safe ly used...

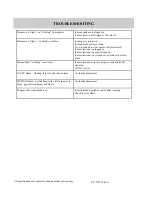
Page 11: ...r different result Insure electrode is plugged in Insure electrode is properly lined up Insure electrode is not cracked spark not in correct place Burner lights clicking won t stop Insure electrode wires are properly connected after cleaning Call for service LAZEY flame floating larger in size than normal Air shutter adjustment LIFTING flame well defined with visible inner core noisy gap between b...

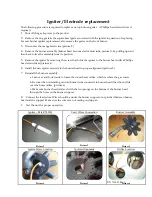
Page 12: ... head screwdriver picture 4 6 Install the new igniter securely to the burner head in proper alignment picture 5 7 Reinstall the burner assembly a Lean over and look inside to locate the round brass orifice which is where the gas enters b Be sure when reinstalling venturi burner tube connected to burner head that the end fits over the brass orifice picture 6 c Make sure burner head sits level with ...

Page 13: ..._________________________ e mail _______________________________________ Installer s Name ___________________________ Telephone ____________________________________ Company _________________________________ Dealer _______________________________________ Telephone ________________________________ CHECK ALL THAT APPLY Appearance and Aesthetics Electrical Connection Exterior Correct voltage Top secti...

Page 14: ...s and nursing homes This Warranty does not cover Products installed outside the U S or Canada This Warranty does not apply to gas type conversions on cooking appliances not completed by a certified gas technician licensed plumber or certified BlueStar servicers Full Two Year Warranty Product Registration is not required to obtain Warranty Coverage but is highly recommended for optimal servicing an...

Page 15: ...ed Warranty on Product Refurbished Refurbished Products are covered by a six 6 months limited functional parts and labor warranty with proof of installation as well as an additional six 6 months limited parts warranty There is no cosmetic warranty of any kind on Refurbished Product Registration Registration is strongly recommended While not necessary to effectuate warranty coverage it is the best ...

Page 16: ...replacement of a part or Product under this Warranty does not extend the Warranty period If the Product is removed from the property where it was originally installed Slight color variations may be noticed because of differences in painted parts kitchen lighting product placement and other factors this warranty does not apply to color variations Service calls to educate the customer on proper use ...

Page 17: ...ESULTING FROM BREACH OF THIS WARRANTY OR ANY IMPLIED WARRANTY Some states and provinces do not allow the exclusion or limitation of incidental or consequential damages so these provisions may not apply to you Where Can Any Legal Remedies Be Pursued Please see the Arbitration Clause and Related Provisions which affect your legal rights Read this Arbitration Clause and its related provisions careful...

Page 18: ...rising out of contract and tort pursuant to statute or otherwise 3 CLASS ARBITRATION WAIVER ARBITRATION IS HANDLED ON AN INDIVIDUAL BASIS IF A DISPUTE IS ARBITRATED YOU AND WE EXPRESSLY WAIVE ANY RIGHT TO PARTICIPATE AS A CLASS REPRESENTATIVE OR CLASS MEMBER ON ANY CLASS CLAIM YOU MAY HAVE AGAINST US AND US AGAINST US OR AS A PRIVATE ATTORNEY GENERAL OR IN ANY OTHER REPRESENTATIVE CAPACITY YOU AND...

Page 19: ...w Prizer Painter will pay your share of the fees charged by the arbitration organization and arbitrator s beyond the first 200 Where permissible by law you may be required to reimburse Prizer Painter for the fees of the arbitration organization and arbitrator s in whole or in part by decision of the arbitrator s at the discretion of the arbitrator s 11 Survival and Enforceability of this Arbitrati...

Reviews: