background image

23

22

ENGLISH

ENGLISH

TROUBLE SHOOTING

Fault

Cause

Solution

Light on, but motor 

does not work

The blades are blocked

Check the status of the 

blades

The capacitor is damaged

Replace the capacitor

The motor is damaged

Replace the motor

The internal wiring of motor 

is cut off/disconnected. An 

unpleaseant smell may be 

produced

Replace the motor

Both light and motor 

do not work

Apart from the above mentioned, check the following:
Light damaged

Replace the lights

Power cord loose

Connect the wires as per the 

electric diagram.

Oil leakage.

Outlet and the air ventilation 

entrance are not sealed tightly.

Take down the outlet and 

seal with glue.

Insufficient suction.

The distance between cooker 

hood and cooker top is too 

large.

Readjust the distance.

Too much ventilation from 

open doors or windows.

Choose a new place to install 

the appliance or close some 

doors and windows during 

using.

The machine inclines

The fixing screws are not tight 

enough

Tighten the fixing screw and 

make it horizontal.

The hanging screws are not 

tight enough

Tighten the hanging screw 

and make it horizontal.

Vibration

The blade , if damaged, can 

cause vibrating

Replace the blade

The motor is not tightly fastened Fasten the motor tightly

The cooker hood is not tightly 

fixed.

Fixed the cooker hood tightly.

ENVIRONMENT FRIENDLY DISPOSAL

 You can help protect the environment! Please remember to respect 

the local regulations: hand in the non-working electrical equipments 

to an appropriate waste disposal center.

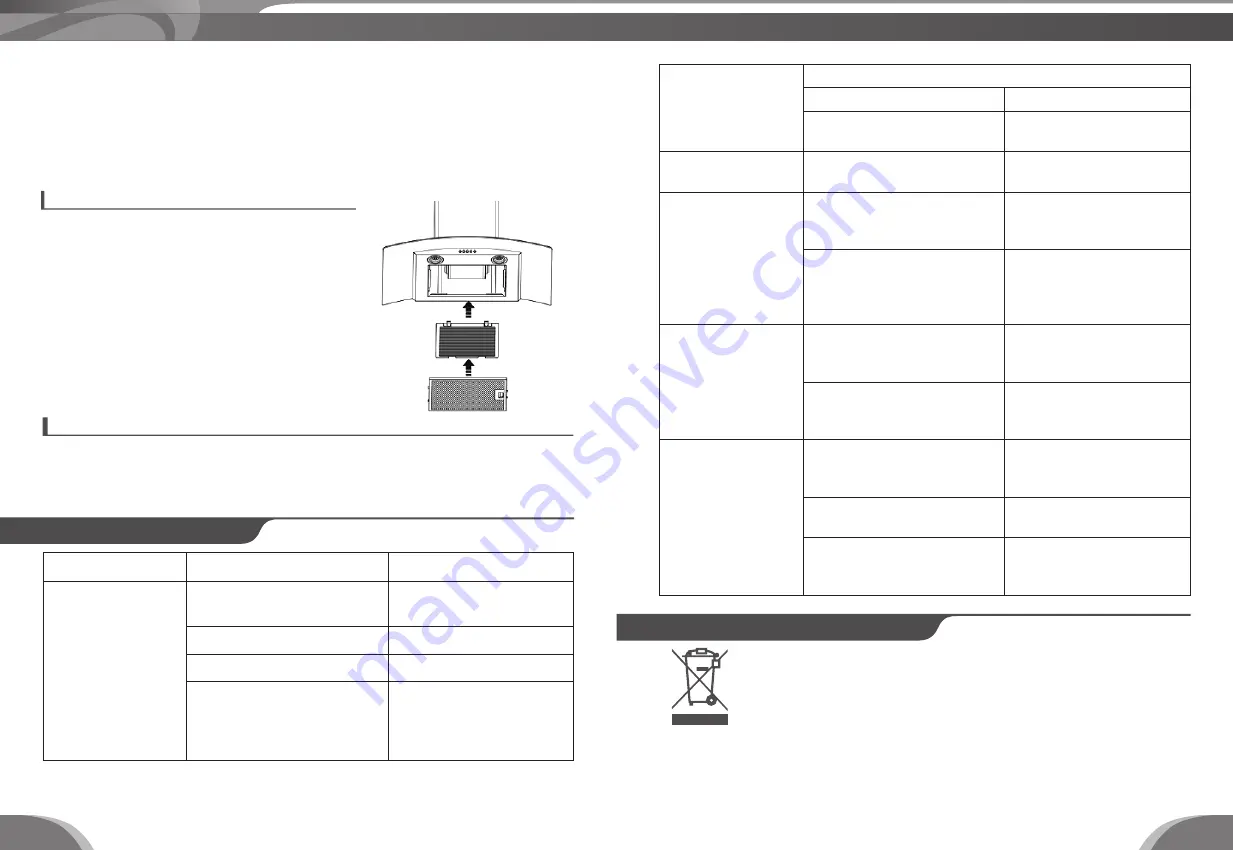
Clean the Control panel surface:

- The control panel can be cleaned by using warm soapy water. Ensure the cloth is 

well wrung before cleaning.

- Use a dry soft cloth to remove any excess moisture left after cleaning.

- If the grease filter is cleaned by dishwasher, place it inside. Select the most 

powerful washing program and highest temperature, maximum is 60

o

C.

- Do not use abraisive product to clean the grease filters.
- After cleaning, ensure that the filters are completely dry before refitting.
- Clean thoroughly the aluminium grease filter once a month 

Replace the carbon filters:

- Replace the carbon filter every 3 months. 
- Increase the filter cleaning/replacing 

frequency if the hood is used for more than 2 

hours a day.

- The carbon filter must be replaced by the 

manufacturer, its service agent or similarly 

qualified person in order to avoid a hazard.

Summary of Contents for HOB-8733

Page 1: ...Máy hút mùi Hướng dẫn sử dụng Model HOB 8733 Công Suất Hút 750m3 h Lưới lọc hợp kim nhôm 5 lớp và bộ lọc than hoạt tính Độ ồn thấp ...

Page 2: ...ẩm BlueStone được thiết kế theo tiêu chuẩn quốc tế nghiêm ngặt nhằm đáp ứng được nhu cầu ngày càng cao của người tiêu dùng BlueStone luôn coi trọng việc chăm sóc khách hàng Các sản phẩm BlueStone đều được bảo hành 2 năm MỤC LỤC HƯỚNG DẪN ĐĂNG KÝ BẢO HÀNH ĐIỆN TỬ 04 CẢNH BẢO AN TOÀN 05 HƯỚNG DẪN LẮP ĐẶT 06 THÔNG SỐ KỸ THUẬT 09 MÔ TẢ TỔNG QUÁT 09 HƯỚNG DẪN SỬ DỤNG 10 VỆ SINH VÀ BẢO TRÌ 10 SỰ CỐ VÀ C...

Page 3: ...vào bóng đèn sau khi sử dụng vì có thể gây bỏng 16 Không sử dụng máy mà không có bộ lưới lọc 17 Không tắt máy trực tiếp bằng cách rút dây nguồn khi máy vẫn còn đang hoạt động 18 Sản phẩm cần phải được lắp đặt bởi đại lý dịch vụ hoặc những người có trình độ chuyên môn 19 Luôn rút phích cắm khỏi ổ điện sau khi sử dụng hãy nắm đầu phích cắm để rút ra khỏi ổ điện không nắm dây điện mà giật ra để tránh...

Page 4: ...ác nhau Phụ kiện bao gồm 1 Chuẩn bị lắp đặt a Đường kính của ống dẫn là 150mm như hình minh họa Vì vậy khi lắp đặt đường ống ra ngoài bạn phải sử dụng đúng phụ kiện của sản phẩm để tăng hiệu quả cho việc lọc mùi và giúp máy vận hành tốt hơn d Sản phẩm hút mùi khi lắp ráp cần có ống thoát khí ra ngoài để việc lọc đạt hiệu quả tốt và máy vận hành êm ái hơn Đồng thời giúp tăng tuổi thọ của máy và giả...

Page 5: ...khói vào khớp với khóa của hai bên Hình 1 Cách 2 Sau khi đã khoan 2 lỗ và gắn máy hút vào lắp đặt nắp ống khói bằng cách khóa 2 ốc vít ở hai bên của các lỗ khoan Hình 2 Phương pháp này giảm được sự rung do va chạm và tạo ra âm thanh của máy e Lắp đặt bộ lọc than hoạt tính Để lắp đặt bộ lọc than hoạt tính nên lấy lưới lọc dầu mỡ ra trước Nhấn vào nút khóa và kéo lưới lọc xuống Hình 1 Hình 2 CHÚ Ý 1...

Page 6: ... lọc hợp kim nhôm định kỳ 1 tháng lần Thay bộ lọc than hoạt tính Thay bộ lọc than hoạt tính 3 tháng lần để thiết bị hoạt động hiệu quả hơn Nếu máy hút mùi được sử dụng nhiều hơn 2 tiếng mỗi ngày cần phải vệ sinh hoặc thay thế bộ lọc thường xuyên Việc thay bộ lọc nên được thực hiện bởi những người có chuyên môn hoặc bạn có thể liên hệ Đại lý gần nhất để thực hiện việc này Vệ sinh bề mặt bảng điều k...

Page 7: ...ùi khét khó chịu từ trong máy Thay thế động cơ Cả đèn và máy đều không hoạt động Tương tự những nguyên nhân trên kiểm tra như sau Sự cố đèn Thay đèn Dây cắm lỏng lẻo Kết nối dây điện với bảng mạch điện Rò rỉ dầu Đầu ra và đầu vào của không khí không được bịt kín Tháo ống thoát mùi và dán lại bằng keo Hút mùi không đạt hiệu quả Khoảng cách giữa máy hút mùi và mặt bếp quá lớn Điều chỉnh khoảng cách ...

Page 8: ...est part of range hood is 650mm 11 Do not share the same air ventilation tube with other appliances such as gas tube warmer tube and hot tube There will be hazard of under pressure combustion impaired and harmful gases drawn back 12 Plug the power cord to socket outlet with earthing continuity terminal 13 If the supply cord is damaged it must be replaced by the manufacturer its service agent or si...

Page 9: ...2 1 Prepare for installation a Outlet s diameter is 150mm as shown Therefore it is a must to use original authorized accessories when installing to get higher effectiveness and the appliance will operate more durable b Before installation turn the unit off and unplug it from the outlet c The cooker hood should be placed at a distance of 65 75cm above the cooking plane for best effection a Drill 3 ...

Page 10: ...er into the machine Note 1 Make sure the filter is securely locked Otherwise it would loosen and cause dangerous 2 When activated carbon filter attached the suction power will be lower There are 2 methods for installing the chimney cover Please check the below picture for reference Option 1 After drilled the 2 holes and fixed the hook hang the chimney cover by matching the both side lock Picture 1...

Page 11: ...30 W Diameter of Air Tube 150 mm Air flow 750 m3 h Noise level 55 dB INSTRUCTION FOR USE Control panel Cleaning of the filters Remove the filter according to below picture The grease filters can be cleaned by hand in warm soapy water Soak in warm water and some washing up liquid For subborn grease stains use a soft nylon brush to help remove these stains Turn off button Low speed Medium speed High...

Page 12: ...screw and make it horizontal Vibration The blade if damaged can cause vibrating Replace the blade Themotorisnottightlyfastened Fasten the motor tightly The cooker hood is not tightly fixed Fixedthecookerhoodtightly ENVIRONMENT FRIENDLY DISPOSAL You can help protect the environment Please remember to respect thelocalregulations handinthenon workingelectricalequipments to an appropriate waste dispos...

Page 13: ......

Reviews: