background image

0063-19

Dieses Produkt eignet sich nicht als Hauptheizgerät.

This product is not suitable for primary heating purposes.

10032817

Gasheizgerät

Summary of Contents for 10032817

Page 1: ...0063 19 Dieses Produkt eignet sich nicht als Hauptheizgerät This product is not suitable for primary heating purposes 10032817 Gasheizgerät ...

Page 2: ...mitätserklärung 8 Technische Parameter 9 2 Sehr geehrter Kunde wir gratulieren Ihnen zum Erwerb Ihres Geräts Lesen Sie die folgenden Hinweise sorgfältig durch und befolgen Sie diese um möglichen Schäden vorzubeugen Für Schäden die durch Missachtung der Hinweise und unsachgemäßen Gebrauch entstehen übernehmen wir keine Haftung Scannen Sie den QR Code um Zugriff auf die aktuellste Bedienungsanleitun...

Page 3: ...d unten verteilt ist Das Gasheizgerät darf nicht in der Nähe von anderen Wärmequellen aufgestellt werden mindestens 1 Meter Abstand oder in der Nähe brennbarer oder explosiver Stoffe Das Gerät darf nicht frontal zu Gegenständen stehen die beschädigt werden können oder brennen z B Gardinen Sesseln oder anderen Möbeln Stellen Sie den Gasheizer so auf dass die Wärme in die Mitte des Raumes gelenkt wi...

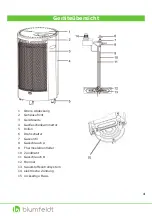
Page 4: ...häusefront 3 Geräteseite 4 Gasflaschenkammertür 5 Rollen 6 Drehschalter 7 Gasventil 8 Gasschlauch A 9 Thermoelementleiter 10 Zünddraht 11 Gasschlauch B 12 Brenner 13 Sauerstoffkontrollsystem 14 elektrische Zündung 15 rückseitige Basis 15 4 ...

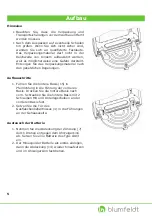
Page 5: ...tzlichen Regelungen Aufbauschritte 1 Führen Sie die hintere Basis 15 in Pfeilrichtung in die Führung der vorderen Basis Drücken Sie die hintere Basis nach vorn Schrauben Sie die hintere Basis mit 2 Schrauben M8 und Unterlegscheiben an der vorderen Basis fest 2 Setzen Sie die Tür des Gasflaschenbehältnisses 4 in die Führungen an der Gehäuseseite Austausch der Batterie 1 Nehmen Sie die Abdeckung der...

Page 6: ...ig dass kein Gas aus der Zuleitung dringt Verwenden Sie dazu Seifenwasser 1 Teil Reinigungsmittel 2 Teile Wasser Wenn es ein Leck gibt steigen Blasen hoch Ziehen Sie die Verbindung fester an oder wenden Sie sich an Fachleute Stellen Sie die Gasflache in das Behältnis Achten Sie darauf dass der Schlauch nicht geknickt oder abgewürgt ist und keine heißen Teile berührt Hängen Sie die Tür für die Gasf...

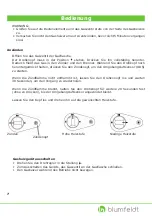
Page 7: ...ücken Sie den Zündknopf um den Umgebungsluftsensor ODS zu starten Wenn die Zündflamme nicht entflammt ist lassen Sie den Drehkonopf los und warten 30 Sekunden um den Vorgang zu wiederholen Wenn die Zündflamme brennt halten Sie den Drehknopf für weitere 20 Sekunden fest ohne zu drücken bis der Umgebungsluftsensor angezündet bleibt Lassen Sie den Kopf los und drehen ihn auf die gewünschten Heizstufe...

Page 8: ...me Wenn Sie den Gasbrenner für längere Zeit nicht benutzen befolgen Sie die folgenden Schritte 1 Schließen Sie den Gashahn und trennen Sie den Druckregler von der Gasflasche 2 Lagern Sie die Gasflasche an einem gut belüfteten Ort weit von brennbaren oder explosiven Stoffen entfernt vorzugsweise außerhalb des Hauses Lagern Sie die Gasflasche nie im Keller oder auf dem Dachboden 3 Das Gasheizgerät m...

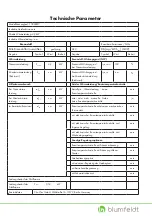
Page 9: ...meleistung keine Raumtemperaturkontrolle nein Bei Mindestwärme leistung elmin n a kW zwei oder mehr manuelle Stufen keine Raumtemperaturkontrolle ja Im Bereitschaftszustand elSB n a kW Raumtemperaturkontrolle mittels eines mechanischen Thermostats nein mit elektronischer Raumtemperaturkontrolle nein mit elektronischer Raumtemperaturkontrolle und Tageszeitregelung nein mit elektronischer Raumtemper...

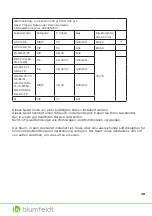
Page 10: ...E FI GR HU IT IS LT LV MT NL NO PT SE SI SK RO TR I3B P 28 30 G30 G31 PL I3P 37 G31 Dieses Gerät muss von einer befähigten Person installiert werden Dieses Gerät benötigt einen Schlauch und einen Regler fragen Sie Ihren Gashändler Nur in einem gut belüfteten Bereich verwenden Nicht in Freizeitfahrzeugen wie Wohnwagen und Wohnmobilen verwenden Der Raum in dem das Gerät installiert ist muss über ein...

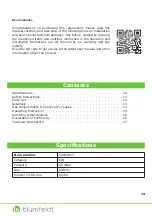
Page 11: ...Gas G30 31 Injector 1 100 mm 64 64 12 Dear Customer Congratulations on purchasing this equipment Please read this manual carefully and take care of the following hints on installation and use to avoid technical damages Any failure caused by ignoring the mentioned items and cautions mentioned in the operation and installation instructions are not covered by our warranty and any liability Scan the Q...

Page 12: ...n of 105 cm2 divided equally between high and low level The heater must not be close to other sources of heat at least 1 meter away or inflammable or explosive materials and must not face objects that can be damaged or burned for example not facing curtains easy chairs or furniture Position the heater so that the heat is directed towards the centre of the room and at any rate towards an open space...

Page 13: ...Left right side panel 4 Tank cover assembly 5 Wheels 6 Control knob 7 Gas valve 8 Gas pipe A 9 Thermocouple wire 10 The wire of electric Ignition 11 Gas pipe B 12 Blue flame burner 13 ODS Oxygen Depletion System 14 Electric ignition 15 Bottom base 15 14 ...

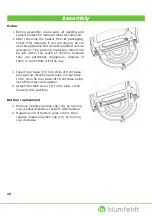
Page 14: ...ause they are potentially dangerous dispose of them in conformity with the law 1 Insert rear base 15 into slots of front base along arrow direction and push on rear base to fix then fix rear base into front base using 2pcs M8 screws and washer 2 Attach the tank cover 4 to the slots in the housing side sections Battery replacement 1 Remove impulse ignition cap 12 by turning cap counterclockwise Ins...

Page 15: ...hat there is no gas leaking from the connection using soapy water one part detergent and three parts water If there is a leak bubbles will form tighten the connection more or seek professionally qualified service Place the cylinder in its compartment taking care that the tube is not twisted or choked and doesn t touch any hot parts Align the rear cylinder cover onto the main body see ASSEMBLY 2 To...

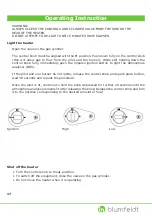
Page 16: ...ush the impulse ignition button to light the atmosphere analyzer ODS If the pilot and one burner do not ignite release the control knob and spark piezo button wait 30 seconds and repeat the procedure Once the pilot is lit continue to hold the knob depressed for further 20 seconds until the atmosphere analyses remains lit after releasing the knob Release the control knob and turn it to the position...

Page 17: ... an extended period it is a good idea to follow the instructions below 1 Close the tap on the cylinder and disconnect the regulator from the cylinder 2 Store the cylinder in a well ventilated room far from inflammable or explosive materials and preferably outside your home never store the cylinder in a basement or attic 3 The heater must be stored in a dry place and protected from dust and even be...

Page 18: ...tage heat output and no room temperature control no At minimum heat output fan motor elmin N A kW two or more manual stages no room temperature control yes In standby mode elSB N A kW with mechanic thermostat room temperature control no with electronic room temperature control no electronic room temperature control plus day timer no electronic room temperature control plus week timer no Other cont...

Page 19: ...7 G30 G31 BG HR CH CY DK EE FI GR HU IT IS LT LV MT NL NO PT SE SI SK RO TR I3B P 28 30 G30 G31 PL I3P 37 G31 This appliance requires installation by a competent person This appliance requires a hose and regulator check with your gas dealer Use only in a well ventilated area Do not use in leisure vehicles such as caravans and auto caravans The room where the appliance is installed must have enough...

Reviews: