background image

13

EN

Lighting instructions

Place logs on the coal grid. 

Note

: Make sure that the wood lies centrally on the grille and does not reach 

to the edge of the grille. The wood should not be stacked too high.

Then place light, dry wood chips under the logs.

CLEANING AND CARE

CAUTION


Danger of burns! Allow the garden fireplace to cool completely 

before inspecting or cleaning it for damage.

Inspect the garden fireplace for damage

Check the garden fireplace regularly for damage to ensure product safety and 

a longer service life.

1.  Check all parts to make sure they are tight.
2.  Check the components for damage and rust.

3.  If you find damage to any component, have the heater repaired before 

continuing to use it.

Cleaning

• 

Make sure that the fire is completely extinguished when you no longer use 
the garden fireplace.

• 

Make sure that the fire is completely extinguished and the fireplace has 

cooled down before removing the ashes.

•  Use a damp cotton cloth to remove soot from the net cover and chimney 

cover. Clean the fireplace regularly to ensure a long service life.

Note

: The surface may discolour after repeated use.

• 

Do not clean the fireplace until the fire has completely burnt out and the 
fireplace has cooled down.

•  Do not use oven cleaner or scouring agents, as these can damage the 

product.

•   Clean the outside with water and a mild dishwashing liquid.
•  For stubborn stains, use a citrus-based cleaner and a nylon brush.

Summary of Contents for 10032987

Page 1: ...Gartenkamin Garden Fireplace Cheminée de jardin Chimenea de jardín Camino da giardino 10032987 ...

Page 2: ......

Page 3: ... Hinweise und unsachgemäßen Gebrauch entstehen übernehmen wir keine Haftung Scannen Sie den folgenden QR Code um Zugriff auf die aktuellste Bedienungsanleitung und weitere Informationen rund um das Produkt zu erhalten INHALTSVERZEICHNIS Sicherheitshinweise 4 Kleinteile 5 Zusammenbau 6 Reinigung und Pflege 7 HERSTELLER Chal Tec GmbH Wallstraße 16 10179 Berlin Deutschland English 9 Français 15 Españ...

Page 4: ...hle komplett abgebrannt und die Asche abgekühlt ist Fassen Sie den Kamin erst an wenn er komplett abgekühlt ist Tragen Sie während dem Betrieb hitzebeständige Handschuhe Verstauen Sie den Kamin erst wenn er komplett abgekühlt ist und die Asche entsorgt wurde Verwenden Sie immer Werkzeuge und hitzebeständige Handschuhe wenn Sie Brennmaterial hinzufügen oder den Kamin bewegen Lassen Sie den Kamin wä...

Page 5: ...5 DE KLEINTEILE Teil Beschreibung Bild Stk A Regenschutzdeckel 1 B Oberer Kamin 1 C Unterer Kamin 1 D Basis 1 E Beine 1 F Schrauben M6 15 1 G Muttern 1 ...

Page 6: ...ontieren Sie den unteren Kamin C mit 3 Schrauben M6 15 F und Muttern G an der Basis D 3 Montieren Sie den oberen Kamin B mit 3 Schrauben M6 15 F und Muttern G am unteren Kamin C 4 Setzen Sie den Regenschutzdeckel A auf den oberen Kamin B und ziehen Sie alle Schrauben fest Die Montage ist abgeschlossen ...

Page 7: ...Sie Schäden an einer Komponente feststellen lassen Sie den Kamin reparieren bevor Sie ihn weiter benutzen Reinigung Versichern Sie sich dass das Feuer vollständig gelöscht ist wenn Sie den Gartenkamin nicht mehr verwenden Stellen Sie sicher dass das Feuer vollständig gelöscht ist und der Kamin abgekühlt ist bevor Sie die Asche entfernen Verwenden Sie ein feuchtes Baumwolltuch um Ruß von der Netzab...

Page 8: ......

Page 9: ...aused by ignoring the items and cautions mentioned in the instruction manual is not covered by our warranty and any liability Scan the QR code to get access to the latest user mannual and other information about the product CONTENT Safety Instructions 10 Hardware Contents 11 Assembly 12 Cleaning and Care 13 PRODUCER Chal Tec GmbH Wallstraße 16 10179 Berlin Germany ...

Page 10: ...re pit after use Leave a thin layer of ash to protect the bottom Do not remove ashes or charcoal until they are completely and fully extinguished Do not touch the fire pit until it is completely cooled unless you are wearing heat resistant gloves as it is hot when in use Do not handle or move the fire pit when in use as it is hot Do not attempt to store the fire pit until all ashes and charcoals a...

Page 11: ...11 EN HARDWARE CONTENTS Part Description Picture Qty A Rain Lid 1 B Top Funnel 1 C Bottom Funnel 1 D Main Body 1 E Legs 1 F Bolts M6 15 1 G Nuts 1 ...

Page 12: ... Bolts F and Nuts G 2 Assemble Bottom Funnel C to Main Body D with 3pcs M6 x 15 Bolts F and Nuts G 3 Assemble Top Funnel B to Bottom Funnel C with 3pcs M6 x 15 Bolts F and Nuts G 4 Put Rain Lid A on Top Funnel B Now check and tighten all fixings assembly is complete ...

Page 13: ...nd rust 3 If you find damage to any component have the heater repaired before continuing to use it Cleaning Make sure that the fire is completely extinguished when you no longer use the garden fireplace Make sure that the fire is completely extinguished and the fireplace has cooled down before removing the ashes Use a damp cotton cloth to remove soot from the net cover and chimney cover Clean the ...

Page 14: ......

Page 15: ...es Nous ne saurions être tenus pour responsables des dommages dus au non respect des consignes et à la mauvaise utilisation de l appareil Scannez le QR Code pour obtenir la dernière version du mode d emploi et à d autres informations concernant le produit SOMMAIRE Consignes de sécurité 16 Petits éléments 17 Assemblage 18 Nettoyage et entretien 19 FABRICANT Chal Tec GmbH Wallstraße 16 10179 Berlin ...

Page 16: ... refroidies Ne touchez pas la cheminée tant qu elle n a pas complètement refroidi portez des gants résistants à la chaleur pendant le fonctionnement Ne rangez la cheminée que lorsqu elle est complètement refroidie et que les cendres ont été éliminées Utilisez toujours des outils et des gants résistants à la chaleur lorsque vous ajoutez du combustible ou que vous déplacez la cheminée Ne laissez pas...

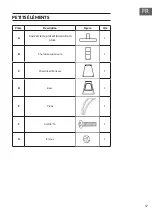
Page 17: ...17 FR PETITS ÉLÉMENTS Pièce Description Figure Qté A Couvercle de protection contre la pluie 1 B Cheminée supérieure 1 C Cheminée inférieure 1 D Base 1 E Pieds 1 F Vis M6 15 1 G Ecrous 1 ...

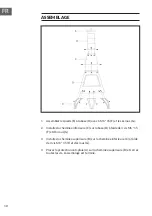
Page 18: ...a cheminée inférieure C sur la base D à l aide de 3 vis M6 15 F et d écrous G 3 Installez la cheminée supérieure B sur la cheminée inférieure C à l aide de 3 vis M6 15 F et d écrous G 4 Placez la protection anti pluie A sur la cheminée supérieure B et serrez toutes les vis L assemblage est terminé ...

Page 19: ...t faites réparer la cheminée avant de continuer à l utiliser Nettoyage Assurez vous que le feu est complètement éteint lorsque vous cessez d utiliser la cheminée de jardin Assurez vous que le feu est complètement éteint et que la cheminée s est refroidie avant de nettoyer le bac à cendres Remettez les cendres dans le conteneur à cendres sortez le conteneur à cendres et videz le Utilisez un chiffon...

Page 20: ......

Page 21: ...presa no se responsabiliza de los daños ocasionados por un uso indebido del producto o por haber desatendido las indicaciones de seguridad Escanee el código QR para obtener acceso al manual de usuario más reciente y otra información sobre el producto ÍNDICE Indicaciones de seguridad 22 Piezas pequeñas 23 Montaje 24 Limpieza y cuidado 25 FABRICANTE Chal Tec GmbH Wallstraße 16 10179 Berlín Alemania ...

Page 22: ...n apagado y la chimenea se haya enfriado No toque la chimenea hasta que se haya enfriado utilice guantes resistentes al calor durante el manejo de la misma Guarde la chimenea después de que se haya enfriado y haya retirado las cenizas Utilice siempre utensilios y guantes resistentes al calor cuando añada el material combustible o mueva la chimenea No deje la chimenea sin supervisión cuando está en...

Page 23: ...23 ES PIEZAS PEQUEÑAS Pieza Descripción Figure Uds A Tapa contra la lluvia 1 B Chimenea superior 1 C Chimenea inferior 1 D Base 1 E Pata 1 F Tornillo M6 15 1 G Tuerca 1 ...

Page 24: ... chimenea inferior C en la base D utilizando 3 tornillos M6 15 F y tuercas G 3 Monte la chimenea superior B en la chimenea inferior C utilizando 3 tornillos M6 15 F y tuercas G 4 Coloque la tapa contra la lluvia A en la chimenea superior B y atornille bien todos los tornillos La chimenea está montada ...

Page 25: ...detectar cualquier deterioro u oxidación 3 Si detecta cualquier deterioro repárelo antes de volver a utilizar la chimenea Limpieza Compruebe que el fuego está completamente apagado si no utiliza más la chimenea Asegúrese de que el fuego está completamente apagado y la chimenea enfriada antes de retirar las cenizas Utilice un paño de algodón húmedo para retirar el hollín de la tapa de rejilla y la ...

Page 26: ......

Page 27: ...alcuna responsabilità per danni scaturiti da una mancata osservazione delle avvertenze di sicurezza e da un uso improprio del dispositivo Scansionare il codice QR seguente per accedere al manuale d uso più attuale e per ricevere informazioni sul prodotto INDICE Avvertenze di sicurezza 28 Piccoli componenti 29 Montaggio 30 Pulizia e manutenzione 31 PRODUTTORE Chal Tec GmbH Wallstraße 16 10179 Berli...

Page 28: ...e è completamente bruciato e la cenere si è raffreddata Toccare il camino solo quando è completamente raffreddato Durante l utilizzo indossare guanti termoresistenti Riporre il camino solo quando è completamente raffreddato ed è stata rimossa la cenere Quando si aggiunge materiale combustibile o si sposta il camino utilizzare sempre utensili e guanti termoresistenti Non lasciare il camino privo di...

Page 29: ...29 IT PICCOLI COMPONENTI Pezzo Descrizione Figura Nr A Coperchio parapioggia 1 B Comignolo superiore 1 C Comignolo inferiore 1 D Basamento 1 E Gambe 1 F Viti M6 15 mm 1 G Dadi 1 ...

Page 30: ... 2 Montare il comignolo inferiore C sul basamento con 3 viti M6 15 F e dadi G 3 Montare il comignolo superiore B al comignolo inferiore C con 3 viti M6 15 F e dadi G 4 Posizionare il coperchio parapioggia A sul comignolo superiore B e stringere tutte le viti Il montaggio è concluso ...

Page 31: ...3 Se si nota un componente danneggiato far riparare il camino prima di utilizzarlo Pulizia Assicurarsi che il fuoco sia completamente spento quando non si utilizza più il camino Assicurarsi che il fuoco sia completamente spento e che il camino si sia raffreddato prima di rimuovere la cenere Utilizzareunpannoincotoneumidoperrimuoverefuligginedallacopertura in rete e dal coperchio del comignolo Puli...

Page 32: ......

Page 33: ......

Page 34: ......

Reviews: