background image

Flavius  

Gartenkamin
Garden chimney 
Chimenea de jardín
Cheminée de jardin 
Caminetto da giardino

10030722

Summary of Contents for Flavius

Page 1: ...Flavius Gartenkamin Garden chimney Chimenea de jard n Chemin e de jardin Caminetto da giardino 10030722...

Page 2: ......

Page 3: ...ie den folgenden QR Code um Zugriff auf die aktuellste Bedienungsanleitung und weitere Informationen rund um das Produkt zu erhalten INHALTSVERZEICHNIS Sicherheitshinweise 4 Einzelteile 6 Zusammenbau...

Page 4: ...st heraus wenn die Kohle komplett abgebrannt und die Asche abgek hlt ist Fassen Sie die Feuerstelle erst an wenn sie komplett abgek hlt ist Tragen Sie w hrend des Betriebs hitzebest ndige Handschuhe V...

Page 5: ...5 DE VORSICHT VERWENDEN SIE KEIN ALKOHOL ODER BENZIN ZUM ENTZ NDEN ODER WIEDERENTZ NDEN...

Page 6: ...6 DE EINZELTEILE...

Page 7: ...hutz 1 6 Gittert r 1 7 Kohlerost 1 8 Ofenbasis 1 9 Verbindungsst ck 6 10 Montageblech 1 11 Halterung 1 12 Luftauslass 1 13 Mittelring 1 14 Bein 3 15 Schraube M6x20 12 16 Schraube M6x25 9 17 Mutter M6...

Page 8: ...ie Beine 14 mit den Schrauben M6x25 16 Federringen und Muttern M6 17 montieren Fest anziehen und die Beine 14 in die richtige Position bringen Am Mittelring 13 befestigen Das Montageblech 10 und den L...

Page 9: ...erbindungsst ck 9 und den Funkenschutz 5 auf die Ofenbasis 8 setzen und mit den Schrauben M6x20 15 den Unterlegscheiben 18 Federringen 19 und Muttern 17 befestigen Die Gittert r 6 und den Funkenschutz...

Page 10: ...Verbindungsst ck 9 am Funkenschutz 5 anbringen und auf der Abdeckung 4 montieren Die Schrauben M6x20 15 Unterlegscheiben 1 Federscheiben 19 und Muttern 17 verwenden Die Luftklappe 3 auf die Abdeckung...

Page 11: ...tellen in sicherem Abstand zu brennbaren Stoffen Nicht vergessen dass sich der gesamte Ofen aufheizt Der Gartenofen bedarf keiner besonderen Pflege Es braucht keinen Sand um die Metallbasis zu isolier...

Page 12: ...Gefahr darstellen Feuer l schen Um das Feuer ausgehen zu lassen kein weiteres Brennmaterial hinzuf gen und das Feuer sterben lassen oder mit Sand zusch tten Nicht mit Wasser l schen au er in einem Not...

Page 13: ...or improper use Please scan the QR code to access the latest operating instructions and for further information about the product CONTENTS Safety Instructions 14 Individual parts 16 Assembly 18 Use 21...

Page 14: ...he soil Only remove the ash when the coal has burnt down completely and the ash has cooled down Do not touch the fireplace until it has cooled down completely Wear heat resistant gloves during operati...

Page 15: ...15 EN CAUTION DO NOT USE ALCOHOL OR GASOLINE TO IGNITE OR RE IGNITE...

Page 16: ...16 EN INDIVIDUAL PARTS...

Page 17: ...Cover 1 5 Spark guard 1 6 Mesh door 1 7 Charcoal grate 1 8 Stove base 1 9 Coupler 6 10 Mounting plate 1 11 Holder 1 12 Air outlet 1 13 Centre ring 1 14 Leg 3 15 Screw M6x20 12 16 Screw M6x25 9 17 Nut...

Page 18: ...its side and mount the legs 14 with the M6x25 screws 16 lock washers and M6 nuts 17 Tighten firmly and bring the legs 14 into the correct position Attach to the centre ring 13 Fit the mounting plate 1...

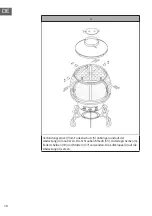
Page 19: ...19 EN 3 Place the coupler 9 and the spark guard 5 on the stove base 8 and secure with the M6x20 screws 15 fasten the washers 18 lock washers 19 and nuts 17 Fit the grille door 6 and the spark guard 5...

Page 20: ...20 EN 4 Attach the coupler 9 to the spark guard 5 and mount it on the cover 4 Use the M6x20 screws 15 washers 1 spring washers 19 and nuts 17 Place the air flap 3 on the cover 4...

Page 21: ...ace at a safe distance from combustible materials Don t forget that the whole oven heats up The garden oven does not require any special care It does not need sand to insulate the metal base You can m...

Page 22: ...s Too large a fire can damage the garden stove and pose a hazard Extinguish fire To let the fire go out do not add any more fuel and let the fire die or cover it with sand Do not extinguish with water...

Page 23: ...haber desatendido las indicaciones de seguridad Escanee el siguiente c digo QR para obtener acceso al manual de usuario m s reciente y otra informaci n sobre el producto NDICE Indicaciones de segurida...

Page 24: ...as cenizas hasta que el carb n se haya quemado por completo y las cenizas se hayan enfriado No toque la chimenea hasta que se haya enfriado por completo Use guantes resistentes al calor cuando la chim...

Page 25: ...25 ES ATENCI N NO USE ALCOHOL O GASOLINA PARA ENCENDER O VOLVER A ENCENDER LA CHIMENEA...

Page 26: ...26 ES COMPONENTES...

Page 27: ...as 1 6 Puerta de malla 1 7 Rejilla para el carb n 1 8 Base de la estufa 1 9 Conector 6 10 Placa de montaje 1 11 Soporte 1 12 Salida del aire 1 13 Anillo central 1 14 Pata 3 15 Tornillo M6x20 12 16 Tor...

Page 28: ...8 de lado y monte las patas 14 con los tornillos M6x25 16 arandelas el sticas y tuercas M6 17 Apriete firmemente y coloque las patas 14 en la posici n correcta F jelas al anillo central 13 Monte la p...

Page 29: ...ector 9 y el protector contra chispas 5 en la base de la estufa 8 y f jelos con los tornillos M6x20 15 las arandelas 18 las arandelas el sticas 19 y las tuercas 17 Monte la puerta de malla 6 y el prot...

Page 30: ...l conector 9 en el protector contra chispas 5 y m ntelo en la cubierta 4 Utilice los tornillos M6x20 15 las arandelas 1 las arandelas el sticas 19 y las tuercas 17 Instale la aleta de ventilaci n 3 en...

Page 31: ...una superficie estable a una distancia segura de los materiales combustibles No olvide que toda la chimenea se calienta La chimenea de jard n no requiere ning n cuidado especial No necesita arena para...

Page 32: ...demasiado grande puede da ar la chimenea de jard n y suponer un peligro Extinci n del fuego Si desea apagar el fuego no a ada m s combustible y deje que el fuego se apague solo o c brelo con arena No...

Page 33: ...a mauvaise utilisation de l appareil Scannez le QR Code pour obtenir la derni re version du mode d emploi ainsi que d autres informations concernant le produit SOMMAIRE Consignes de s curit 34 Pi ces...

Page 34: ...charbon n a pas compl tement br l et que les cendres n ont pas refroidi Ne touchez pas la chemin e tant qu elle n a pas compl tement refroidi Portez des gants r sistants la chaleur pendant le fonction...

Page 35: ...35 FR ATTENTION N UTILISEZ PAS D ALCOOL OU D ESSENCE POUR ALLUMER OU RALLUMER LE FEU...

Page 36: ...36 FR PI CES D TACH ES...

Page 37: ...es 1 6 Porte grillag e 1 7 Grille de charbon de bois 1 8 Socle du po le 1 9 Pi ce de raccordement 6 10 Plaque de montage 1 11 Support 1 12 vacuation d air 1 13 Anneau central 1 14 Pieds 3 15 Vis M6 x...

Page 38: ...ontez les pieds 14 avec les vis M6x25 16 les rondelles de blocage et les crous M6 17 Serrez fermement et amenez les pieds 14 dans la bonne position Fixez les l anneau central 13 Montez la plaque de mo...

Page 39: ...39 FR 3 Montez le connecteur 9 avec les vis M6x20 15 les rondelles 18 les rondelles de blocage 19 et les crous M6 17 Montez la porte de la grille 6 et le pare tincelles 5...

Page 40: ...ez la pi ce de raccordement 9 au pare tincelles 5 et montez le sur le couvercle 4 Utilisez les vis M6x20 15 les rondelles 1 les rondelles de blocage 19 et les crous 17 Placez le volet d air 3 sur le c...

Page 41: ...table une distance s re des mat riaux combustibles N oubliez pas que le po le entier chauffe Le po le de jardin ne n cessite aucun entretien particulier Il n a pas besoin de sable pour isoler sa base...

Page 42: ...n feu trop important peut endommager le po le de jardin et constituer un danger Pour teindre le feu Pour teindre le feu n ajoutez plus de combustible et laissez le feu mourir ou couvrez le de sable Ne...

Page 43: ...icurezza e da un uso improprio del dispositivo Scansionare il codice QR seguente per accedere al manuale d uso pi attuale e per ricevere informazioni sul prodotto INDICE Avvertenze di sicurezza 44 Sin...

Page 44: ...solo quando si raffreddata e la carbonella completamente bruciata Toccare il camino solo quando si raffreddato completamente Indossare guanti termoresistenti durante l uso Riporre il camino solo quan...

Page 45: ...45 IT ATTENZIONE NON UTILIZZARE ALCOOL O BENZINA PER ACCENDERE O RAVVIVARE IL FUOCO...

Page 46: ...46 IT SINGOLI COMPONENTI...

Page 47: ...e 1 6 Graticola 1 7 Griglia per la carbonella 1 8 Base del forno 1 9 Connettore 6 10 Pannello di montaggio 1 11 Supporto 1 12 Condotto di scarico 1 13 Anello centrale 1 14 Gamba 3 15 Vite M6x20 12 16...

Page 48: ...montare le gambe 14 con le viti M6x25 16 le rondelle elastiche e i dadi M6 17 Stringere saldamente sistemare le gambe 14 nella posizione corretta e fissarle all anello centrale 13 Montare il pannello...

Page 49: ...3 Posizionare il connettore 9 e il parascintille 5 sulla base del forno 8 e fissarli con le viti M6x20 15 le rondelle 18 le rondelle elastiche 19 e i dadi 17 Installare la graticola 6 e il parascinti...

Page 50: ...IT 4 Collegare il connettore 9 al parascintille 5 e montarlo sul coperchio 4 Utilizzare le viti M6x20 15 le rondelle 1 le rondelle elastiche 19 e i dadi 17 Posizionare le prese d aria 3 sul coperchio...

Page 51: ...distanza di sicurezza da materiali infiammabili Non dimenticare che tutta la stufa si riscalda La stufa da esterno non richiede alcuna manutenzione speciale Non ha bisogno di sabbia per isolare la bas...

Page 52: ...a stufa da esterno e costituire un pericolo Spegnere il fuoco Per far spegnere il fuoco non aggiungere altro combustibile e lasciare morire il fuoco o coprirlo con della sabbia Non spegnerlo con acqua...

Page 53: ......

Page 54: ......

Page 55: ......

Page 56: ......

Reviews: