55
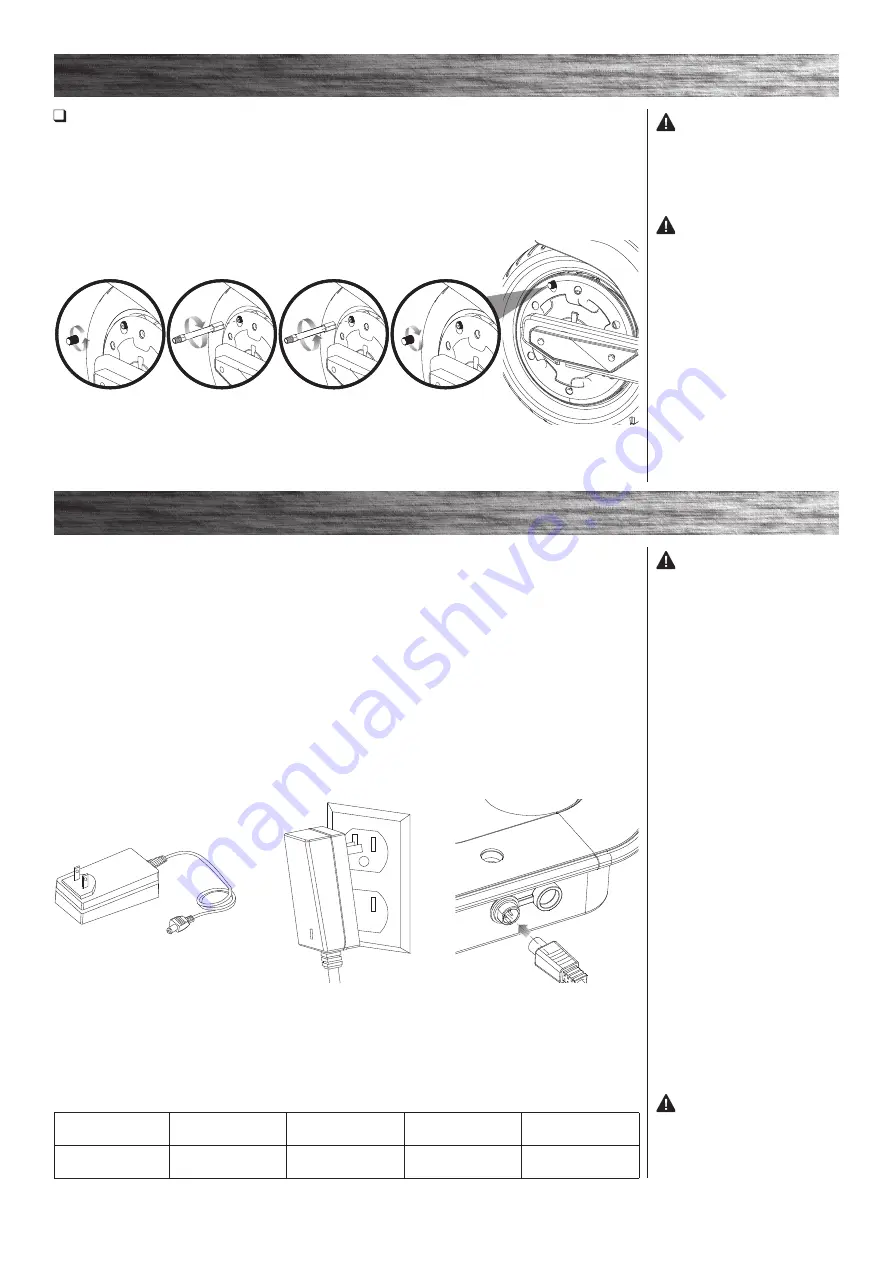
CHARGING THE BATTERY
Charger
(Note: Charger design may vary from
one shown)
1
Plug the charger plug into wall
outlet. The light on the charger
should be green.
Note:
If green light (LED) does not
turn on, try a different outlet.
2
Note:
Make sure power button is
in the
OFF
position. Plug the charger
into the charger port. The light on
the charger should turn red during
charging. The light will turn green
again when charging is complete.
Your BLVD URBN may not have a fully charged battery; therefore you must charge the battery prior
to use. Be sure to charge the battery in a clean, dry location away from direct sunlight, flames or sparks.
• Initial charge time: 8 hours.
• Recharge time: up to 8 hours, even if the light
turns green.
• Always charge the battery immediately after riding.
• Fully charge battery before storing for extended
periods of time.
• Unplug charger from the wall outlet when not in use.
• Failure to recharge battery periodically may result in a
battery that will not accept a charge.
• Make sure the power button is turned OFF when
product is not in use. If the power button is left on for
an extended period of time, the battery may reach a
stage at which it will no longer hold a charge.
• Run time: Up to 60 minutes of continuous ride time.
Run time may vary depending on riding conditions,
rider weight, climate, and/or proper maintenance.
• Constant starting and stopping may shorten ride time.
• Battery life can vary depending on proper
maintenance and usage of the product.
• Do not charge at or below 0°C (32°F).
Charger
WARNING:
Use ONLY with
the recommended charger. Batteries
are only to be charged under adult
supervision. The charger is not a
toy. Always disconnect the charger
before wiping down and/or cleaning
the BLVD URBN with a damp cloth.
The charger supplied with the
BLVD URBN should be regularly
examined for damage to the cord,
plug, enclosure and other parts. In
the event of such damage, the BLVD
URBN must not be charged until it
has been repaired or replaced.
Chargers have built-in overcharge
protection to prevent battery from
being over-charged.
Note:
If the charger gets warm
during regular use, this is a normal
response and is no cause for
concern. If your charger does not get
warm during use, it does not mean
that it is not working properly.
Wall outlet - Green (stand by)
Wall outlet and unit - Red (charging)
Wall outlet and unit - Green (charged)
Note:
Continue charging unit even if
light turns green prior to 8 hours.
WARNING:
Battery charge
can deplete over time. Periodically
recharge battery when not in use.
Model
Voltage
(Nominal) Vdc
Capacity
(Nominal) Ah
Charge
Temperature Range
Operating
Temperature Range
BLVD URBN
36
7.65
0° to 40°C
32° to 104°F
-20° to 40°C
-4° to 122°F
ASSEMBLY AND SET-UP
Inflating the Rear Tire
Required Tool:
Tire Valve Adapter (included)
The rear tire is inflated when shipped, but it invariably may lose some pressure between the point of manufacturing
and your purchase.
Always inflate tire to the correct PSI before first time use.
Lower air pressure can result in a shorter ride time.
Periodically check front tire. Reinflate when needed.
1
Remove the valve cap and install the tire valve adapter. Using a bicycle style tire pump equipped for a Schrader-type
valve, inflate the rear tire to the correct PSI indicated on the sidewall of the tire. Remove adapter and replace the valve
cap. Store tire valve adapter for future use.
WARNING:
Do not use the
electric scooter for the first time
until you have inflated the rear tire
to the correct PSI. Failure to do so
may damage your electric scooter
and void your warranty.
WARNING:
Do not
overinflate, as this could damage
the tire or wheel.
Note:
The pressure air supplies
found at gasoline stations are
designed to inflate high-volume
automobile tires. If you decide to
use such an air supply to inflate your
electric scooter tire, first make sure
the pressure gauge is working, then
use very short bursts to inflate to
the correct PSI. If you inadvertently
overinflate the tire, release the
excess pressure immediately.
Summary of Contents for urbn
Page 13: ......

