background image

30

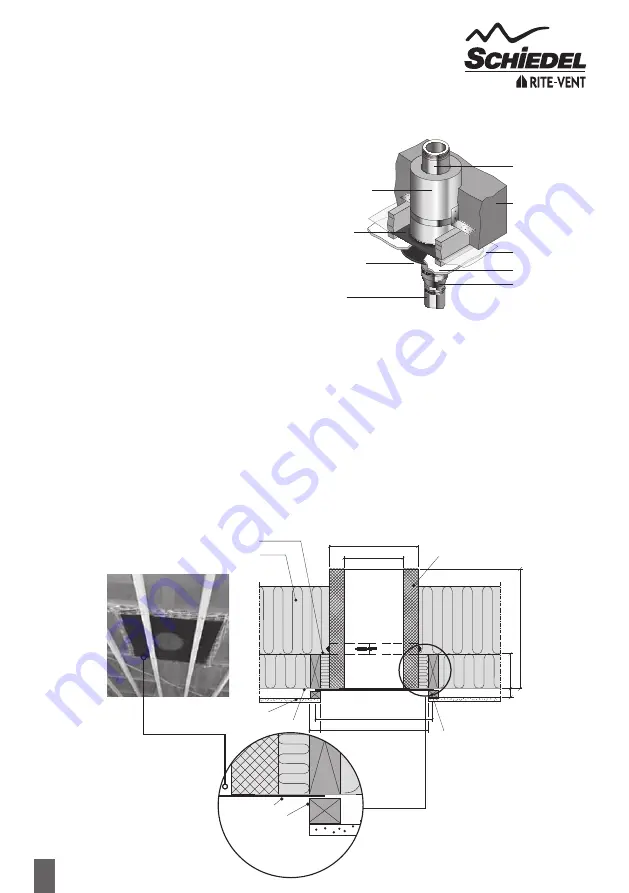
Protect Box

Schiedel  provide  an  air  tight  sealing  kit  to  prevent 
leakage where the chimney passes through vapour and/
or wind barriers. This sealing kit is used in conjunction 
with  our  ICS50  System  Chimney. The  use  of  50mm 
insulation ensures that the outer skin temperature on 
the  chimney  remains  low  enough  for  the  EPDM  kit 
to maintain its elasticity, and remain tight around the 
ICS50 product, ensuring the air tight joint. 
The  kit  is  then  fastened  securely  to  the  air  tight 
membrane using the special tape supplied in the bag, 
together with the EPDM seal. 

New Housing Airtightness Requirements

Installation

Schiedel airtight kits are tailored to meet the outer diameter of Schiedel’s twin wall insulated ICS50 System Chimney. 
The kit is pulled around the outer case of the ICS50 System Chimney and attached to the air tight membrane, using 
the special tape provided.

Sealing Tape

The special tape used with the airtight kit is made from elastic PE film and acryl adhesive. This combination means the 
tape is long-lasting and quick to fit (it sticks immediately). To make it as easy to use as possible, the tape comes with a 
paper liner which is removed prior to use. 
N.B. Do not use tape on steel pipe, only to seal the joint between the EPDM seal and the vapour/wind barriers.

Application

The tape is used to attach the EPDM seal to the vapour and/or wind barriers. Schiedel Chimney Systems Ltd does not 
advise using the tape on rough surfaces, concrete, brick or bitumen-based materials. Surfaces must be clean, dry and 
grease-free before fitting.

Ø455

550

48

600 x 600 (EPDM)

700

200

48

Ø255

Support bracket

Plasterboard

Vapour barrier

Protect Box

Insulation

Wooden substructure
for plasterboard

EPDM seal

EPDM is fixed to the

vapour barrier with 

tape and screwed to 

the wooden structure

Ø455

550

48

600 x 600 (EPDM)

700

200

48

Ø255

Support bracket

Plasterboard

Vapour barrier

Protect Box

Insulation

Wooden substructure
for plasterboard

EPDM seal

EPDM is fixed to the

vapour barrier with 

tape and screwed to 

the wooden structure

ICID Plus 

Pipe Length

Protect Box Kit

ICS50 

Pipe Length

Roof Insulation

(max 600mm 

height)

Ceiling

Vapour Barrier

ICID Plus - ICS50 

Adaptor

Solid Firestop

EPDM Seal

(around ICS50)

Summary of Contents for Schiedel RITE-VENT ICID PLUS

Page 1: ...nal Diameter Twin Wall Insulated Chimney System for gas oil wood and multi fuel applications including condensing applications ICID PLUS INSTALLATION INSTRUCTIONS Part of BMI Group SAPVersion 3 940002165 November 2017 ...

Page 2: ...y Route Connection to Draught Diverter Direct Connection Appliance to System Chimney Distance to Combustibles Enclosures Shafts Support Components ChimneyTermination Terminals Page 2 Page 3 Page 4 Page 5 Page 7 Page 8 Page 9 System Chimney EN1856 1 Connecting Flue Pipe EN1856 2 T450 N1 D V2 L50050 G100 M T450 N1 WV2 L50050 G60 T450 N1 DV3 L50050 G60 60mm Distance to combustibles in a combustible s...

Page 3: ...e there has been no damage Do not use damaged components Build the chimney up through the previous designed route which should be as straight as possible Ventilation It is very important that sufficient air for combustion and ventilation is provided to the room containing the appliance to enable correct and efficient working of the appliance and chimney system Reference should be made to the appli...

Page 4: ...the pipe e g for Ø125mm the distance is 375mm and for Ø150mm the distance is 450mm to combustibles on both painted and non painted variants On measured M single wall or double wall products this distance will be as declared by the chimney manufacturer On ICID Plus this distance has been measured and is set at 100mm Connecting Flue Pipe Route Single wall connecting flue pipes should only be used to...

Page 5: ... connecting flue pipe from the appliance passes through any wall other than the existing chimney wall the connecting flue pipe must be a System Chimney of twin wall insulated design Top Outlet Twin Wall Connecting Flue Pipe through Solid Wall into Twin Wall System Chimney Wall Sleeve FlexibleTwin Wall Chimney Liner Chimney Wall Support Bracket Wall Support Measured from back of connecting flue pip...

Page 6: ...s configuration check manufacturers distance to combustibles For minimum distance for this configuration check manufacturers distance to combustibles Measured from back of connecting flue pipe to flue liner No further bends allowed on this configuration 600min 100 100 For minimum distance for this configuration check manufacturers distance to combustibles Measured from back of appliance to outside...

Page 7: ... fuels there should be no more than 4 changes of direction of maximum 45 Factory made 90 bends or tees within the system may be treated as being equal to two 45 bends as per Document J of the Building Regulations issued October 2010 Connection to Draught Diverter Where the appliance features a draught diverter the connection should rise vertically from it for at least 600mm before any change of di...

Page 8: ...on combustible ceiling an unventilated bungalow fire stop plate kit can be used Please note that an unventilated support plate can not be used above the ceiling in this case The weight of the chimney should be supported using the roof support see p 19 Distance to combustibles must be respected within the ceiling space see Fig 2 below and mesh frame should be used within the loft space which must b...

Page 9: ...extended locking bands at the joint immediately below the last support and on each pipe joint above the last support Alternatively guy wire brackets can be used at the 1 5m level and every 1 5m thereafter in conjunction with guy wires or rigid stays provided by others Chimney Termination For full information regarding to chimney termination please refer to Annex M of BS EN 15287 1 As a guide pleas...

Page 10: ...the clip Push the interlocking collars together and twist into position see Fig 1 Position the locking band so that it grips both collars then fasten using the clip Note joints must NOT occur within floor or ceiling spaces All flue gas carrying components must be installed with the direction arrow on the product label pointing to termination with the external male collar uppermost Locking Band sup...

Page 11: ... the 2 piece adjustable pipe see Fig 3 and at the bottom of the 1 piece adjustable pipe N B Where a 1 piece adjustable pipe is used then no female lip seal is required in the groove below the male collar of the preceeding pipe Fig 3 2 Piece Adjustable Pipe 1 Piece Adjustable Pipe On 2 Piece Adjustable Pipe a female lip seal is required on the preceeding standard pipe to ensure leakage performance ...

Page 12: ...us to Prima Smooth The ICID Plus female collar should be attached to the previous ICID Plus component and the joint secured using the locking band provided Structural Locking Band The structural locking band which is purchased separately is used instead of a standard locking band in a situation where extra structural support is required for instance where the chimney height is 1 5m above the last ...

Page 13: ...to stove pipe and NOT directly to appliance SW DW Adjustable Starter Section The protruding male spigot of the adaptor slides down inside the female socket of the Prima Smooth pipe and the socket of the Prima Smooth pipe slides within the conical section of the starter adaptor to a maximum length of 75mm into the cone with a minimum of 15mm to ensure a secure connection This maximum length of 75mm...

Page 14: ...male spigot of liner into the appliance spigot Remove two loose insulation strips and keep to one side Slide adjustable case down over the insulation to cover the appliance spigot Finished installation Seal using the rope gasket fire cement or similar Loosen the locking band on the liner using the quick release clip retain the locking band to one side Break the fire cement seal between the applian...

Page 15: ...r spigot down inside the appliance spigot and seal using the fire cement rope gasket or similar Slide adjustable cover down 5mm past insulation Position final insulation around spigot with joint to the rear Slide locking band into place around the joint on the liner Now tighten the bolt on the locking band around the joint of the liner Slide adjustable case down over the insulation to cover the ap...

Page 16: ...pic Pipes They are used with standard components to achieve an exact length on site and avoid on site cutting of components 1 Calculate the length required 2 Remove insulation as required to achieve the correct length 3 Fix the adjusted section to standard components using the locking band provided Please note that the adjustable pipe is non load bearing When used in a condensing or a positive pre...

Page 17: ...This component is installed as per a standard pipe section 135 Tee including Drain Cap There are 2 versions of the 135 tee available The condensing version has a fully welded liner so please ensure prior to installation on a condensing appliance that you have the fully welded version to hand This component may be used in combination with a 45 elbow to connect from a connecting flue pipe to the ver...

Page 18: ...644 409 1161 279 958 225 678 150 517 107 388 72 180 1644 409 1161 279 958 225 678 150 517 107 388 72 200 1648 409 1165 280 962 225 682 150 521 107 392 73 Offsets for 30 Bend with Standard Pipe Length Int Ø mm 1460 Eff A Pipe B 960 Eff A Pipe B 750 Eff A Pipe B 460 Eff A Pipe B 293 Eff A Pipe B 160 Eff A Pipe B 125 1494 792 1061 542 879 437 628 292 483 208 368 142 100 1059 541 877 436 626 291 481 2...

Page 19: ...and 2 Piece Rectangular The ventilated fire stop plates are used in combination with standard ICID Plus pipes where the chimney passes through a combustible floor or ceiling The outermost circle of ventilation slots gives a distance to combustibles of 60mm This measures the required distance for solid fuel applications For gas and oil applications a minimum of 50mm is required which should be meas...

Page 20: ...ce the position of the support has been determined secure the U shaped bracket to the wall with a method of fixing to ensure adequate attachment and support Determine the amount of extension required and secure the back bracket of the wall band in place onto the adjustable section Fasten the strengthening cross bracket in place using the bolts provided With the back bracket in place locate the rea...

Page 21: ...ility only it is NOT load bearing and is to be positioned at maximum 4 metre centres 1 2 3 Int Ø Ext Ø A mm B mm 125 180 144 55 100 150 126 55 150 200 164 55 180 235 194 55 200 256 214 55 Structural Wall Band Structural Wall Band with Type W1 Extension Assembly Structural Wall Band with Types L1 L2 Extension Assembly B A Type W1 Type L1 L2 Structural Wall Band Extensions C Structural Wall Band Ext...

Page 22: ...y For maximum height of chimney see load bearing details please refer to tables and diagrams on pages 32 33 Side Plates Cantilever Brackets Once the position of the support has been established in relation to the chimney route secure the side plates or cantilever brackets to the wall using expansion bolts to ensure adequate attachment and support see Fig 2 Fig 1 Top Plate Side Plates Cantilever Su...

Page 23: ... system being installed Fig 1 Fig 2 Ceiling Joist Support A A Ceiling Joist Support The joist support can be used in 2 different ways Option 1 where the chimney passes through a combustible ceiling into the roof space and the weight of the chimney has to be taken at floor level The ceiling joist support must be firmly fixed by using bolts or screws For load bearing Data refer to tables 1 and 2 on ...

Page 24: ...ort horizontal runs of the chimney from the roof or ceiling and offers adjustment from 130mm to 1115mm Once the position of the ceiling support has been determined the section length of uni rax channel must be securely fixed to the roof or the ceiling using a method of attachment to ensure adequate attachment and support All items are assembled as shown to attach the length of studding to the chan...

Page 25: ...e mastic sealant provided and MUST be used in conjunction with the storm collar supplied Angled Flashing Manufactured in sheet aluminium for use on pitched roofs The base of the flashing should be nailed or screw fixed to the roof batons prior to tiling The front edge of the flashing should be hooked to the underside of the batons to prevent lifting This component should be sealed with the mastic ...

Page 26: ...lintels and their support areas as well as other bearing elements must not be weakened In case of uncertainty consult a structural engineer IMPORTANT 3 Remove plasterboard NOTE The vapour barrier must not be damaged 4 Cut a cross shape in the vapour barrier to the required dimensions of the opening see figs 1 and 2 The dimensions of the IGNIS PROTECT wall bushings have already been matched to the ...

Page 27: ...ly opening in the studwork IMPORTANT follow the safe working notes on page 29 10 15 View of the finished vapour barrier sealed tightly all round Check width of the opening 565mm NOTE Ignis Protect must not be shortened on site 8 13 With Ignis Protect in place cut away the vapour barrier flush to the edges Check height of the opening see image 2 NOTE Ignis Protect must not be shortened on site 9 14...

Page 28: ...low the safe working notes on page 29 20 Check that the thermal insulation is flush with the wall 19 By pulling out the corresponding inner protection pipes and the assembly cap A the connection size is adapted to fit the required connecting pipe or transition piece The Ignis Protect inner protection pipe and the outer protection pipe are basically designed for 24mm wall planking TIP The inner pro...

Page 29: ...atory Protection Mask HAZARDS FOR PEOPLE AND THE ENVIRONMENT Mineral wool insulation materials in this group of products can release fine fibres which may have carcinogenic effects in the lungs If inhaled fibres can get into the body and cause damage to health Larger fibres or fragments of fibres can cause irritation itching of the skin the upper airways and the eyes PROTECTION MEASURES AND SAFE P...

Page 30: ...the tape is long lasting and quick to fit it sticks immediately To make it as easy to use as possible the tape comes with a paper liner which is removed prior to use N B Do not use tape on steel pipe only to seal the joint between the EPDM seal and the vapour wind barriers Application The tape is used to attach the EPDM seal to the vapour and or wind barriers Schiedel Chimney Systems Ltd does not ...

Page 31: ... within 600mm of the ridge Elsewhere on the roof whether pitched or flat Below on a pitched roof or within 2300mm horizontally to an openable rooflight dormer window or other opening Note 3 Within 2300mm of an adjoining or adjacent building whether or not beyond the boundary Note 3 At or within 600mm above the ridge At least 2300mm horizontally from the nearestpointontheweathersurfaceand a at leas...

Page 32: ...llation with pair of Cantilever Brackets and Structural Locking Bands Offset Installation 45 with pair of Side Plates Distance between Lateral Supports Int Ø mm 100 125 150 180 200 A m 3 3 3 3 3 B m 22 22 18 18 18 C m 15 15 15 15 15 D m 4 4 4 4 4 Max Offset Info in same plane Int Ø X m Y m 100 200 3 1 5 ...

Page 33: ...de Plates see diagram B Cantilever Support Extension Support Anchor Plate Ventilated Support Plate All types Support Plate Wall Band 50mm Adjustable Wall Band 75 300mm Structural Wall Band Extension for Structural Wall Band Roof Support above truss Roof Support below truss Guy Wire Bracket 90 Tee Locking Band 135 Tee Locking Band InspectionTee Rectangular 125 22 15 15 15 10 22 1 5 12 12 3 3 4 4 6 ...

Page 34: ...spection require the use of appropriate tooling under no circumstances should chemical cleaners or mild steel tools be used to sweep stainless steel chimneys Cleaning inspection of any chimney system should be carried out at least once a year along with maintenance of the appliance but it is recommended that chimneys serving solid fuel appliances be swept at least twice a year at the end of the he...

Page 35: ...erials or faulty manufacture Schiedel Chimney Systems undertake to replace the product only Schiedel Chimney Systems cannot accept liability nor take any responsibility for the installation building or redecorating costs or any other consequential losses arising If any complaint is found to be a result of faulty installation non compliance with or abuse contrary to these conditions the cost of sit...

Page 36: ...0AQ Tel 44 0 191 416 1150 Fax 44 0 191 415 1263 info schiedel co uk www schiedel co uk Complementary products and services from Schiedel Chimney Systems HETAS TRAINING See website for course prospectus and application form downloads or scan QR code Follow SchiedelUK on ...

Reviews: