background image

TEAM

BMPRO

.COM

POWERING YOUR ADVENTURES

With over 50 years’ experience in power 
solutions combined with manufacturing 
and design facilities in Melbourne, 
Australia, BMPRO are the leading 
experts in RV power management.

Inspired by the great outdoors, we 
have created a range of rugged, smart 
and reliable products to power your 
adventures.

Our range of battery, power and RV  
management and control systems gives 
you peace of mind when you are on the 
road, so that you can relax in even the 
most far-flung destinations, knowing 
you have control over your power 
needs.

To learn more about the BMPRO range 
of products, please visit our website 

teambmpro.com

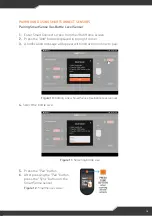
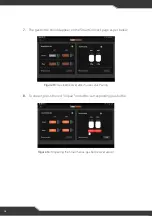
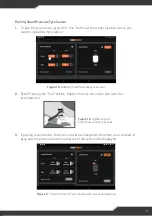
Summary of Contents for JHub

Page 1: ...TEAMBMPRO COM OWNER S MANUAL JHubTABLET ...

Page 2: ...ed by the great outdoors we have created a range of rugged smart and reliable products to power your adventures Our range of battery power and RV management and control systems gives you peace of mind when you are on the road so that you can relax in even the most far flung destinations knowing you have control over your power needs To learn more about the BMPRO range of products please visit our ...

Page 3: ...G 22 FAQS AND TROUBLESHOOTING 23 App and Tablet 23 Battery 23 ControlNode 24 Date and Time 24 Load Control 25 Pairing 27 APPENDICES 29 Specifications 29 WARRANTY TERMS AND CONDITIONS 30 Copyright 2019 MANUAL PART 034722 REV 7 0 Designed by BMPRO one of Australia s leading power solution experts the BMPRO range of products are proudly Australian Made in Melbourne Victoria and represent a high quali...

Page 4: ... with wet hands Contact with water will cause the product or your battery to short circuit or corrode and may result in electric shock Do not use this product in environments that are excessively hot cold dusty or humid or where it will be exposed to magnetic fields or long periods of sunshine Such exposure may cause the product or your battery to fail catch fire or explode Product specifications ...

Page 5: ...rate caravan features including lights hot water slide out and water pump from anywhere in the caravan 9 Full visibility and control of the caravan s battery system including battery status power consumption and available charge sources 9 Monitoring of clean and dirty water tanks and caravan temperature 9 Option to monitor a range of Bluetooth connected devices via BMPRO s SmartConnect WHAT S INCL...

Page 6: ...creen on off 2 microUSB Input To charge the JHub Tablet 3 Return Navigate to previous page 4 Main Screen Navigate to JHub Tablet s main screen 5 Recent Applications Display a list of recently used background applications JHub TABLET Figure 1 The JHub Tablet 3 4 5 1 2 6 ...

Page 7: ...uetooth connectivity status indications Please be aware that when Bluetooth is disconnected any information displayed on the JHub may be incorrect When the Bluetooth connection is established the JHub will update to reflect correct battery usage BLUETOOTH ICON CONNECTION STATUS CONNECTED CONNECTING DISCONNECTED RED YELLOW BLUE Figure 2 The JHub Home Screen 2 15 4 5 6 7 11 16 12 8 9 1 3 10 13 14 7 ...

Page 8: ...teps should you need to pack your caravan This temporary switch on of the caravan loads may also be done by pressing the Battery icon on your battery monitor 4 Slide In Out Control Where fitted controls the caravan s slide in out mechanism 5 Area 1 Master Light Switch 6 Area 2 Master Light Switch 7 Area 3 Master Light Switch 8 Hot Water Heater Switch 9 Water Pump Switch 10 Battery Status 11 Batter...

Page 9: ...e caravan s loads VOLTAGE Caravan battery voltage Figure 3 Renaming and changing tank type 12 Tanks Monitor water levels of up to 4 water tanks Tank properties such as name water source i e fresh or grey water are configurable via the Settings Menu When a Fresh tank is almost empty the lowest water level segment of the tank will turn red to indicate the tank is almost out of water The water level ...

Page 10: ... J35 2 Ensure that the J35 is powered ON 3 Ensure that the JHub s Bluetooth is ON 4 Press the pairing button on the ControlNode The LED will start flashing green which means that you have 30 seconds to pair your JHub 5 If the app is not automatically launched launch the JHub app on your JHub and press the Scan button and it will now search for the nearby ControlNode devices Once this is complete a...

Page 11: ...e number that corresponds to the last six digits of the serial number of the ControlNode you wish to pair to 7 After a successful connection the LED status indicator on the ControlNode will turn OFF and the Bluetooth icon in the JHub will turn from red to blue Figure 6 JHub scanning for available ControlNode 11 ...

Page 12: ...eady paired to and in Bluetooth range with five mobile devices the LED Status Indicator on the ControlNode will flash orange for one second Hold the Pairing Button on the ControlNode for 10 seconds until the LED flashes red This will clear the ControlNode memory of any connected devices The ControlNode will then automatically flash green for up to 30 seconds to indicate that it s ready to pair wit...

Page 13: ...city and Time Remaining 1 Press the menu icon in the top left corner of the Home Screen 2 Select Settings from the drop down list 3 Scroll Down to the Battery Capacity Field If using the JHub with J35D 4 Scroll Down to the Battery Profile and select the appropriate battery type Lead Acid default or LiFeP04 4 Enter your battery s Battery Capacity in Amp hours 5 Return to the JHub Home screen by the...

Page 14: ...rol of caravan loads from the JHub App will be unavailable if you press the Battery icon and enable Sleep Mode To regain control of the caravan loads disable Sleep Mode User Enabled Storage Mode Control of caravan loads from the JHub App will be unavailable if you activate the Load Isolation Switch connected to the J35 to enter Storage Mode To regain control of the caravan loads switch the Load Is...

Page 15: ...ruction on how to pair 4 Select the bottle size PAIRING AND USING SMARTCONNECT SENSORS Pairing SmartSense Gas Bottle Level Sensor 5 Press the Pair button 6 After pressing the Pair button press the Sync button on the SmartSense sensor Figure 12 SmartSense sensor Figure 11 Selecting bottle size Figure 10 Adding a new SmartSense gas bottle level sensor 15 ...

Page 16: ...appear on the SmartConnect page as per below 8 To unpair press the red Unpair under the corresponding gas bottle Figure 13 Gas bottle level after Successful Pairing Figure 14 Unpairing the SmartSense gas bottle level sensor 16 ...

Page 17: ...utton tighten the lock nut on the tyre with the provided tool Figure 16 Tightening the SmartPressure tyre sensor 3 If pairing is successful the tyre icon will be changed to the white color instead of grey and the pressure and temperature of the tyre will be displayed Figure 17 SmartPressure Tyre sensor after successful pairing Figure 15 Adding SmartPressure tyre sensor 17 ...

Page 18: ...with Try again and Cancel buttons 5 To unpair the SmartPressure sensor press the Unpair button below the SmartPressure tile and then press the red Unpair button to complete the process of unpairing the sensor Figure 18 SmartPressure tyre sensor pairing failure Figure 19 Unpairing SmartPressure tyre sensor 18 ...

Page 19: ...ecting SmartTemp temperature sensor location 4 Press the pair button to start pairing the temperature sensor 3 Turn on the temperature sensor by pressing and holding the power button on the temperature sensor for 3 seconds Figure 22 Switching On Off the SmartTemp temperature sensor Figure 20 Adding SmartTemp temperature sensor Figure 23 SmartTemp sensor pairing in progress 19 ...

Page 20: ...Unpairing SmartTemp temperature sensor 5 After pairing is successful temperature sensors will be listed 6 To unpair the SmartTemp sensor press the Unpair button below the SmartPressure tile and then press the red Unpair button to complete the process of unpairing the sensor 20 ...

Page 21: ...both SmartTemp temperature sensor and SmartPressure Tyre sensor follow the below instructions 2 Press the Settings button in the Sensor s tile Setting Sensor Alarms Figure 27 Selecting Sensors settings 1 Press the Menu button in the top left corner of the App homepage and select Settings from the list Figure 26 JHub menu list 21 ...

Page 22: ...yco dealer for assistance 3 Set your desired limits for both minimum and maximum tyre pressure and minimum and maximum limits temperature sensors Figure 29 Warning signs 4 If either of the measured pressure or temperature is beyond the pre set limits a warning sign will appear for the corresponding tyre pressure temperature sensor Figure 28 Setting the limits for the SmartPressure and SmartTemp se...

Page 23: ...e power to charge the JHub Tablet Why are the icons in the JHub App unresponsive Whenever you power the JHub System on it takes approximately 30 seconds for the icons in the JHub App to become responsive Continually pressing a button on off may also cause the button to be unresponsive for 10 seconds Why is the text in the JHub display misaligned Changing the original font of the tablet in the tabl...

Page 24: ...ime zone Figure 7 Accessing the JHub Tablet s settings Table 3 ControlNode Operational Status and LED Flash Codes After memory has been cleared the ControlNode LED Status Indicator will immediately flash green to enable pairing to a new mobile device Operational Status Flashing Status Notes ControlNode is ready to pair Green 30 secs ControlNode memory is full cannot pair to any new mobile devices ...

Page 25: ...appear to be powered and I can t use the JHub App to power the loads on again In this situation when you attempt to power loads from the JHub App the resultant pop up message will help to diagnose why the loads are no longer powered Figure 8 Sleep mode is switched on SLEEP MODE IS SWITCHED ON This pop up message will occur if the battery button in the JHub App has been selected All icons except fo...

Page 26: ...n battery charging Figure 9 Low voltage mode is switched on THERE IS NO BLUETOOTH CONNECTION All icons in the JHub App will be blue The Bluetooth Connectivity Icon will be red This message will appear if 1 The switch connected to the J35 Load Isolation input is activated deactivate the switch 2 The J35 has entered the second stage of LVD Storage Mode connect the J35 to a power source and begin bat...

Page 27: ...blet s Settings menu figure 7 and make sure Bluetooth is turned on 2 Go to the tablet s Settings figure 7 and make sure that Location is turned on and check the Google Location History If a previous version of Android has turned off access to your locations for apps click Yes to turn it back on figure 11 3 Go to the tablet s Settings menu figure 7 and select Apps scroll down and select the JHub Ap...

Page 28: ...ed The ControlNode will then automatically flash green for up to 30 seconds to indicate that it s ready to pair You may now use the JHub App to scan for the ControlNode I ve paired to the ControlNode why is the Pairing Status icon on the JHub App red Check the following 1 Ensure the JHub Tablet is turned on and is located in its mount or within the range of ControlNode 2 Ensure the J35 is powered ...

Page 29: ...APPENDICES JHub Tablet Input Voltage 5V DC Input Current 3A Charger Input Voltage 12V Communication Charger Cable USB to microUSB Weight 0 5 kg SPECIFICATIONS 29 ...

Page 30: ...no responsibility in addition to our consumer guarantee obligations where a product has been installed incorrectly 4 This warranty does not extend to product failures or defects caused by or associated with but not limited to failure to install or maintain correctly unsuitable physical or operating environment accident acts of God hazard misuse unauthorised repair modification or alteration natura...

Page 31: ...31 ...

Page 32: ...TEAM BMPRO COM POWERING YOUR ADVENTURES BMPRO 61 3 9763 0962 sales teambmpro com 19 Henderson Rd Knoxfield VIC 3180 Australia teambmpro com ...

Reviews: