8
8
16
16
1
10
2
2
9
9
16
16
2
1
2
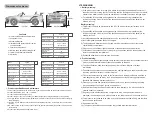
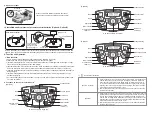
2) Music button: Under MUSIC play mode, press this button to play a song, and the green light of this
button is on; press this button again to play the next song; there are 2 music buttons,
each button will play 3 songs repeatedly.
3) Previous\Volume - Button:
(Option A)
(Option B, Option C)
①
In MUSIC USB BT mode: short press this button, the green light of this button
will be on for a short period of time and it will change to the previous music; long
press this button for 2 seconds without release, the green light of this button will
be on, the volume will be decremented, the volume value on display will
decrease from U30 to U00.
②
Each time of starting, the default volume value will be U25.
①
In MUSIC playback mode: short press this button, the green light of this button
will be on for a short period of time and it will change to the previous music;
②
In MUSIC and MP3 playback mode: long press this button for 2 seconds without
releasing, the green light of this button will be on, the volume will be decrement-
ed, and the volume value on the display will be decremented from U30 to U00.
③
Each time of starting, the default volume value will be U25.
4
)
Next music \ button:
(Option A)
(Option B, Option C)
①
In MUSIC USB BT mode: short press this button, the green light of this button
will be on for a short period of time and it will change to the next music; long
press this button for 2 seconds without releasing, the green light of this button
will be on; the volume will increase and the volume value on the display will be
displayed incrementally from U00 to U30.
②
Each time of starting, the default volume value will be U25.
①
MUSIC playback mode: short press this button, the green light of this button will
be on and it will change to the next music;
②
In MUSIC and MP3 playback mode: long press this button for 2 seconds without
releasing, the green light of this button will be on; the volume will increase, and
the volume value on display will be displayed incrementally from U00 to U30.
③
Each time of starting, the default volume value will be U25.
5)
Light / fan button:
(Option A)
The start button is in “off” mode by default, press once to turn on the light, and the
green light will be on; press again to turn on the fan, and the light will be off; press
the button for the third time to turn on both the light and fan; press the button for the
fourth time to turn off both the light and fan, and at the same time, the green light of
this button will be off.
Press
Press
Turn on
the fan
(Turn off
the light)
Turn on
both the
light
And the fan
Loop)
(It will be
as such
Press
Press
Turn on
the light
Turn off
both the
light
And the fan
6)
Light button:
(Option B, Option C)
It is by default in off status; press it once, the light will turn on, and the green light
will be on; press it again, the light will turn off, and the green light will turn off.
7) (Option A, Option B) Foot switch button:
①
It is by default in the foot switch mode, and the green light of this
button will be on; then turn on the gear, and step on the foot switch
to start and loose the foot switch to slow down the car; press the
remote control button to stop the car forcefully. (The car can’t be
started by foot switch when it is stopped by the remote controller!)
②
Safety protection function: Before starting the car by stepping on the
accelerator or switching from the remote control mode to the
footswitch mode, you must first loosen the accelerator pedal and
then step on it.
8) (Option A, Option B) Remote control button: When this button is pressed, the system will switch to the remote
control mode, and the green light will be on, then the remote
controller can be used to drive the car.(At this time, stepping on the
accelerator pedal is unavailable!)
9) (Option C) Cheering button: Press this button once to send a cheering sound. The green light of this button will
be on and it will be off when the sound stops.
10) (Option C) Brake sound button: Press this button once to send a brake sound. The green light of this button will
be on and it will be off when the sound stops.
(Option C)
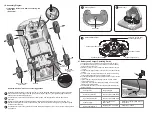
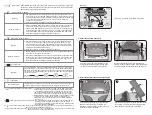
6. Install the seat and seat back
After the power supply is installation, put the
seat (part 8) into the assigned location of the
car body, and fix it with the screw (part 16).
Put the seat backrest (part 9) into the assigned
location of the car body as shown in the figure below,
and tighten it with the seat backrest screw (part 16).
7. Install the windshield and the empennage
Install the windshield (part 2) at the specified
position on the front of the car. Before the
installation, fix the position of each buckle and
press until it is firmly fastened.
Insert the rear wing (part 10) at the direction shown
by the arrow, and insert the corresponding buckle,
and press the buckle firmly until it is fasten.
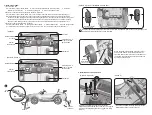
A
A
Black
cable
Battery
red-plug
(+)
Battery
black-plug
(-)
Red cable
Control
panel box
Over-current
protection
Insert plug (A) into the circuit board to its bottom.


